Because the books are in Swedish; so will this blogpost be. Update; the books are being translated and some of them are available in English!
Kommer ni ihåg att jag skrev om mansdräktsboken förut? Nu har även kvinnoboken kommit ut, och jag ville förstås bläddra i den också!
Boken påminner mycket om mansdräkten med samma lättöverskådliga layout, enkel och tydlig text, och stycken som efter en snabb genomgång ger dig koll på dräkten. Det är den typen av bok jag skulle börja med att skaffa om jag ville göra 1400tal, eller ge till en nybörjare som vet *ingenting* men gärna vill vara med. Det sena 1400talet är en komplex period med många samexisterande stilar och plagg, men jag tycker ändå att det känns som att den ger en överblick över det tyska modet, även om det inte finns plats för så många sömnadstekniska detaljer som jag skulle vilja- det är ju trots allt mitt intresse =)
Boken innehåller, förutom referenslistor, också massor av bilder från perioden. Bredvid varje avsnitt om plagg/material osv hittar du alltså både historiska referenser, bilder, skisser och materialförslag från ett modernt perspektiv. Dessutom finns ett uppslag om hur du får till 1400talslooken med en “turbanslöja”, jag förutspår att det här kommer vara nya innestilen till sommaren…
Uppdatering: 1300tals kvinnodräkt har också kommit ut! Jag fick tag på min via http://www.Handelsgillet.se och den innehåller gott om exempel på olika typer av klänningar att sy + tips på accessoarer och slöjor.
I purchased this book on a whim, and was happily surprised! It is a really good presentation of the Luttrell Psalter (from 1330) and richly illustrated with both religious and every day paintings inspired by 1330 England. If you have an interest in this period, likes illuminating manuscripts or just want another good book for your medieval library this is a must-read!
I really liked all the pictures of everyday chores and people in the book, me being somewhat of a nerd on period clothing (have you noticed…?) lots of detailed clothing, hair styles and accessories.
The last tutorial was about how I made my first Houppelande (medieval overdress) that was an early houppelande, with a pattern layout that saved in on the fabric.
Now we move on to the opposite; a full circular houppelande dress that was the high fashion during the 15th century, and were worn by both men and women (with different lengths and fashion details of course) The construction method for this one is open for discussion; there might have been gores and more pieces according to different fabric widths during the medieval period. This layout is practical and simple if your fabric is 150 cm wide and you want the houppelande to be of as much fabric as possible, the small pieces allowing you to save in on the fabric a little.
The construction idea is from an article I found ages ago (that is now lost on the internet?) And later tailor’s books which shows very full dresses for women and coats for men. The shape, style and drape of this method also look similar to paintings of houppelandes.
First, you need a lot of fabric! How much depends on your length, in this example, I make a pattern that gives you a dress around 150 cm long; good for the shorter woman or for a man (since houppes for men usually leaves at least the shoes visible) That means you will need 5,2 meters of fabric for the dress itself, and then another 1,5 to 3 meters for the sleeves. Oh, and maybe a full lining too?
The pattern is basically 4 quarters of a circle; forming a full circle when put together. The small pieces save you some fabric, but you may cut out the full quarter circles if you prefer. If you go with the pieces, then sew them together with the quarters the first thing when you have cut them out, so you have 4 whole quarters.
Then, sew the shoulder seams together, that is the short straight seams above the arrows. Leave the armholes (on the pattern they are cut out as half-moons) and sew the sides together. To know how wide your armholes should be; measure yourself loosely around your armpit, or use a previous pattern. Add extra cm for movement; at least 5-6 cm.
The seam length of the shoulder should follow your shoulder; between 10-14 cm depending on how long shoulders you have. The armholes should be laying on the body, not falling down from the shoulder to your upper arm. Cut away what you don’t need, a little at a time if you are unsure.
When you are satisfied with the shoulder, armholes and side seams, sew the back and front together with each other, front to front, back to back. In the front, you leave an opening big enough so you can dress and undress easily. On paintings, some dresses are open almost to the hip. In the back you need to leave an opening big enough for your neck, try it on and you will understand! The open seam will give you the neckline on the back, and can then be cut for a rounder style if you like, or you could add a collar.
So, that was it- quick and easy yes? Now the dress should look something like the sketch above, and you can attach the sleeves to the dress. Sleeves? Well, that is for the next part of the Houppelande tutorial series. Stay tuned!
During the 16th century it became high fashion to slash or cut fabrics in a decorative manner, and this was taken up by mercenary landsknechts and women working and living in the armies as well. Being a fashion for richer or high-born persons, it was quite the dare for mercenaries to wear, but such a good way to show that you were a high earner with lots of status and gold on your pocket…
So, I wanted to share with you all my best tips for getting that slashed and cut look that you may want for your outfit!
But first, some good things to know:
The most important thing is the material to work with; wool is by far the easiest. In finds and manuscripts, you will also find garments made by silk or silk/linen and silk/wool blends, but those garments will have very small cuts (also called pinking) made with a specific tool and is a whole different story. So; chose a wool fabric. A felted, dense and tightly weaved wool is the best, this will give you a sturdy garment that won’t fray easily.
The slashing is not hemmed. I know many people do this because they chose a sensitive fabric, they are afraid it will fray and tear, or they have just been told that all raw edges should be hemmed or sewn. The standard is to not hem or sew the slashes, they should be raw, made with a very sharp tool, and yes- they might wear out faster than a garment that is not slashed. There are garments made with other techniques, for examples doublets with sleeves that are being made out of strips of lined/hemmed fabrics. These might look similar to cut garments, but the making is different.
Slashed and cut garments may not last as long as more sensible ones, or look very pretty after using for a while, that is the point with this fashion! You’ll have to be rich enough to order fine materials, pay a tailor to sew it for you, pay even more for the slashing and cutting, and then don’t mind that you will have to exchange the garment once it looks worn. If you are a more economically laid modern person, pick a wool fabric for your outfit, since this lasts longer than silk or linen.
Almost all slashed garments that I have seen have been lined with a second layer of unslashed fabric. This could be a regular lining or a whole garment that holds together the one laying over, providing stability and fit. I often use a linen fabric lining for wool and silk fabrics, but in the case with slashed guards (strips of fabrics) I place the guards on top of the main fabric, to make it visible through the slashing.
Feeling ready for some slashing now?
The pictures are mostly from my trossfrau dress project, this from a woodcut that I have copied and coloured to get a feeling for the dress to be.
I usually wash my wool fabrics, iron them and then cut out the pieces I want for the garment. Before I sew them together I draw out my slashes on the wrong side with a fabric marker and then cut them before I put the garment together. If you are not sure about the fitting, it is good to baste the garment together and try it on before this, since it is difficult to adjust fitting after the slashing is made.
I usually also draw out helplines during this stage; everything that helps you make good sharp lines placed exactly where you want them is good. A ruler, some mathematics and a marker go a long way. I also like to make a template to use while drawing out the slashes.
Do not slash all the way to the edges, remember the seam allowance and leave 2-3 cm along the edges to make it easier to sew the pieces together.
This is a larping outfit (only inspired by historical fashion) as an example of a durable slashed garment. The arms have slashes, but not the armpits or body, and the slashes ends some cm before the seams. Sewn in a medium-heavy twill, slightly felted.
If you want the garment to be sturdy and hold together, slash less along the armpits, side seams and crotch; all areas where the fabric gets more wear. If you look at historical woodcuts and painting, you may notice that tight fitted pants have no slashes at the backside of the legs near the seams, neither over the butt (there might be exceptions, as always)
The finished dress, a hot day in Visby a couple of years ago
Last year I made a woolen dress, based on the cut, sewing technics and seams from the finds from Herjolfnes, Greenland. I really didn’t plan it, I just had this sudden burst of creativity and had to make a plain, undyed working dress… The fabric is from Medeltidsmode, and it is an undyed natural wool that was just lovely to work with, the seams went very well, and the drape of the shirt is really good to. It is based on two different models, but with my measures- so it is a historical reconstruction with a practical use in mind.
Cutting out the pieces
And sewing them together with running stitches in wool thread
Sewing gores from the right side of the dress, with a whip stitch
The hems are made by a single fold, whip stitched and then sewed with another seam according to the finds. To finish of the hems two times was a bit tiring, but the result went very well, with especially the neckline and wrist coming out nice and stable for wear.
All inside seams are felled and whip stitched down, to make them more durable and the inside smooth and pretty.
There are several gores in the dress, both in the shirt and in the sides, that goes up to the arm holes. This gives the dress lots of hem line, as well as a nice drape. If you would like to make a dress more modern flattering, you could begin the width in the side seams by the waist. My dress is lose almost under the bust, which makes for a warm dress, that is easy to get in and out of, and probably good for medieval pregnancy if you are interested in trying that out…
The dress is so comfy, and despite a rather smooth fit over arms and shoulders it is easy to move in it.
On these photos I have rolled up my sleeves a bit and you can see the linen shift, a good way of keeping your sleeves dry when doing dishes.
Definitly one of my favourite dresses right now, it being so simple and yet pretty!
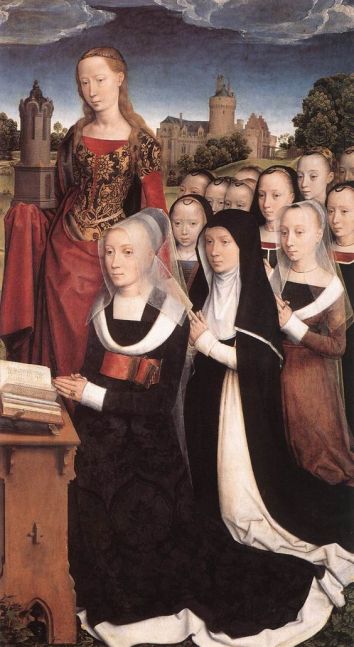
The last 1- 1 1/2 year the 15 century has been one of my main interests. It is a really interesting period in history, with lots of changes in both politics, society and how trade, money and people moved. My main interest has been the clothing in middle Europe, around what is today Germany, Belgium and the Netherlands (more or less, influences and fashions spread and you can see similar styles in areas boarding to these ones).
From these areas came several great artists, there are lots of paintings and artistic work left, and Scandinavia were greatly inspired by the clothing and fashion movements from the German area.
To both challenge and inspire myself I decided to make a Golden Egg challenge on the topic of 15th century clothing. The Golden Egg is a household in the SCA; you can read more about it here. My goal is now to research and make a whole outfit from the late 15th century for myself, and the timeline is one year between start and presentation.
I wanted to share some of my research, as well as some good sources for you to read for yourself. My main interest is the clothing for women, but you will find lots of good inspiration for men’s fashion as well.
Some important points to remember when studying 15 c fashion (or any historical fashion really) is:
The diversity of the period. Fashion shifted over a certain time, and during the 15th c it shifted quite fast. It also differed over areas (such as towns, countries) as well as social classes. It is not possible to sum up the period by stating “a women wore this and this, in such a way” but some things are similar, like wearing a linen shift, middle kirtle and over dress of some kind. How these looked, what materials they were made in and how you wore them differed greatly, as did the accessories.
The art and paintings of the period is a really good source, since there’s a lot of them, and the fashion of art suggested a natural, realistic reproduction of the people living during that period, with lots of details regarding seams, models, fashion and materials. This was also the period when portraits became popular for others than the nobility, with the ever-increasing burgher class economy as a base for portraits. This give us a source of good depictions of people of the time, and also gives a good clue on what kind of clothing and headwear was in fashion. It is important to note that there also were sumptuary laws regarding what you could wear, and how you were to be portrayed according to your status in society, making the understanding of art and symbolic meanings very important.
Religious art was also very important, and great artworks were often the result of a whole workshop with different painters, studies and sketches from different areas and periods, as well as saints depicted with biblical clothing and symbolic tokens. This means that you can find different styles in one and the same painting, both considering fashion and the style of the artist, even though the master overlooked the work on each artwork. It also means that flowing robes and cloaks that appear might not be the fashionable items like the gowns and doublets right beside them, but more some kind of biblical clothing.
Colours, technics and styles regarding painting developed greatly during this century, with the use of different mineral sources etc as a way of getting vibrant, expensive and fashionable colours. But this does not mean that the colour tone on a painting was the same as the depicted garment from sketches and models; the colour was foremost the result of the client’s budget, where vibrant reds, dark blues and golden inlays were important for the fashionable and rich client. Does this mean that paintings can’t be the source for fashion studies? No, of course you can look at art for getting an idea of the clothing of the time. Just keep in mind that the colour that you see on your computer screen is the result of both a computer screen setting, the photography of the painting (with editing) how well the painting has withstood time (mineral paint tend to change over time) as well as the idea of what a really expensive colour looked like in art versus fashion.
Artists of the time was more handcrafters and less artists in our modern use of the word. They trained for masters, belonged to workshops and worked with paintings as a team, not as one expressive personality. The money came from churches, rich nobility and the burgher class who commissioned art pieces (or bought ready-made pieces) such as piety paintings, portraits and, later on, everyday scenes from their home. This means that art was the result of society, fashion, study and individuals, greatly inspired by the ongoing social development as well as other painters. Of course there were room for personal style; compare Rogier van der Weyden to Durer and you will find style differences, even if you are not a trained art historian.
The artist had knowledge about the fact that fashion shifts; and that what was worn everyday when the paintings was made, was not the clothes of the time depicted in them. So in a painting of Christ’s birth; you can se both people dressed in the high of 1470’s fashion, as well as mythical and religious figures dressed in cloaks and robes that were meant to be seen as “some kind of long time ago clothing”. This might be pretty obvious, but to make it a bit trickier there is also paintings with 14th century fashions depicted (in a rather loose style) in 15th century paintings.
Dress for your age; as for society today, people tend to dress after their age, with the young girls and women of that time preferring high fashion dresses, loose hairstyles or flowing hair for the unmarried (or soon to be crowned queens) while older women seems to be more covered, with additional layers and more elaborate veils. Older women can also be seen in “unfashionable” garments; what was the thing 10-20 years ago at their prime seems to hang along.
Having this in mind, you can clearly se that if you aim to make an outfit as historical accurate as possible (…possible for your means, skill etc) an important start is to choose a certain time and period. The social standing is also important, so a good starting point could be a woman from south Germany (or a city of your choice) from the wealthy burgher class, who lived during 1450-1470.
I have chosen to focus on the area of Germany, the Netherlands and the Flemish region. This because there were some great artists living there that I want to study further, but I also enjoy the fashion of that area and how the geographic areas and countries influenced each other. If you compare this areas to (for example) Italy or France, you will find that both style in art and fashion differs greatly.
Another thing to consider, is to search for sources besides art; like finds, surviving clothing items, sketches, written documentation etc. This will give a depth for your understanding of the period, where the beauty ideals and painting technique might touch up certain details to the point of it being difficult to interpret (like, how did all the women have those small round breasts sitting high up on the body?)
These are some important painters and artists from the German/Netherland/Flemish (Belgium)/Burgundy region during the century that I have chosen to study in more detail:
(About the dating: Sometimes it is difficult to find the year of birth/death for individuals, so the dating in uncertain, but it will provide with a overview of when they lived and were active)
Limbourg brothers (1385-1416) Germany
Hubert van Eyck (1366-1426) Flemish
Jan van Eyck (1395-1441) Netherlands
Rogier van der Weyden (1399-1464) Netherlands
Petrus Christus (1410-1476) Netherlands
Hugo van der Goes (1440-1483) Netherlands
Hans Memling (1430-1494) Netherlands
Hieronymus Bosch (1450-1504) Netherlands
Gerard David (1460-1523) Netherlands
Hans Holbein the Elder (1460-1524) Germany
Albrecht Durer (1471-1528) Germany
If you are interested in this period and want to learn more about the art, there’s some good books about different artists, and this really good (and free) article at Wikipedia about the subject.
I have also studied books on different artists, the Prestels “Masters of Art” series have been very interesting. There you can find both Van Eyck, Durer and many more.
Want to see more artwork from the time? Check out my Pinterest folder!
Fur can be tricky, so here’s some help on the way if you are going to fur line your garment (like this late 15- early 16th century gollar). This method may be used with a good fake fur too!
I am guessing that you historically either treated the fur like a garment of your own (sew the fur together to a garment, then attach it to the outer fabric) or as a fabric lining (cut out the pieces of fur and stitch it to the seam allowances of the outer fabric once this is sewed together). A mix of these two might also be the case, due to the different challenges you face when fur lining a garment without it getting bulky.
If you only want a strip of fur on your garment, I find it easiest to cut out the fur pieces, and treat them like fabric lining; cut them straight and clean, join small bits if necessary before sewing them to the outer fabric. In contemporary art the fully fur lined garments seem to be the most common one, but some artwork you could interpret as only having trims in fur. Fur was both fashionable and warm and used in many garments, and I have a fully lined gollar. This one becomes too warm during summer, and also take a lot of space in the bag when packing, so I thought this new one would be a good alternative; fashionable, with the fur to warm me against the wind, but lighter in both warmth and packing space.
I started with my wool gollar; I cut out the main piece and the collar and sewed them together with running stitches. A common thread for the period is uncoloured linen thread, so I used that and waxed it to make it more durable while sewing backstitches. After the pieces were joined together, I pressed down the seam and cut down the seam allowance on one side, and felled the seam allowance with whipstitching. This makes the seam more smooth and adds durability to the garment.
I tried to lay the gollar out flat, for you to get a good look. Note that it is not a full circle, you want it to lay flat against your back and shoulders in a tight fit. The fit on the gollar you’ll have to try out on yourself; so make one out of scrap fabric if this is your first one!
I measured the collar and the front where I wanted the fur to be, and cut out strips of fur to match them. I then sewed them into place with linen thread and a small, regular needle. A thinner needle makes it easier to sew in fur, and pinning the fur into place makes sure it doesn’t stretch or slides. If you find it hard to use pins, try with fabric clamps/sewing clamps instead.
At the corners, I just sew the fur to the fabric and leave the leftover fur for later. Note that I treat the fur like fabric; sewing the furry side to the right side of the fabric.
When the fur is sewn onto the fabric, I cut away the leftover and trim the edges down.
At the corners I trim away enough fur so when I fold the fur inside the garment it will not get bulky but fit together edge to edge.
At the bottom edge, I want the fur to follow the curved front of the gollar, so I mark this with a pen and then cut it away.
After trimming down the fur, I fold it to the inside of the gollar, and pin it in place. Make sure it lays flat when wearing the garment; fur can be tricky and does not adjust the way fabric does. When you are happy with the fit, sew the fur in place with whip stitches, or attach it to a lining. In the corners the two pieces of fur should barely meet, the hair will hide the seam, so just sew them together loosely.
I chose to have a lining inside my gollar in a thin woollen fabric, to add warmth and make it easier to sew the fur down with no visible stitching.(a fully lined gollar can be seen in art.) For the lining, I cut out another gollar, without a collar (because the fur strip will cover the inside of my collar) and without the parts that would be covered with fur. When fastening the lining in the gollar, pin it or baste in place and then sew it at the same time as you attach the fur on the inside. Start with the collar, and then the front opening going down.
Sewing in fur is time-consuming and quite tiring for the fingers. Nice company or a movie is good to have!
When the fur (and lining) is attached around the gollar I stitched the lower hem with whip stitches. To make the seam smooth, I cut away some excess lining fabric, as can be seen in the photo. So; adjust the lining, cut off excess seam allowance, pin and whip stitch.
To fasten the gollar you can use dress pins, small fabric strips, ribbons or lucet braided strings, hooks and eyes or do as I did; add a fancy clasp at the throat. At the end of the sewing, I didn’t really like that the fur was so visible at the bottom, so I trimmed it down quite hard. Another option would have been to let the fur finish on the inside of the gollar, so it was not so obvious that the gollar was not fur-lined all the way around. Cheating is hard sometimes…
The clasp is a late 15th century find from Sweden, with A standing for “amore”. It added nicely, but for a commoner, a hidden fastening would do better.
A note about fur; I recommend you put some thought and money into the purchase of fur. There are still many fur-fabrics and farms that treat animals like shit, where the animals suffer greatly to become your hobby-based garment. If you buy rabbit skin for 7-9 Euro/skin you probably support these farms, even if not buying directly from them. A better option would be to buy fur from local farms where you can visit the animals, and get to leave the skin at the tanner yourself. You can also find good choices on the internet, buy second-hand or choose fake-fur from the fabric store (not the most historically accurate, but I rather go modern than using unethical furs) I had the fortune of finding a lady breeding rabbits in her garden as a part-time income, and got to buy furs from her, tanned locally by a handcrafter. These were about 30E a piece, so really reasonable in price!
Volare Digital Capture
Some examples of gollars being worn by 16th century common people during dances. Some of them seem to have a fur line around the hem (as being fur-lined) while others could be unlined or lined with fabric.
This Medieval week in Visby was rather different from my previous ones; I traveled without love (who was working) and lived indoors in a rented apartment with two friends. I also had workshops scheduled for every day I was there, and just had a free afternoon the day we arrived. So, with that said, I don’t have much photos since I was working a lot, but I wanted to share some moments with you- both by camera and words.
Me and my two friends really had the best living and it was easy to share with them, but we did have different hours so often I was on my own to and from work. It actually was really nice, I had some of my best moments because I was out on my own, strolling or talking with people and new friends I otherwise wouldn’t have time to see. I really recommend having some time on your own during the Medieval Week- it’s the perfect way of meeting new friends!
And adventuring on my own also means climbing things; even if wearing a full silk dress and veils…
One afternoon I met up with Minna to take some photos in the botanical garden, one of them is now the header for my social media! Here in the late afternoon light, trying to tie up my headwear without a mirror and enough pins (it ended up hanging from one side as you may have seen…)
Minna in her awesome hood; made from a manuscript from South Europe.
Work, I say? Yes, since I run Handcrafted History as my full-time commitment, most of my medieval and viking adventures and event is about work for me. I either have my market stall, selling clothes and handcrafting materials, or holding workshops and lectures. During Medieval Week, I mostly work at Kapitelhusgården, which is a lovely place and medieval restaurant in the middle of Visby. During the day, they offer workshops and lectures, and in the evening the garden transforms to a restaurant and pub, with a picnic-feeling. I love the place!
I am holding my workshops there during the week, and this year one of my attending handcrafters took some pictures with my camera- so I actually have some during-work-photos. (This usually never happen because I get so busy with the workshop and explaining things…) So this is what it could look like when I’m holding workshops! I usually wear medieval or viking clothing when I work, but on modern locations such as universities I wear my everyday clothing (if nothing else is requested).
Linnea whom I traveled and lived with
And J, from my local group, meeting in the park for a chat and some photos
Recently, I was at the SCA event Kingdom University, and there I met lots of really good handcrafting persons. As a result, I got lots of inspiration, new knowledge and good tips on where to read and look for new inspiration. I wanted to share some tips with you, so here is some really good links to other people’s research and blogs;
Textile time travels is such an excellent blog by Annika where she generously shares her knowledge and projects.
Historical textiles have a very interesting blog about different historical finds and such, and a completely awesome dictionary with textile terms in different languages; perfect for reading blogs or books in a foreign language!
Anna/Renika has a nice blog about 15th century clothing, full of both research and sewing tips.
Eva/Aleydis has a blog about her costuming work, apart from some really cool silk dress projects, you can also read some more about Kingdom University there!
Right now, I’m working with the photos from Kingdom Univ, sewing on some projects, and trying to stay alive in the cold, dark November of Sweden. When I have worked through all the pictures I will show you them, along with some really great paintings ans sculptures from the Rijksmuseum. See you!
Det här inlägget är en gästpost, skriven av min vän Linnea. Hon har återskapat trossfraus/kvinnor i landsknektsarmén från 1500talets Tyskland i nästan tio års tid. Hon berättar om sin dräktresa, saker hon lärt sig, och vackra dräkter hon sytt. Läs och inspireras! (fotografer är angivna där Linnea har haft namn på dem/tillhör mig.)
This is a guest post by my friend Linnea. Since she chosed to write in Swedish, I will publish it accordingly- but use google translate to read about her journey as a handcrafter and 16th century camp follower from the German areas. She presents her different outfits and things she has learned along the way!
Linnea:
Jag gick med i SCA, Styringheim på Gotland, 2008. Det var en kompis som sydde min första klänning, tidigt 1400-tal, i ett tjock mörkblått ylle med en ljusare blå underklänning i linne. Den ligger undanlagd i gömmorna sedan länge. Kanske använde jag den bara vid två eller tre event. Redan på mitt första event fick jag syn på en klänning som skulle sätta så djupa spår i mig att jag för tio år framöver inte skulle ha några andra stilar. Det var en klänning som tillhörde Jovi, som skulle komma att bli en av mina vänner, och hörde hemma i det tyska 1500-talet. 2009 gick jag med i landsknektsföreningen Proknekt och var under två år föreningens ordförande.
Efter den första egensydda dräkten har det blivit betydligt fler och i dagsläget har jag sytt 10 klänningar i samma stil. Det har varit min egen utveckling, en strävan efter att hela tiden förbättra kläderna, utan att för delen ha en önskan om att forska djupare. I början var klänningarna inspirerade av andra klänningar jag sett och med tiden har jag för varje klänning gjort en förbättring. Jag anser att alla måste lägga sig på en nivå som känns bekväm, vi har alla varit nya och måste få ha rätten att börja någonstans. Det här är min klädresa.
Första klänningen syddes i ett tungt mörkblått, nästan svart, ylletyg med orangea detaljer. Den är sydd på maskin och eftersom jag tröttnade på att sy i det alldeles för tjocka yllet, är slitsarna till viss del limmade. Kjolen består av två raka stycken, vidden blev 3 meter. Klänningen har synlig snörning, något jag förstått senare inte är historiskt riktigt. Men så stolt jag var första gången jag hade klänningen på mig! Om jag inte minns fel så var det på Knäckekriget 2009. Skjortan är sydd för hand med en smockad kant. Kanten fick inget stöd och viker därför ner sig på ett mindre smickrande sätt.
Andra klänningen syddes i ett något tunnare mörkgrönt ylle med mörkblå detaljer. Klänningen är helt handsydd. Ärmarna var löstagbara och med en kant som gick att vika upp. Kjolen består av två raka stycken, vidden är 3 meter. Här hade jag gjort en ny underkjol i blekt linne. Den här klänningen var färdig 2010, och jag gjorde samtidigt en ny smockad skjorta.
När jag sydde klänning nummer tre valde jag ett tunnare ylle än för klänning nummer två. Det är fortfarande mörka färger som gäller, blå med röda detaljer. Klänningen består egentligen av kjol och jacka. Ärmarna är fastsydda och har en kant som går att vika upp. Slitsarna är alla sydda för hand, liksom klänningen i övrigt. Kjolen består av två raka stycken, vidden är 3 meter. Den här gången hade jag lyckats få en bättre form på ringningen både på fram- och baksidan, mer fyrkantig i likhet med originalen. Den här klänningen var också färdig till 2010. Här är också första gången som jag har korrekta skor, så kallade oxmular, till kläderna istället för ett par vikingaskor. Delarna syddes ihop till en klänning 2017 för att sen säljas. (Fotograf Ulf Ekberg)
Klänning nummer fyra syddes i ett tunt kostymylle som jag fick billigt. På grund av att kostymyllet var så tunt blev det detaljer i ett brunt syntettyg för att matcha. Men den är helt handsydd. Ärmarna är avtagbara. Kjolen består av två raka stycken, vidden är 3 meter. Klänningen saknar slitsar, något som jag alltid varit mycket sparsam med. Överlag tycker jag att många återskapade klänningar har för många slitsar om man jämför med originalen. Klänningen var klar till Peter und Paul festival i Bretten 2011.
Klänning nummer fem är sydd av ett petroleumblått ylletyg som jag hittade på en militärloppis i Tallin, och svarta detaljer. Ett helt suveränt tyg men kanske inte 100 % ylle. Det regnade under en eldshow på Medeltidsveckan för ett par år sen och regnet bara rann av istället för igenom. Den är handsydd och jag har dagen till ära sytt en ny hatt, i orange ylle. Ringningen är också fyrkantig i likhet med originalen, något jag inte alltid fått till. Kjolen består av två raka stycken, vidden är 3 meter. Klänningen var klar till Medeltidsdagarna på Hägnan 2012. (Fotograf Kim F Rehnman)
Klänning nummer sex var en klänning i linne att fäktas i. Slitsarna är alla nedsydda för hand men i övrigt är klänningen sydd på maskin. Kjolen består av två raka stycken, vidden blev 3 meter. Den var klar till 20th Anniversary of Drachenwald på Ludwigstein Castle 2013.
Klänning nummer sju är sydd i Historiska rums ylleflanell, ett tyg som är tunt och svalt samtidigt som det ganska fort får en lite sliten patina. Den är handsydd, vilket inte var helt kul med tanke på att det är 12 meter handsömnad i varje rand i kjolen… Snörningen är gjord med korsettband, ett mycket bekvämt fusk. Ärmarna är löstagbara med slitsade överärmar. Kjolen består av två raka stycken, vidden är 3 meter. Jag lämnade här min trygghetszon med annars så mörka färger för en ljusare blå. Underkjolen är av oblekt linne. Klänningen var klar till medeltidsveckan på Gotland 2014 och såldes vidare 2017. (Fotograf Bella Ekström)
Till 2017 syddes en underklänning i Medeltidsmodes råväv. De skjortor jag haft under klänningarna har inte varit helt korrekta. Det ska, enligt mina vänner som lägger mer tid på forskning än vad jag gör, vara en underklänning mellan skjorta och överklänning. Det blir varmt och därför har jag den sällan, men här, vid matlagningen på Landsknecht Hurra i Tyskland, passade den ypperligt. Den är handsydd efter samma mönster som mina överklänningar men utan dekorationer. Snörningen är synlig med handsydda snörhål. (Fotograf Torbjörn Walberg)
Klänning nummer nio är sydd i brunt engelskt kläde från Historiska rum med krappröda detaljer. Kjolen är sydd i våder vilket ger 5 meter i nederkant. Inga slitsar här heller, bara dekorbanden. Den här klänningen sitter ihop med hyskor istället för snörning, väldigt bekvämt! Jag har gått från starka färger till en mer nedtonad färgskala, beige och krappröd, något jag föreställer mig är lämpligt för en mindre bemedlad kvinna i trossen. På bilden har jag också en jacka i rött ylletyg med oblekt linnefoder. Jag har också sytt små tossor i linne som skyddar strumporna i stil med tossorna som återfinns på träsnitten. Under överklänningen har jag underklänningen som syns tydligare på bilden ovan. Alltsammans blev klart till Landsknecht Hurra i Tyskland 2017.
Klänning nummer tio syddes också under 2017 och var klar till Medeltidsveckan på Gotland. Det här är den första klänning jag syr efter ett specifikt träsnitt. Den är sydd i ylleflanell från Historiska rum, i bärnsten och krapprött. Kjolen är sydd med våder vilket ger en vidd på över 5 meter. Den stängs med hyskor. Nedre delen av ärmarna är lösa i enlighet med träsnittet. Jag slyngade snörena med slynggaffel. Det var ett test från min sida, jag har hört att det kanske var vanligare med fingerflätade snören. På bilden har jag också en ny hatt, en ny huvudduk i ylle och nytt smockat förkläde. Strumporna är från Kapitelhusgården och väskan från Craft Hive. Banden på kjolen finns inte på träsnittet, jag tyckte det blev snyggare med band än utan. Klänningen ska egentligen också vara rosa med röda detaljer. Men trots att jag har gått från mörka till ljusa färger ligger rosa utanför min gräns… (Fotograf Erika Hernlund)
Blev du inspirerad? Under min sida “tutorials” kan du lära dig att göra en knekthatt, eller spana in högerspalten och klicka på Lansknecht & Trossfraus för att läsa mer om knekt och trossfraudräkter, hur du gör egna och var det finns inspiration. Jag har också länkat till föreningarna som Linnea pratar om, och till de inköpsställen hon använt sig av direkt i texten.


")


")