HANDCRAFTED HISTORY

The 16th century Working Woman

Leave a comment

At DW University on a weekend event

Back in 201something (2016 maybe?) I made this outfit with a brown woolen overdress, based on Drei Schnittbücher by Katherine Barich/Marion McNealy. I wrote a research post to summarize my background research and thoughts but never got around to writing about the finished outfit. The research focused on middle Europe in the early 16th century, but when I found the book with pattern drafts I took the sidestep to try and make the gown after one of the models presented, even though it might be more probable to have made a dress with a waist seam like my trossfrau dress. But who can resist a fun pattern draft from a medieval tailoring book?

Since then, I have been wearing this outfit several times and even adjusted the dress with a lower neckline and a piece of mending over one of the skirt folds. I like this outfit since it is both pretty and comfortable for working, so I thought I would share it with you.

Winter event, with all three layers

I start with a basic linen shift in half bleached linen, based on my tutorial. It has a square cut neckline to match the dress and kirtle, and long sleeves.

Over that, I wear a kirtle or middle dress in wool, sleeveless and simple. This is a really practical working garment, and allow me to roll up the shift sleeves when doing dishes. Back then, I had a yellow sleeveless dress, that got sold to make a new one, one size larger.

Unfortunately, I got sidetracked when making that and decided on an Italian styled dress that is also shown in this tutorial. After that, I realised I really needed a middle layer to make this outfit complete, and made another kirtle in grey-blue wool, with a decorative fabric strip in black wool.

Both the middle layer and the overdress is rather tight fitted, giving me bust support when worn.

(This is what it looked like at first before I moved the neckline down a bit)

The overdress is made in brown wool with decorative borders in amber coloured wool. I liked this dress pattern since it is quite different from others I had tried, and I fell for the challenge. Sadly, the tailor books do not come with much information about how one should assemble all the pieces, so you could best describe this as a try on a medieval pattern, rather than something strictly copied.

I adjusted the cutting out of the fabric pieces to fit the fabric I had available, which was around 300*150 cm of wool. I also choosed to widen the skirt at the back to make it look more like the artwork from the period. The tailoring book shows the centre back (and front) straight, but that does not give the desired folds seen on women. Maybe a gore was supposed to go in there, or some other adjustment that was so obvious none bothered to write it down? To accommodate for the skirt width, I had to piece the sleeves with three different fabric scraps to get the dress together.

The front piece is folded at the centre front, making the skirt without a seam in the front.
The back pieces are pieced at the hem for fuller width
One of the sleeves, basted for trying on.
pattern pieces from the book

The overdress (well, the entire outfit) is sewn by hand, and on this dress, I only used linen thread, a choice I based on research for the period. Sadly, I have misplaced many notes and sources so the only reference I have left is a note saying “linen thread common for working-class clothing, do not bother with silk or wool). Ok, I apparently did that…

The skirt panels and some longer seams are made with running stitches, and the rest of the dress is sewn with backstitching, and the seam allowances are sewn down with whipstitching. The decorative fabric pieces are also whip stitched in place. On the inside, the dress is lined with a piece of sturdy linen fabric in the body, and the front closing is reinforced with a piece of linen canvas and closed with hooks and eyes. Another possibility would be lacing, but I like how fast the dressing is with hooks and eyes!

I found this model harder to fit than the 16th c models with waist seam, since you can’t adjust the waist placement during fitting. It has to be cut out at the beginning. I like to raise the waistline 1-2 cm above my natural waist to achieve the early 16th c silhouette, and that was more difficult here. But the dress made up for it by being really fun to assemble with the skirt folds.

I folded the skirt part that stretches outside the body in several folds and fastened these to the sides and centre back of the body. This gave a lot of strain on specific parts of the dress, causing the folds to rip when someone accidentally stepped on the dress hem. So I mended that side with a piece of fabric.

Here you can see the folds in the centre back and sides.

If I were to remake this whole pattern, I would choose to cut a slit between the body and skirts and fit the skirt in folds as you do on 18th c clothing. But this was several years ago and I hadn’t tried that technique yet.

Side view showing the gathered skirt fabric in the side; drapey and voluminous!

The greatest thing about this pattern was the drape of the skirt. It is full and generous and the folds look great in the centre back and sides. The front on the other hand is straight, with just an extra 15 cm overlap to allow for getting out of the dress. I just fold the gap shut and wear an apron above, but you could pin or hook it in place, or make a slit in the front. The straightness of the front makes the skirt great to work in; when I bend forward the skirt rearrange itself towards my legs, avoiding any flames or obstacles before me. Someone gave this thought “back then”!

The gollar I already made a tutorial for, and you can find it here. The early photos show an amber coloured English broadcloth gollar, fully lined with fur. The red one only has fur strips, enough to add some warmth but still be conveniently small for packing in a suitcase… Erh, I mean historically stylish yet cheap. Yeah?

The cap is a simplified Birgitta cap, and should be worn with a veil on top to be considered “well dressed for the public”. These caps are unusual in contemporary finds from the 16th century, I have seen a model doll and some “maybe” examples in art- it could be a cap but could also be a folded veil or other headwear. Hairnets, veils, braids, straw hats and other kinds of headwear are also visible. The most important is to have your head “dressed”; either with a hairstyle or headwear appropriate to the period.

You can find my pattern on the Birgitta cap at my Patreon or in my Etsystore.

The hoses are the same knee-high wool hose I use for other outfits, and here is a tutorial to make your own.

The apron is made in handwoven linen and smocked with linen thread. Two double folded strips of fabric were sewn shut to form the bands that I tie the apron with. The rest of the apron is only double hemmed and sewn with whipstitching.

When I went back to my old research post I also remembered that I wrote that I needed a jacket and a cloak, amongst other things. I actually made several examples of wool jackets, but they never made it to the blog for some reason. A black wool jacket based on the same tailoring manuscript book as the dress got photographed at an event, but then I sold it to make another one and try out some variations.

photo: Annika Madejska

Phew! So this was a lot of thoughts, and sewing, and years gone by without finishing up the writing on this project. I seldom return to old projects like this one, but since I still like it I thought it would be fun to share it with you. It is not a tutorial of any kind, more of a diary or a presentation of a project done.

Sometimes when you see others on the internet doing cool projects and posting photos of fancy dresses it is easy to feel like you don’t get anything done, but sometimes the road to finished projects can be long, windling and a bit unsure. It is ok too!

My Patreons wished for more research to be published, and I am happy to do so! Want to support the blog and be able to ask for content? Consider joining my supporters here!


2 Comments

The 16th century working woman – Research

This is a post about (one of) my 16th century outfits; and due to several years of research, work and sewing experiences it will probably be more than one post, with different subjects. In this, I will give you an overview and some background research. The outfit is already finished, worn, mended and in line for some redoing, so I will be able to share the whole process with you; both good and bad outcomes and what I could have done differently.

My aim was to make a good recreation of a whole outfit for a woman from early 1500s German (or possibly southern Scandinavian area, since this was influenced by German fashion at the time). She is not poor but works for her living, maybe on a larger farm or in a smaller city. She is well dressed; as is the ladies on all the art I have studied, but like other working women, she owns practical clothing with a skirt short enough to stay out of her way, and a cut to the clothing that is both economical and practical. Contrary to the trossfraus (the women who follow the mercenary armies) she does not wear slashed and mismatched clothing, but items that belong to each other and to a certain class in society. She follows sumptuary laws and does her hair in the braided fashion, or covers it with a simple cap and veil while working.

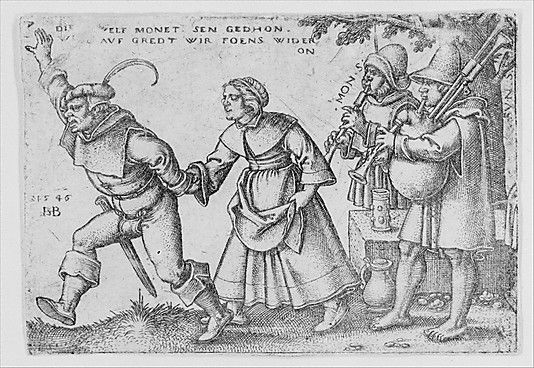
I wanted to show you some interesting images of 16th century women in art so I put together some examples for you;

Three women; wearing work tools but also lots of interesting clothing. The shoes are practical and the skirts reach the foot, not the ground. 

A painted glass piece showing the milking and making of butter. A (probably) younger woman has her hair in two braids, and a covering apron to protect her clothing. The older woman has a veil, a jacket and a dress hiked up in her belt.

This lady is described as a dancing farmer and has probably done her fine dress for a festive occasion, with her hair braided in a nice updo and what looks like a headband around the head. She wears a dress and a gollar that looks fur-edged or with a whole lining in fur.

Another dancing farmer- with a gollar fastened by her neck, and an apron around her waist. The shoes look sturdy and practical (but nothing like the cowmouth shoes you can see on trossfraus) and she has some kind of decorative border at the hem on the skirt, and on her loose sleeves. No slashes though!

This piece shows the women working with flax, the process from plant to fabric demanded both time and hard work in numerous steps. The sitting lady wears a cap or veil around her head, with hair showing at the front. Her jacket is fastened at the front and is cut in the fashion of the time; low and square. The standing lady has her hair in braids around her head and has rolled up her sleeves while working. The dress has a decorative guard at the front, and is hiked up at the waist. Clearly, she is doing some heavy work!

Dressed for cold weather? She has done her veils around her head, chin and neck, and wears a short cloak against the cold. She wears both shoes, socks and hose, and a bag at her belt.

Ah, time for cutting some fleece! The sheep does look dead but is probably just laying at a convenient working pose for the woman, who use a shearing scissor for the work. She wears a simple cap or tied veil over her hair, and a dress with decorative guards at the front. It is hard to say if the brown skirts are part of her yellow dress, discoloured by time, an apron or a piece of cloth.

Festivities again! Do peasants and workers anything else than working and dancing? This lady has the common braids, a gollar and a dress. What is so interesting with this picture is that you can see the back of her dress, which is clearly denser pleated than the sides. Uneven pleating in the skirts is visible in more pictures and seems to be the result of tailored work.

Summertime, and work in the fields this time. Now we can see her shift; a plain linen shift with a long sleeve, and either a high collar, or more believable, a thin gollar/linen cloth to protect her against the sun, as is seen on the woman with the red dress. She wears a straw hat, and her dress is sleeveless; it is a tight-fitting middle kirtle or underdress that gives you the bust support you need, without being in the way for hard work. This layer can be found on other women too; plain, sleeveless and intended to be worn under the woollen overdress. It is only during heavy outdoor labour such as fieldwork, washing and shovelling it is openly worn, older women and richer women always have their overdress on.

Based on my research, I have found that I needed the following items for a whole outfit:

  • linen shift
  • kirtle or underdress
  • wool dress as an overdress
  • apron
  • belt
  • purse (and maybe a rosary too, it is mentioned in some written sources but doesn’t appear on peasants often)
  • cap, veils, a straw hat and/or a braided hairstyle
  • hose
  • shoes
  • gollar
  • jacket
  • cape/cloak

This much? I wanted to make a whole outfit, that would be practical during different kind of events with both cold and warm weather. I also wanted to try to make all the pieces of clothing and accessories that I have found during my research, to better understand how they worked together.

For more research, I have a Pinterest board on the theme if you want to learn more!


2 Comments

Slashing and cutting fabric- a tutorial

During the 16th century it became high fashion to slash or cut fabrics in a decorative manner, and this was taken up by mercenary landsknechts and women working and living in the armies as well. Being a fashion for richer or high-born persons, it was quite the dare for mercenaries to wear, but such a good way to show that you were a high earner with lots of status and gold on your pocket…

IMG_1436

So, I wanted to share with you all my best tips for getting that slashed and cut look that you may want for your outfit!

IMG_1438

But first, some good things to know:

  • The most important thing is the material to work with; wool is by far the easiest. In finds and manuscripts, you will also find garments made by silk or silk/linen and silk/wool blends, but those garments will have very small cuts (also called pinking) made with a specific tool and is a whole different story. So; chose a wool fabric. A felted, dense and tightly weaved wool is the best, this will give you a sturdy garment that won’t fray easily.
  • The slashing is not hemmed. I know many people do this because they chose a sensitive fabric, they are afraid it will fray and tear, or they have just been told that all raw edges should be hemmed or sewn. The standard is to not hem or sew the slashes, they should be raw, made with a very sharp tool, and yes- they might wear out faster than a garment that is not slashed. There are garments made with other techniques, for examples doublets with sleeves that are being made out of strips of lined/hemmed fabrics. These might look similar to cut garments, but the making is different.
  • Slashed and cut garments may not last as long as more sensible ones, or look very pretty after using for a while, that is the point with this fashion! You’ll have to be rich enough to order fine materials, pay a tailor to sew it for you, pay even more for the slashing and cutting, and then don’t mind that you will have to exchange the garment once it looks worn. If you are a more economically laid modern person, pick a wool fabric for your outfit, since this lasts longer than silk or linen.
  • Almost all slashed garments that I have seen have been lined with a second layer of unslashed fabric. This could be a regular lining or a whole garment that holds together the one laying over, providing stability and fit. I often use a linen fabric lining for wool and silk fabrics, but in the case with slashed guards (strips of fabrics) I place the guards on top of the main fabric, to make it visible through the slashing.

Feeling ready for some slashing now?

IMG_1538

The pictures are mostly from my trossfrau dress project, this from a woodcut that I have copied and coloured to get a feeling for the dress to be.

I usually wash my wool fabrics, iron them and then cut out the pieces I want for the garment. Before I sew them together I draw out my slashes on the wrong side with a fabric marker and then cut them before I put the garment together. If you are not sure about the fitting, it is good to baste the garment together and try it on before this, since it is difficult to adjust fitting after the slashing is made.

20150505_193058

I usually also draw out helplines during this stage; everything that helps you make good sharp lines placed exactly where you want them is good. A ruler, some mathematics and a marker go a long way. I also like to make a template to use while drawing out the slashes.

IMG_1433

Do not slash all the way to the edges, remember the seam allowance and leave 2-3 cm along the edges to make it easier to sew the pieces together.

IMG_1990 (2)

This is a larping outfit (only inspired by historical fashion) as an example of a durable slashed garment. The arms have slashes, but not the armpits or body, and the slashes ends some cm before the seams. Sewn in a medium-heavy twill, slightly felted.

If you want the garment to be sturdy and hold together, slash less along the armpits, side seams and crotch; all areas where the fabric gets more wear. If you look at historical woodcuts and painting, you may notice that tight fitted pants have no slashes at the backside of the legs near the seams, neither over the butt (there might be exceptions, as always)

11879095_10153482270739892_682932696704880751_o

The finished dress, a hot day in Visby a couple of years ago


1 Comment

Fur lined gollar- step by step

Fur can be tricky, so here’s some help on the way if you are going to fur line your garment (like this late 15- early 16th century gollar). This method may be used with a good fake fur too!

I am guessing that you historically either treated the fur like a garment of your own (sew the fur together to a garment, then attach it to the outer fabric) or as a fabric lining (cut out the pieces of fur and stitch it to the seam allowances of the outer fabric once this is sewed together). A mix of these two might also be the case, due to the different challenges you face when fur lining a garment without it getting bulky.

If you only want a strip of fur on your garment, I find it easiest to cut out the fur pieces, and treat them like fabric lining; cut them straight and clean, join small bits if necessary before sewing them to the outer fabric. In contemporary art the fully fur lined garments seem to be the most common one, but some artwork you could interpret as only having trims in fur. Fur was both fashionable and warm and used in many garments, and I have a fully lined gollar. This one becomes too warm during summer, and also take a lot of space in the bag when packing, so I thought this new one would be a good alternative; fashionable, with the fur to warm me against the wind, but lighter in both warmth and packing space.

I started with my wool gollar; I cut out the main piece and the collar and sewed them together with running stitches. A common thread for the period is uncoloured linen thread, so I used that and waxed it to make it more durable while sewing backstitches. After the pieces were joined together, I pressed down the seam and cut down the seam allowance on one side, and felled the seam allowance with whipstitching. This makes the seam more smooth and adds durability to the garment.

I tried to lay the gollar out flat, for you to get a good look. Note that it is not a full circle, you want it to lay flat against your back and shoulders in a tight fit. The fit on the gollar you’ll have to try out on yourself; so make one out of scrap fabric if this is your first one!

I measured the collar and the front where I wanted the fur to be, and cut out strips of fur to match them. I then sewed them into place with linen thread and a small, regular needle. A thinner needle makes it easier to sew in fur, and pinning the fur into place makes sure it doesn’t stretch or slides. If you find it hard to use pins, try with fabric clamps/sewing clamps instead.

At the corners, I just sew the fur to the fabric and leave the leftover fur for later. Note that I treat the fur like fabric; sewing the furry side to the right side of the fabric.

When the fur is sewn onto the fabric, I cut away the leftover and trim the edges down.

At the corners I trim away enough fur so when I fold the fur inside the garment it will not get bulky but fit together edge to edge.

At the bottom edge, I want the fur to follow the curved front of the gollar, so I mark this with a pen and then cut it away.

After trimming down the fur, I fold it to the inside of the gollar, and pin it in place. Make sure it lays flat when wearing the garment; fur can be tricky and does not adjust the way fabric does. When you are happy with the fit, sew the fur in place with whip stitches, or attach it to a lining. In the corners the two pieces of fur should barely meet, the hair will hide the seam, so just sew them together loosely.

I chose to have a lining inside my gollar in a thin woollen fabric, to add warmth and make it easier to sew the fur down with no visible stitching.(a fully lined gollar can be seen in art.) For the lining, I cut out another gollar, without a collar (because the fur strip will cover the inside of my collar) and without the parts that would be covered with fur. When fastening the lining in the gollar, pin it or baste in place and then sew it at the same time as you attach the fur on the inside. Start with the collar, and then the front opening going down.

Sewing in fur is time-consuming and quite tiring for the fingers. Nice company or a movie is good to have!

When the fur (and lining) is attached around the gollar I stitched the lower hem with whip stitches. To make the seam smooth, I cut away some excess lining fabric, as can be seen in the photo. So; adjust the lining, cut off excess seam allowance, pin and whip stitch.

To fasten the gollar you can use dress pins, small fabric strips, ribbons or lucet braided strings, hooks and eyes or do as I did; add a fancy clasp at the throat. At the end of the sewing, I didn’t really like that the fur was so visible at the bottom, so I trimmed it down quite hard. Another option would have been to let the fur finish on the inside of the gollar, so it was not so obvious that the gollar was not fur-lined all the way around. Cheating is hard sometimes…

The clasp is a late 15th century find from Sweden, with A standing for “amore”. It added nicely, but for a commoner, a hidden fastening would do better.

A note about fur; I recommend you put some thought and money into the purchase of fur. There are still many fur-fabrics and farms that treat animals like shit, where the animals suffer greatly to become your hobby-based garment. If you buy rabbit skin for 7-9 Euro/skin you probably support these farms, even if not buying directly from them. A better option would be to buy fur from local farms where you can visit the animals, and get to leave the skin at the tanner yourself. You can also find good choices on the internet, buy second-hand or choose fake-fur from the fabric store (not the most historically accurate, but I rather go modern than using unethical furs) I had the fortune of finding a lady breeding rabbits in her garden as a part-time income, and got to buy furs from her, tanned locally by a handcrafter. These were about 30E a piece, so really reasonable in price!

Some examples of gollars being worn by 16th century common people during dances. Some of them seem to have a fur line around the hem (as being fur-lined) while others could be unlined or lined with fabric.


2 Comments

Träffa min vän Linnea!

Det här inlägget är en gästpost, skriven av min vän Linnea. Hon har återskapat trossfraus/kvinnor i landsknektsarmén från 1500talets Tyskland i nästan tio års tid. Hon berättar om sin dräktresa, saker hon lärt sig, och vackra dräkter hon sytt. Läs och inspireras! (fotografer är angivna där Linnea har haft namn på dem/tillhör mig.)

This is a guest post by my friend Linnea. Since she chosed to write in Swedish, I will publish it accordingly- but use google translate to read about her journey as a handcrafter and 16th century camp follower from the German areas. She presents her different outfits and things she has learned along the way!

Linnea:

Jag gick med i SCA, Styringheim på Gotland, 2008. Det var en kompis som sydde min första klänning, tidigt 1400-tal, i ett tjock mörkblått ylle med en ljusare blå underklänning i linne. Den ligger undanlagd i gömmorna sedan länge. Kanske använde jag den bara vid två eller tre event. Redan på mitt första event fick jag syn på en klänning som skulle sätta så djupa spår i mig att jag för tio år framöver inte skulle ha några andra stilar. Det var en klänning som tillhörde Jovi, som skulle komma att bli en av mina vänner, och hörde hemma i det tyska 1500-talet. 2009 gick jag med i landsknektsföreningen Proknekt och var under två år föreningens ordförande.

Efter den första egensydda dräkten har det blivit betydligt fler och i dagsläget har jag sytt 10 klänningar i samma stil. Det har varit min egen utveckling, en strävan efter att hela tiden förbättra kläderna, utan att för delen ha en önskan om att forska djupare. I början var klänningarna inspirerade av andra klänningar jag sett och med tiden har jag för varje klänning gjort en förbättring. Jag anser att alla måste lägga sig på en nivå som känns bekväm, vi har alla varit nya och måste få ha rätten att börja någonstans. Det här är min klädresa.

Första klänningen syddes i ett tungt mörkblått, nästan svart, ylletyg med orangea detaljer. Den är sydd på maskin och eftersom jag tröttnade på att sy i det alldeles för tjocka yllet, är slitsarna till viss del limmade. Kjolen består av två raka stycken, vidden blev 3 meter. Klänningen har synlig snörning, något jag förstått senare inte är historiskt riktigt. Men så stolt jag var första gången jag hade klänningen på mig! Om jag inte minns fel så var det på Knäckekriget 2009. Skjortan är sydd för hand med en smockad kant. Kanten fick inget stöd och viker därför ner sig på ett mindre smickrande sätt.

Andra klänningen syddes i ett något tunnare mörkgrönt ylle med mörkblå detaljer. Klänningen är helt handsydd. Ärmarna var löstagbara och med en kant som gick att vika upp. Kjolen består av två raka stycken, vidden är 3 meter. Här hade jag gjort en ny underkjol i blekt linne. Den här klänningen var färdig 2010, och jag gjorde samtidigt en ny smockad skjorta.

När jag sydde klänning nummer tre valde jag ett tunnare ylle än för klänning nummer två. Det är fortfarande mörka färger som gäller, blå med röda detaljer. Klänningen består egentligen av kjol och jacka. Ärmarna är fastsydda och har en kant som går att vika upp. Slitsarna är alla sydda för hand, liksom klänningen i övrigt. Kjolen består av två raka stycken, vidden är 3 meter. Den här gången hade jag lyckats få en bättre form på ringningen både på fram- och baksidan, mer fyrkantig i likhet med originalen. Den här klänningen var också färdig till 2010. Här är också första gången som jag har korrekta skor, så kallade oxmular, till kläderna istället för ett par vikingaskor. Delarna syddes ihop till en klänning 2017 för att sen säljas. (Fotograf Ulf Ekberg)

Klänning nummer fyra syddes i ett tunt kostymylle som jag fick billigt. På grund av att kostymyllet var så tunt blev det detaljer i ett brunt syntettyg för att matcha. Men den är helt handsydd. Ärmarna är avtagbara. Kjolen består av två raka stycken, vidden är 3 meter. Klänningen saknar slitsar, något som jag alltid varit mycket sparsam med. Överlag tycker jag att många återskapade klänningar har för många slitsar om man jämför med originalen. Klänningen var klar till Peter und Paul festival i Bretten 2011.

Klänning nummer fem är sydd av ett petroleumblått ylletyg som jag hittade på en militärloppis i Tallin, och svarta detaljer. Ett helt suveränt tyg men kanske inte 100 % ylle. Det regnade under en eldshow på Medeltidsveckan för ett par år sen och regnet bara rann av istället för igenom. Den är handsydd och jag har dagen till ära sytt en ny hatt, i orange ylle. Ringningen är också fyrkantig i likhet med originalen, något jag inte alltid fått till. Kjolen består av två raka stycken, vidden är 3 meter. Klänningen var klar till Medeltidsdagarna på Hägnan 2012. (Fotograf Kim F Rehnman)

Klänning nummer sex var en klänning i linne att fäktas i. Slitsarna är alla nedsydda för hand men i övrigt är klänningen sydd på maskin. Kjolen består av två raka stycken, vidden blev 3 meter. Den var klar till 20th Anniversary of Drachenwald på Ludwigstein Castle 2013.

Klänning nummer sju är sydd i Historiska rums ylleflanell, ett tyg som är tunt och svalt samtidigt som det ganska fort får en lite sliten patina. Den är handsydd, vilket inte var helt kul med tanke på att det är 12 meter handsömnad i varje rand i kjolen… Snörningen är gjord med korsettband, ett mycket bekvämt fusk. Ärmarna är löstagbara med slitsade överärmar. Kjolen består av två raka stycken, vidden är 3 meter. Jag lämnade här min trygghetszon med annars så mörka färger för en ljusare blå. Underkjolen är av oblekt linne. Klänningen var klar till medeltidsveckan på Gotland 2014 och såldes vidare 2017. (Fotograf Bella Ekström)

Till 2017 syddes en underklänning i Medeltidsmodes råväv. De skjortor jag haft under klänningarna har inte varit helt korrekta. Det ska, enligt mina vänner som lägger mer tid på forskning än vad jag gör, vara en underklänning mellan skjorta och överklänning. Det blir varmt och därför har jag den sällan, men här, vid matlagningen på Landsknecht Hurra i Tyskland, passade den ypperligt. Den är handsydd efter samma mönster som mina överklänningar men utan dekorationer. Snörningen är synlig med handsydda snörhål. (Fotograf Torbjörn Walberg)

Klänning nummer nio är sydd i brunt engelskt kläde från Historiska rum med krappröda detaljer. Kjolen är sydd i våder vilket ger 5 meter i nederkant. Inga slitsar här heller, bara dekorbanden. Den här klänningen sitter ihop med hyskor istället för snörning, väldigt bekvämt! Jag har gått från starka färger till en mer nedtonad färgskala, beige och krappröd, något jag föreställer mig är lämpligt för en mindre bemedlad kvinna i trossen. På bilden har jag också en jacka i rött ylletyg med oblekt linnefoder. Jag har också sytt små tossor i linne som skyddar strumporna i stil med tossorna som återfinns på träsnitten. Under överklänningen har jag underklänningen som syns tydligare på bilden ovan. Alltsammans blev klart till Landsknecht Hurra i Tyskland 2017.

Klänning nummer tio syddes också under 2017 och var klar till Medeltidsveckan på Gotland. Det här är den första klänning jag syr efter ett specifikt träsnitt. Den är sydd i ylleflanell från Historiska rum, i bärnsten och krapprött. Kjolen är sydd med våder vilket ger en vidd på över 5 meter. Den stängs med hyskor. Nedre delen av ärmarna är lösa i enlighet med träsnittet. Jag slyngade snörena med slynggaffel. Det var ett test från min sida, jag har hört att det kanske var vanligare med fingerflätade snören. På bilden har jag också en ny hatt, en ny huvudduk i ylle och nytt smockat förkläde. Strumporna är från Kapitelhusgården och väskan från Craft Hive. Banden på kjolen finns inte på träsnittet, jag tyckte det blev snyggare med band än utan. Klänningen ska egentligen också vara rosa med röda detaljer. Men trots att jag har gått från mörka till ljusa färger ligger rosa utanför min gräns… (Fotograf Erika Hernlund)

Blev du inspirerad? Under min sida “tutorials” kan du lära dig att göra en knekthatt, eller spana in högerspalten och klicka på Lansknecht & Trossfraus för att läsa mer om knekt och trossfraudräkter, hur du gör egna och var det finns inspiration. Jag har också länkat till föreningarna som Linnea pratar om, och till de inköpsställen hon använt sig av direkt i texten.

Spara

Spara

Spara

Spara