I have a new digital workshop/masterclass; how to learn tablet weaving! This masterclass is created after several of my followers and friends told me they would love to attend my weaving workshops, but the sites/schedule didn’t add up. So I remade my popular workshop that I have run for 10 years, and made it digital! I am very happy with it, and I hope you will enjoy it too!
from a video clip
In the online masterclass, you will learn everything you need to start weaving: how to set up your warp, weave, solve problems and design simple patterns. The Masterclass is online; log in and follow the instructions at your pace with video clips for every step. Revisit them as many times as you need, and learn more theory in the included PDF booklet. Ask questions in the community and share your experiences with others.
How does it work?
Purchase the masterclass either by email or on Etsy. You will receive a password to the login page here on my website where you will find 25 instructional video clips and the 15-page booklet. Follow the instructions and work your way through the videos one by one, at your own pace. You will have access to the Masterclass for the rest of the year!
Starting kit: I offer a starting kit if you don’t yet have all the tools that you need!
If you don’t order the starting kit you need the following: 8 tablets, a shuttle, and a tablet lock. I use wool yarn 20/2, 40 meters of each colour.
Other tools: scissors, pen, measuring tape, sturdy ribbon.
Online Masterclass: Masterclass pdf booklet. Access to the masterclass page with video clips + bonus clips. Access to my online community, chat with others and get feedback from me.
Online masterclass + starting kit: Masterclass pdf booklet. Access to the masterclass page with video clips + bonus clips. Access to my online community, chat with others and get feedback from me. +All tools you need to start weaving: 8 Paper tablets, tablet lock/pin, shuttle and weaving fastener. Wool yarn for your first project + more weaving. 400 meters of each colour, a total of 800 meters. Pick your 2 favourite colours or get a surprise mix (write a comment). Additional 12 tablets for future projects (20 in total). The starting kit will be shipped to your address.
This tutorial is made with the support of my Patreons. Support me to help me make more free tutorials!
The Skjoldehamn hood is a find from the 11th century, and because it is the only find of this type of garment (from Scandinavia) dated close to the Viking age period, it is often used as a Viking/Iron age garment by reenactors.
We don’t know who the garment belonged to; man or woman, rich or poor, or if the wearer considered themself a part of the Viking culture, the native Sami culture, or both. The clothing was found in a bog burial in northern Norway and the garment items resemble modern Sami clothing according to articles I found on the subject. But the hood also reminds us of the later medieval hoods, although it has square gores. Hoods with slits over the shoulders, or long cloaklike hoods can be seen from earlier periods in Europe.
Skjoldehamn in Norway
All considered, it is a good choice to make if you need a warm garment for iron-age clothing and want a hood, at least if you have a north Scandinavian-based outfit, a Birka-based Viking outfit might have had a hat instead. Overall, the hood is probably more common in reenacting than it was during it’s lifetime, but who does not want a practical garment when it is cold or wet?
Materials:
Most outdoor clothing that has been found from the period seems to be practical rather than decorative. Choose a warm and sturdy fabric, slightly fulled, and use wool or linen thread for sewing. The original has a seam on top of the head to give the hood some shaping, and a pair of cords on the side to pull it closer to the head. This tutorial is a simplified version without these elements, but feel free to add them if you like. And don’t be afraid of piecing together the hood if needed, piecing is very historical!
How to make the pattern:
The hood is constructed with two long rectangles (or one piece folded at the top) and two squares.
This guide give you a hood similar to the original, covering your shoulders but not your arms. You could also make a longer one by lengthening measure B.
A is the depth of the hood, measure from the face where you want the opening to be, around your head and back. Divide the measurement in 2. I like deeper hoods to get protection from wind and rain, I usually have 32 cm.
B is the length of the hood from the head down to the shoulder, measure yourself from the top of the head, following your body, to the shoulder point (where the shoulder ends). Mine is 60 cm.
Measurement C is the face opening, measure around the whole face, under the chin, to get an opening. Try pulling the measuring tape “on and off” the head so you know if the opening is big enough to be comfortable. I like a looser opening to accommodate hairstyle/veils. Divide the measurement you get by 2. Mine is 34 cm.
Measurement D is B-C; the length of the hood minus the opening, 26 cm on my hood. D is also the sides of the gores.
You can make a paper pattern with these measurements. If you want to include seam allowance while drafting the paper pattern, add 2 cm to all measurements before drawing the pieces. Otherwise, do it directly on the fabric.
How to make the hood: Put the pattern pieces on the fabric and add seam allowance by drawing 1 cm outside all paper pieces.
You may cut the long rectangle in one piece, or in two pieces that are sewn together on top of the head. Cut out 2 square gores, one for the front and one for the back.
If this is your first hood, basting it together is a good choice to try out the fit. if you like it, leave the basting thread in as a guide while sewing. If you want to adjust anything it is easier to remove basting than a sewn seam.
sewing order
Start with sewing the seam on top of the head, if you have one.
Sew one side of each gore to the rectangle, right side to right side.
After that, fold the rectangular piece at the top to make it look like a hood, and pin the gores to the rectangle. Sew the gores from the bottom and up.
In the back, you continue with the seam all the way up to the top.
Finish the face opening by folding in the raw edge, press it and whip stitch it in place.
Repeat with the bottom edge.
Tip: In the front, sew the hood together 1 cm above the gore for added durability, and then leave the face opening.
Seams:
Sew the hood with backstitching to make it sturdy, or use running stitches if you are in a hurry.
Finish the seams by pressing the seam allowance, cut one side down and press it to that side, and whip stitch it down for added strength. I like to fold the seam allowance toward the larger piece; in this case, I sew the seam allowance down to the main hood and not the squares. In the back seam you can fold it either way.
There are two cool finds of sewn mittens available at the National Museum of Iceland’s webpage and you can see them here and here. They are both sewn in wool cloth and constructed with a separate piece making the thumb. I adore the Garðar Mitten and decided to make a pair for myself.
My first thought was to make them as a type of over-mitten to be worn over my regular needle-bound ones, but then I got sidetracked while making the pattern and made the grey ones the exact size for my hands. So I made another pair in red, for really cold days.
The outside of the mitten is larger than the inside, meaning you will shape the outer side around the inner, creating a gathered effect that is both pretty and practical.
The tumb is inserted in a round hole in the hand, making it both fun to do and comfortable to wear.
Tips for working with the pattern:
Add seam allowance to the mittens, 1-1,5 cm. Remember to sew with the correct seam allowance, small garments really differ in size if you are lazy with the seam allowance.
The tumb seam can be made in different ways; by using a backstitch and sewing the pieces right side together, or:
If you find it difficult to make the thumb insertion seam, try treating it like an “inserted gore” from my tutorial, and press the seam allowance on the inside piece, before sewing it to the thumb piece. (I will show you how to do it below, on the red mitten).
Or go inspired and fasten the thumb piece from the outside as I did with the grey mittens, adding a decorative seam to protect the fabric edge.
Step by step instructions
Place the paper pattern pieces on the fabric with some space in between for seam allowance, and pin the paper in place.
Trace around with a fabric marker, 1 cm outside the pattern. Use a ruler/measuring stick to guide you.
In small projects, some extra seam allowance can make a big difference. To help yourself making the garment the right size, you can trace around the pattern pieces with a basting thread.
It is fast, and you will know exactly were to place your seam. Here the basting line is blue, and I moved the pattern piece for it to show better on the photo.
Cut out all your pieces (remember to check that you have a left and right mitten before doing this).
Tip: it is always easier to cut a sharp line if you have a sharp scissor, and cutting the fabric with the scissor resting on a table.
Pieces ready for basting and trying on!
Start with basting the tumb together at the top, down to the start of the semicircle shape.
Use your blue basting lines, pair them together and pin the tumb in place on the inside piece. Work from the right side of the mitten, the blue lines should line up on top of each other.
Variations: If you want to sew your mitten according to the seam in the original, use a backstitch and attach the pieces right side to right side. If you want to use the “attached gore method”, scroll down to the red mitten photos.
Bast the tumb in place, with the raw edge of the inside piece visible.
Baste the inside seam of the wrist, and continue up basting the tumb to the outside piece.
Before basting the rest of the mitten together, put in a gathering seam around the top piece to to gather it to match the inside. If you have already basted the seam allowance to guide you, you may use this thread and pull it gently to gather the top of the outside fabric together.
Gather the fabric so it fits to the inside piece, and distribute the folds evenly. Sew a basting seam holding them together.
Baste around the top and continue down to the gore. Put this in place, baste both sides, and then you are ready to try the mitten on!
Looks nice! Remember to try your mitten on with the right side out.
I chose a linen thread 35/2 and backstitches, to make the seam sturdy. I follow along the basting threads, and rip these out as I go along (or afterwards if you prefer). Place the seam 1 mm inside the basting seam instead of on top of it, to avoid sewing the basting seam to the mitten.
The tumb is secured with whip stitches, this is on the inside while felling the seam. You can see some red thread which is the decoration from below. I felled the seams to one side after sewing them, to make the mitten more comfortable and the seams more resistant to water.
To secure the raw edge of the inside piece where the thumb is, I chose to make a decorative stitching with wool thread, sewing on the right side. I used a blanket stitch for the edge, and then an embroidery stitch for added decor. Instead of doing this, you can whipstitch the tumb in place on the right side.
Decorating mittens are fun, but don’t show in the historical sources I used.
Soon finished, now I need to finish the embroidery and hem the bottom edge!
The historical red mittens
I made another pair of mittens to be used for medieval reenactment, big enough to be able to insert a smaller mitten or lining for added warmth. These are made without embroidery, and instead I made the thumb hole seam like this:
Cut the pieces out as above, and then fold the seam allowance in, but only in the tumb hole. Press with an iron to make it lie flat.
Work from the right side and pin the tumb in place. If the tumb seem a bit large for the hole, don’t mind that but just follow the seam allowance. This will create more space for movement for the tumb.
Whip stitch the tumb in place, from the right side. (This is what I referred to when I wrote that you can use the “inserted gore” method.)
Another round of whipstitching on the inside to secure the seam allowance. Make the tumb on the other mitten the same way, and finish the rest of the mittens as above.
Felling seams inside small garments: It is often easier to finish one seam before making the next one. Sew one seam, press and cut it, then sew it down with whipstitching. After that, take the next seam etc.
If you want to sew the mitten together first, I find it easier to work with my hand inside the mitten while felling seams. This way you can adjust the seam and seam allowance while sewing, and keep the fabric stretched out. You are also sure not to accidentally sew throught the next layer of mitten.
Stretching out the fabric and seam with my hand, while sewing with the other.
If you want to make a pair yourself, the pdf including a pattern, can be found on my Etsy and Patreon. If you have 2023 years Advent Calendar, you will find the pattern in there. If you have larger or smaller hands than size 9-11, you might need to make a mock up/test the mittens in cheap fabric to adjust the sizing (mainly the width and lenght of the front and back pieces).
Beeswax cloths are a really simple way of storing food or a picnic snack during your historical event, and they are also nice to cover bowls and jugs!
After this year’s Double Wars event when our encampments got overrun with aphids/lice, I really had it and promised myself to make some protective cloths for next year. And here they are! It was so easy and practical so we use them as everyday items at home, too.
To make some for yourself, start with measuring the sizes you want to have; I made two for covering jugs, a couple for bowls and some bigger ones for wrapping cheese in. I prewashed the linen fabric, cut it in squares, and hemmed the edges with linenthread and a whipstitch before waxing. (To be fair, I used scraps from earlier projects.)
You can wax cloths in different ways; by melting beeswax in a pot and scooping it over the cloths, or by distributing small pieces of wax on the cloth and then melting it in your oven or with an iron. The important thing to know is that beeswax tends to get sticky and may be hard to remove from your favourite pot, oven tray etc. Use baking sheets to protect your kitchen as well as your oven and iron. An apron might be good too, it is hard to get beeswax stains off your clothes.
I chose to melt the wax in a pot that I have already used for beeswax, this was quicker and allowed me to just dump in a big block of beeswax at once. I melted the vax on low heat and scooped it from the pot over the cloths with a spoon.
To save time, I stacked all the cloths on top of each other, poured over a generous amount of wax, and then covered everything with a baking sheet and used an iron on middle heat to help distribute the wax over and through all the cloths.
As soon as the wax is melted into the fabric your first layer is ready- remove it, put it on a baking sheet to cool, and continue down through your stack. You can do this task on your oven too, just make sure you protect surfaces with baking sheets. The cloths gets darker with the wax on, and while they are hot they look shiny and smell nice!
Don’t use too much heat- you want a generous layer of wax to remain in your cloth rather than soak through. Too much heat or too much time in the oven/under the iron will not give you enough wax in your cloth. If this happens, the waxed cloth will look uneven, and won’t stay in shape after cooling down (try to fold it or make a shape with the cloth, it should stay in place and stick to itself). If this happens, just repeat the procedure; pour on more wax and melt it down.
If you have to low temperature, the wax will not melt in properly but lay in cakes/lumps on your fabric. Try to add a little more heat! Beeswax is nice to work with because nothing gets destroyed if you don’t get it perfect the first time, it will just take a bit longer time.
I calculated 2-3 tablespoons of melted beeswax for a 40*40 cm cloth, but this depends on the thickness/weight of the cloth. In retrospect, I would have liked my fabric to be a bit thicker (around 180-250 grams/meter) than this 120 grams/meter linen. It was so fine it had problems holding enough beeswax, but turned out ok for this round of cloths. Next time, I will make them from other scraps.
If you want to make lids for jars, jugs etc. from leather you could also use this process much the same way. Make sure your leather piece is vegetable-tanned and undyed, and get some extra wax since it often takes more to wax a leather piece than a fabric piece of the same size.
Are you longing for that perfect iron age (viking) look of square awesomeness, yet still wanting to show off some womanly curves? Fear no more, this is how you make your apron dress fit really nicely! (Yes, we are going to be more serious real soon)
This apron dress is the same style as you can find in this tutorial, but back then I never guided you through the fitting, straps or stitching. Kind readers have asked for more details, so now this part 2 is here for you.
Ok, so let’s start with the dress already cut out and basted together (white machine thread). It looks something like this, hanging a bit boring…
Step one- try it on!
I pinned two pieces of ribbon onto the dress to be able to try it on easily. These will later be my guides for making the sewn linen straps.
In the back, I put the straps closer to the middle. I find them more comfortable and less likely to slip off my shoulders.
Now it is time to do some shaping! I like to wear my apron dresses higher up on my body, which means I get fabric bulk under my arms. To avoid that, I draft a curved line under my armpit and then cut away the excess fabric. You don’t have to make a full “arm hole”, just add some space for your arm.
Drafting the curved line in the armpit with a fabric marker.
The next step is to pin away fabric in the seam above the bust. Here the seam stood out a bit, so in order to follow the shape of my body, I pinned away a little fabric. As you can see in the photo it is not much, only to add a soft shape.
Marking the fitting with pins will allow you to feel the new fit.
Next are the side seams in the front. I pin away fabric under my bust, turn at my natural waist and continue out in a soft line to the basting line again. The goal is not to achieve a super snug fit, just to highlight that you have a body underneath.
Pinning the shape loosely.
Continue with the back seams and pin away fabric to add some shape to your waist here too. I hold my hand by my natural waist, and as you can see I did not aim to make the apron dress tight. Just removing a couple of cms to add shape.
My goal here was to be able to wear the apron dress with a woollen kirtle underneath, so I needed the fit to be loose. If you want a tighter fit you can try pinning away more fabric- just remember to try it on with new basting seams afterwards to make sure you can get it on and off. Apron dresses never have lacing or such.
Pinning the back seams by the waist.
Now it is time to check out the new fit! Mark the position of your pins on both sides of the seams, remove them to be able to take off your dress easily, and then bast along the drafted lines.
Basting can be done on a machine or by hand.
Here you can already see the added shape of the bust and waist, even without the seams properly finished. When you are satisfied with the fit, remove the old basting from places with double basting. This is needed to finish the dress by hand with a historical stitch.
Trying on the dress again to check the fit.
Press all seams with the basting still in place. (This step is important if you want to try out the seam below, but if you use a sewing machine for your dress you should first sew all seams on the machine, remove the basting thread and then press.)
Pressing the seam allowance to either side will make the sewing easier.
This is what the new shaping looks like after the pressing.
Sewing with wool thread.
Turn the apron dress so the right side is out (yes, we are sewing the dress from the outside) and start by the hem with a small whip stitch. Work your way up on the outside, fasten the thread on the inside of the garment as needed, and repeat with all four seams.
This is a sketch of how the seam looks, side to side with the actual seam.
The key to making this seam look neat is to make small stitches mainly running on the inside of the garment. I like to start from the bottom up, so I can try out the best thread tension and width between the stitches where it does not show so much. The pressing in the step before also helps a lot, as well as the basting on the inside, keeping the garment together while I sit comfortably on the sofa, sewing.
Close up on the seam. If you sew with wool thread, choose a thread with a high twist and 2-3 ply. Take shorter threads and a needle somewhat thicker than the thread. This will make the thread last longer when you work.
After the seams are closed on the outside, I remove the basting thread on the inside. Then I finish of the seams by cutting down the seam allowance on one side, and pressing the other seam allowance over this side. This way I just have to make one more whip-stitched seam for each long seam, instead of two.
Every seam is sewn two times with whip-stitching. This makes the seams sturdy and flexible!
Finish the dress with a double folded hem and whipstitches. Press all seams when you have finished.
When the dress is done, it is time to make some straps! Use the ribbons from earlier as your mockups /guides to decide how long your straps should be, but remember that the tortoise brooches will take some space too. Add seam allowance (3 cm) and extra for your loops. If you are unsure, make the strap 10 cm longer and then cut away the end you don’t need when you have made the loop and finished off everything else.
Linen fabric going to be apron dress straps.
The measure for my dress straps was approx 30 cm long and 4 cm wide. I made 2, and then 2 really short ones to make the loops attached to the apron dress above the front seams. Then I pressed the straps in the middle, folded them, and then folded in the edges. Very smooth!
Use waxed linen thread for sewing in linen fabric. Linen straps on wool dresses can be found in grave finds from the period.
Whipstitch the folded straps along the edge. When you have finished, press them again but with the seam in the middle. This way the stitching will be protected in the middle and the straps will be looking really nice and even.
Nice and even, I love pressing seams!
Making loops for the tortoise brooches.
To make the loop in the edge of the strap, finish the seam along the line and then fold the edge back and fasten it with some stitches. I like these loops, they keep the brooch in place and look neat. The small fabric pieces for the lower loops get treated in the same way. Double fold, press, whipstitch along the line and fold to a loop.
The loops are sewn to the inside of the upper hem, beside the front side seam.
Fasten the lower loops to the front, and remember to put them where you pinned your ribbons on in the beginning. The placement will help the shaping of the garment. If you wear a modern underwire bra, the placement of the loops is often towards the middle from the bra straps. Remember that your tortoise brooches should have a fairly even place to rest on your body.
Sewing the straps onto the back of the apron dress.
Before attaching the straps to the back, try the dress on with your tortoise brooches, to adjust the length needed for your straps. When you are satisfied, pin the straps in place on your back, and sew them with some waxed linen thread. I like to work my way around the strap and through the wool fabric to make them sturdy.
That’s it! We’re done with all the fitting and sewing, and owners of a splendid apron dress with a perfect fit! Did you like this post? Support me on Patreon to help me make more!
With this blog post, I am celebrating 10 years worth of blog posts on this blog. I had another blog before this, so I have been writing for a longer time, but when I moved here I decided to take with me the handcrafting posts, and the first one is dated to late October, 10 years ago.
So with this, I am sending a big THANK YOU to all of you who read and support the blog; by reading, sharing, liking, talking, supporting the blog on Patreon and doing business with me whenever we meet. It is thanks to you the blog still remains, without your support I would probably have lost the heart to continue writing here. Let’s hope we stay together for 10 more years to come!
This summer I visited the island Björkö again, where the viking city Birka flowered as a centre for trade and cultural influence during the Iron Age. Birka is such a magical place, and I can really see how people have chosen to live here for such a long time.
I wore my most recent viking outfit, I call it my Västerbotten Viking (which I explain in the blog post about the garments) and enjoyed wearing a comfortable and practical outfit as I strolled the pastures, enjoyed magical light and amazing sunsets.
One evening my friend Rand I enjoyed a nice view of the harbour when we got company from a friendly sheep and her lambs. Apparently, vikings give the best scratches, and handmade beads and bronze jewellery is great to nibble at. Yes, I now have lamb drool all over my things. Totally worth it.
We also enjoyed some adventuring; rowing out with this viking boat (…ship? Do you call it a boat or a ship? I know nothing about boat-things) which was fun, sweaty and a great experience.
In the viking harbour, several reconstructed boats were available for admiration and occasional trips around the island. Here another group of vikings set sail out into the evening sun. In Sweden, there are several viking groups specialising in maintaining and using these ships, and we met lots of friendly and knowledgeable persons that gladly shared their knowledge with us.
One evening we had a great feast in the village, with skilful cooks preparing a meal and festive-dressed vikings enjoying it. After a long time with pandemic restrictions, it felt almost unreal to meet so many other people at the same time and eat by the same table. But alas, some work was required to take nice photos without the hand sanitisers visible…
Pretty vikings with pretty flowers and glass replicas.
And even more pretty vikings up at the hill, enjoying a guided tour ending by the sunset. This year we got a guided tour by Max, who kindly shared all his knowledge and told us about strange finds from around the site.
Viking age clothing; linen sark, wool apron dress, wool shawl and a veil. From my brooches, my knife and needle case is hanging by chains.
Birka is one of my latest infatuations and I long to go back there. This is really one of the most amazing things with my work and hobby; getting to visit and live at these historical and lovely sites. It is also really hard, because I now harbour a deep love and longing to visit places all over Sweden such as Visby and Birka, but also Tällberg where the larping area is, as well as southernmost Sweden for Double Wars, and Hamar in Norway to mention a few… How will I have time for it all?
Do you also have a magical place that you keep in your heart?
This post is a collab with Korps and contains advertisement for plantdyes and fabrics
I wanted to put down what I have learned about coloured garments and fabrics from the Viking age, so you may use it as a guide when deciding on the colours for your viking outfit.
Colour pigments available during the Viking age according to Ewing in “Viking Clothing”: blue (woad), lichen (purple), red (madder) and yellow (not identified) but also…
Blue could range from soft, muted grey-blue, watered blues, to saturated deep blue tones. The same goes for other colours; white wool, lots of dye and a skilled dyer will get you deeper and more even colours than mixed wools, and so on. The range of red is very wide; orange hues, muted brown-red tones, to saturated reds and cold red such as wine red. Lichen purple range from violet and almost lavender tones to purple hues with red and pink tones. Yellow dyes can be made with a great number of different plants all the way from a beige soft tone to brilliant yellows, or light green tones.
Walnut shells found in Hedeby and Oseberg gives you rich reddish browns, or warm browns.
Natural colours from the sheep’s wool ranged from white to muddled white tones, browns and dark browns. Black fabric would not have been as black as the fashionable 16th c fabrics, but more brown-black from the sheep’s natural colour.
The shawl and silk cap are dyed with natural colours (woad), while the dress and apron dress are dyed with modern dyes.
By sorting the wool into different qualities and colours you can make fabric that is white and therefore gives a very brilliant colour when dyed, but also mottled fabrics, or striped ones by weaving with threads of different colours. Some weaves from the Herjolfnes finds (medieval period) are made this way; by having one colour in the warp and one in the wheft.
Different ways of dyeing: the wool, the spun yarn or the finished fabric. Dyeing spun yarn and then weaving gives you a fabric that is a bit mottled, but was also used to make patterned fabrics. Dyeing the woven fabric make sure you get the exact amount you need for a garment in as even a tone as possible. Dying the wool before spinning is mentioned in later sources from the medieval period, and one madder-red example was found in viking settlements in York.
Many people probably wore undyed clothing in natural beige, browns, dark brown tones, woven in an even tone, mottled hues or patterned by the use of different natural shades during weaving.
Muted and soft colour tones, as well as mottled hues, were easier to make than deeply saturated colours and thus cheaper. Plants used for dyeing have been found growing in the same regions as the viking settlements, as well as being imported as raw materials, or already coloured fabrics.
Brilliant red and blue tones are being mentioned as high-status markers worn by royalty and their followers or being important gifts. Especially blue seems to have been a popular colour with lots of examples from finds and written texts. Old sagas and literature describe people donning coloured garments (a blue kirtle for example) before going out on important business, so if you are planning on attending an important meeting, a great feast or avenging a friend, you could always wear your best red cloak or blue kirtle for the occasion!
Linen was unbleached, or bleached. A linen shirt being “white as snow” was a status marker clearly standing out to those around the wearer. A finer weave and brighter white were seen as superior and would give higher prices.
(There are examples of dyed linen fabrics in red and blue colours, but they are uncommon so I will not go into details here.)
Shades based on cochineal
What should you look for when buying fabric?
Vibrant and saturated: blue and red were popular but expensive, if you would like to create a high-status viking these are good choices. Combine these with high-status jewelry, good quality shoes and white linen for undergarments.
Muted, soft shades: if you want to create everyday garments, softer tones are better: soft blues, reds, yellows, dyed browns, but also all in-between hues that are hard to describe in text: rust-red, red-brown, yellow-greens, light purple-pink hues, warm tones between yellow-orange-brown-apricot. Combine with unbleached, half bleached or almost white linen underwear.
Uncoloured wools are a good choice for the everyday clothes of people living farther from cities and other trading areas. For underwear, unbleached or half bleached linen, or another layer of wool fabric will do nicely. (Finds from Norway and Gotland indicates that an all wool outfit were more usual there).
Sometimes it can be difficult to find good fabric choices, so here are some examples from Korps that I would recommend. Avoid the darkest reds/greens/blues/turquoise and go for the softer shades. The beige/natural coloured wool is a great example of an undyed fabric choice.
I always order fabric samples to be able to see and feel the fabrics for real before buying (you should do it too, they have lots of samples!) It also gives you the opportunity to match shades with each other for a great outfit. For more on that subject; check out this post.
Korps have plant dyes if you want to try plant dying yourself, along with a free booklet (in Swedish) with information and formulas. Look for fabrics that are sold for plant dying, or ask for those, to avoid already coloured or treated fabrics.
Remember: not all plant dyeing available today was used during the Viking age, some are imports from a later date, or was not effective enough without chemicals. If you want to learn more about plant dyes and colouring there’s much to read on the internet, even at Wikipedia.
I am Linda, and Handcrafted History is my one-woman business located outside Sundsvall, in the middle of Sweden. Follow me on my handcrafting and historical adventuring here on my blog!
My business offers You made-to-measure historical clothing, handmade by me with high quality materials, and designed together with you from historical sources.
During lectures and workshops from Iron age (Viking age) to Late medieval period I share my knowledge from more than 20 years of sewing and research, and help you create the outfit from your dreams.
You can also find historical hats here, or shop away from my historical tent during markets around Sweden, and abroad.
Here is information on How to order clothes, Book me for workshops or browse the free Tutorials on Sewing or Swedish Larping. Below, you find the blog that I’ve been writing for about 10 years. I share research projects as well as fun guides and inspiration for your handcrafting.
Please contact me by email at linda.handcraftedhistory @ gmail.com for invites to markets, ordering clothing, booking workshops or for collaborations regarding the blog.
This post is a collaboration with Korps and contain advertisement for fabrics from their webpage.
Are you longing for some historically-inspired life and camping? Now is a great time to get inspiration and ideas for the next event and plan what you would like your living place to look like!
Look at this lovely place, I am longing to be outside in a camp again! Imagine sitting in that corner while it is raining, having cookies and wine and chatting with friends.
I spent lots of time at the beginning of my reenactment adventure life pondering over what I would need and what I would like to bring to different events. I also collected lots of photos of things that looked practical or just pretty and wrote lists of things that would be good to have next time. Kitchen towel, water flask, bucket and extra wool blankets are things that piled on those lists, helped there by experience or inspiration from other reenactors.
Mmm, look at this cozy place! Wouldn’t you love to eat lunch here? I would put the bread in a basket, have extra napkins and plates for guests ready and decorate the table with some fruits.
My main inspiration to improve my camping life have come from SCA events, since these often are quite long and you’ll meet lots of others that have been in the hobby for a long time, thus having created pretty and comfortable living areas.
Far from everything in these photos is as historically close as possible; most tents are machine sewn, furniture is made with modern tools and practical solutions mostly won over historical ones, when it comes to food prepping and hygiene. With that said, here are lots of options for camping life, with amazing handcrafting and historical techniques and materials.
Capturing all the good ideas
The feeling of homeliness; look at these camps! The furniture, the kitchenware, pennants, lanterns… Even if everything is not based on historical finds from a specific period, the overall look is awesome. The ropes and tent walls actually add to the feeling of spaciousness, of having a living place outside in the woods. (I like the table cloth, thinking about making one to my kitchen)
My best practical ideas;
A good blanket! I put my heavy wool blanket on top of my bed to keep it dry and warm, use it as a picnic blanket, and a cloak during cold evenings. To get a really big, affordable wool blanket; buy a good quality wool fabric and make one yourself! This fabric is a good choice, super thick and sturdy!
Get the fire up from the ground! On many sites, fire safety dictates that the fire pit should be 30-50 cm above the ground. Plan for that by building a fire bowl with legs, and you have a convenient cooking place so you don’t have to crawl on the ground to cook.
The drink’s on the house! Naw, you don’t have to give out free beer, but it’s good to have water available. Bring jugs and bottles for the stylish table, as well as tanks/containers that fit larger quantities of water. If you don’t have historical options, use a plastic one and hide it in a cloth sack.
A fabric roof! Cheap, practical and good for both sunshade and rain. Make your own by sewing two pieces of fabric together (150*400 cm), and add some sturdy holes in them. To put up your new roof you also need some ropes and wooden poles with nails going through the holes. You can find good tent/canvas fabrics here. (You could also use these fabrics to sew your own tent on your regular sewing machine.)
Do you have any goals for your camp, or fun ideas you want to do? Here is my wish-list for improving our camp: (hopefully I will get around to these, and now when I have put them down here I think the probability will be even higher…)
A fireplace like this. Sooo practical! I wish someone would build me a square fire bowl. I would stack the wood neatly underneath, make coffee in the morning and feel like a queen while doing so!
Making the packing a bit less… plastic. It is convenient to store and transport lots of things in plastic bins, but they are Oh So Ugly. I am working on using wooden boxes instead, and cloth sacks.
Painted silk flags! It is so pretty, I want a whole bunch of them hanging by our camp, and then I will give everyone directions to our tent by telling them “just go to the big tent with all the pretty pennants”.
There’s a lot to say about this year, but at least I’ve been having plenty of time for sewing. Unfortunately, a bad shoulder gave me some pains, but with rest and a training program, I think we are mostly friends again!
I thought it would be fun to share some projects with you here, as an inspiration and a kind of journal to myself: I always forget what I have been sewing, and find myself longing to finish yet another personal “small project” but not understanding why I don’t make any progress…
72 garments finished during 2020; both for customers, friends and myself. I am not going to write about them all, and many have not been photographed yet. I also have a whole bunch of things not yet ready; commissions, old projects known as UFOs (unfinished objects) and some rather new ideas I have been working on.
It was time to make some new viking clothes and I managed this blue dress, the red apron dress and some matching items, like the handwoven and woad plant-dyed shawl. I am really pleased with how the outfit turned out, even if the outfit might not be sexy to the modern eye… I love experimenting with different historical cuts that could have been in use, trying out how they look and feel when I make and wear them.
Later I made this early 14th century outfit as I finally, after a long period of 15th century-romance, have laid my eyes on new conquests. The 13th and 14th centuries are very nice, and I want to get to know them a little more. The next project will be something from the Maciejowski/Morgan Bible.
I have made several complete outfits for customers based on viking age and medieval clothing, and this was the year when I only met GOOD CUSTOMERS! I kid you not! Everyone has been polite, fun to work with and sent their payments. For those of you working regularly in customer service; you know my feeling here! How did I get to be so lucky? And, will this continue during 2021?
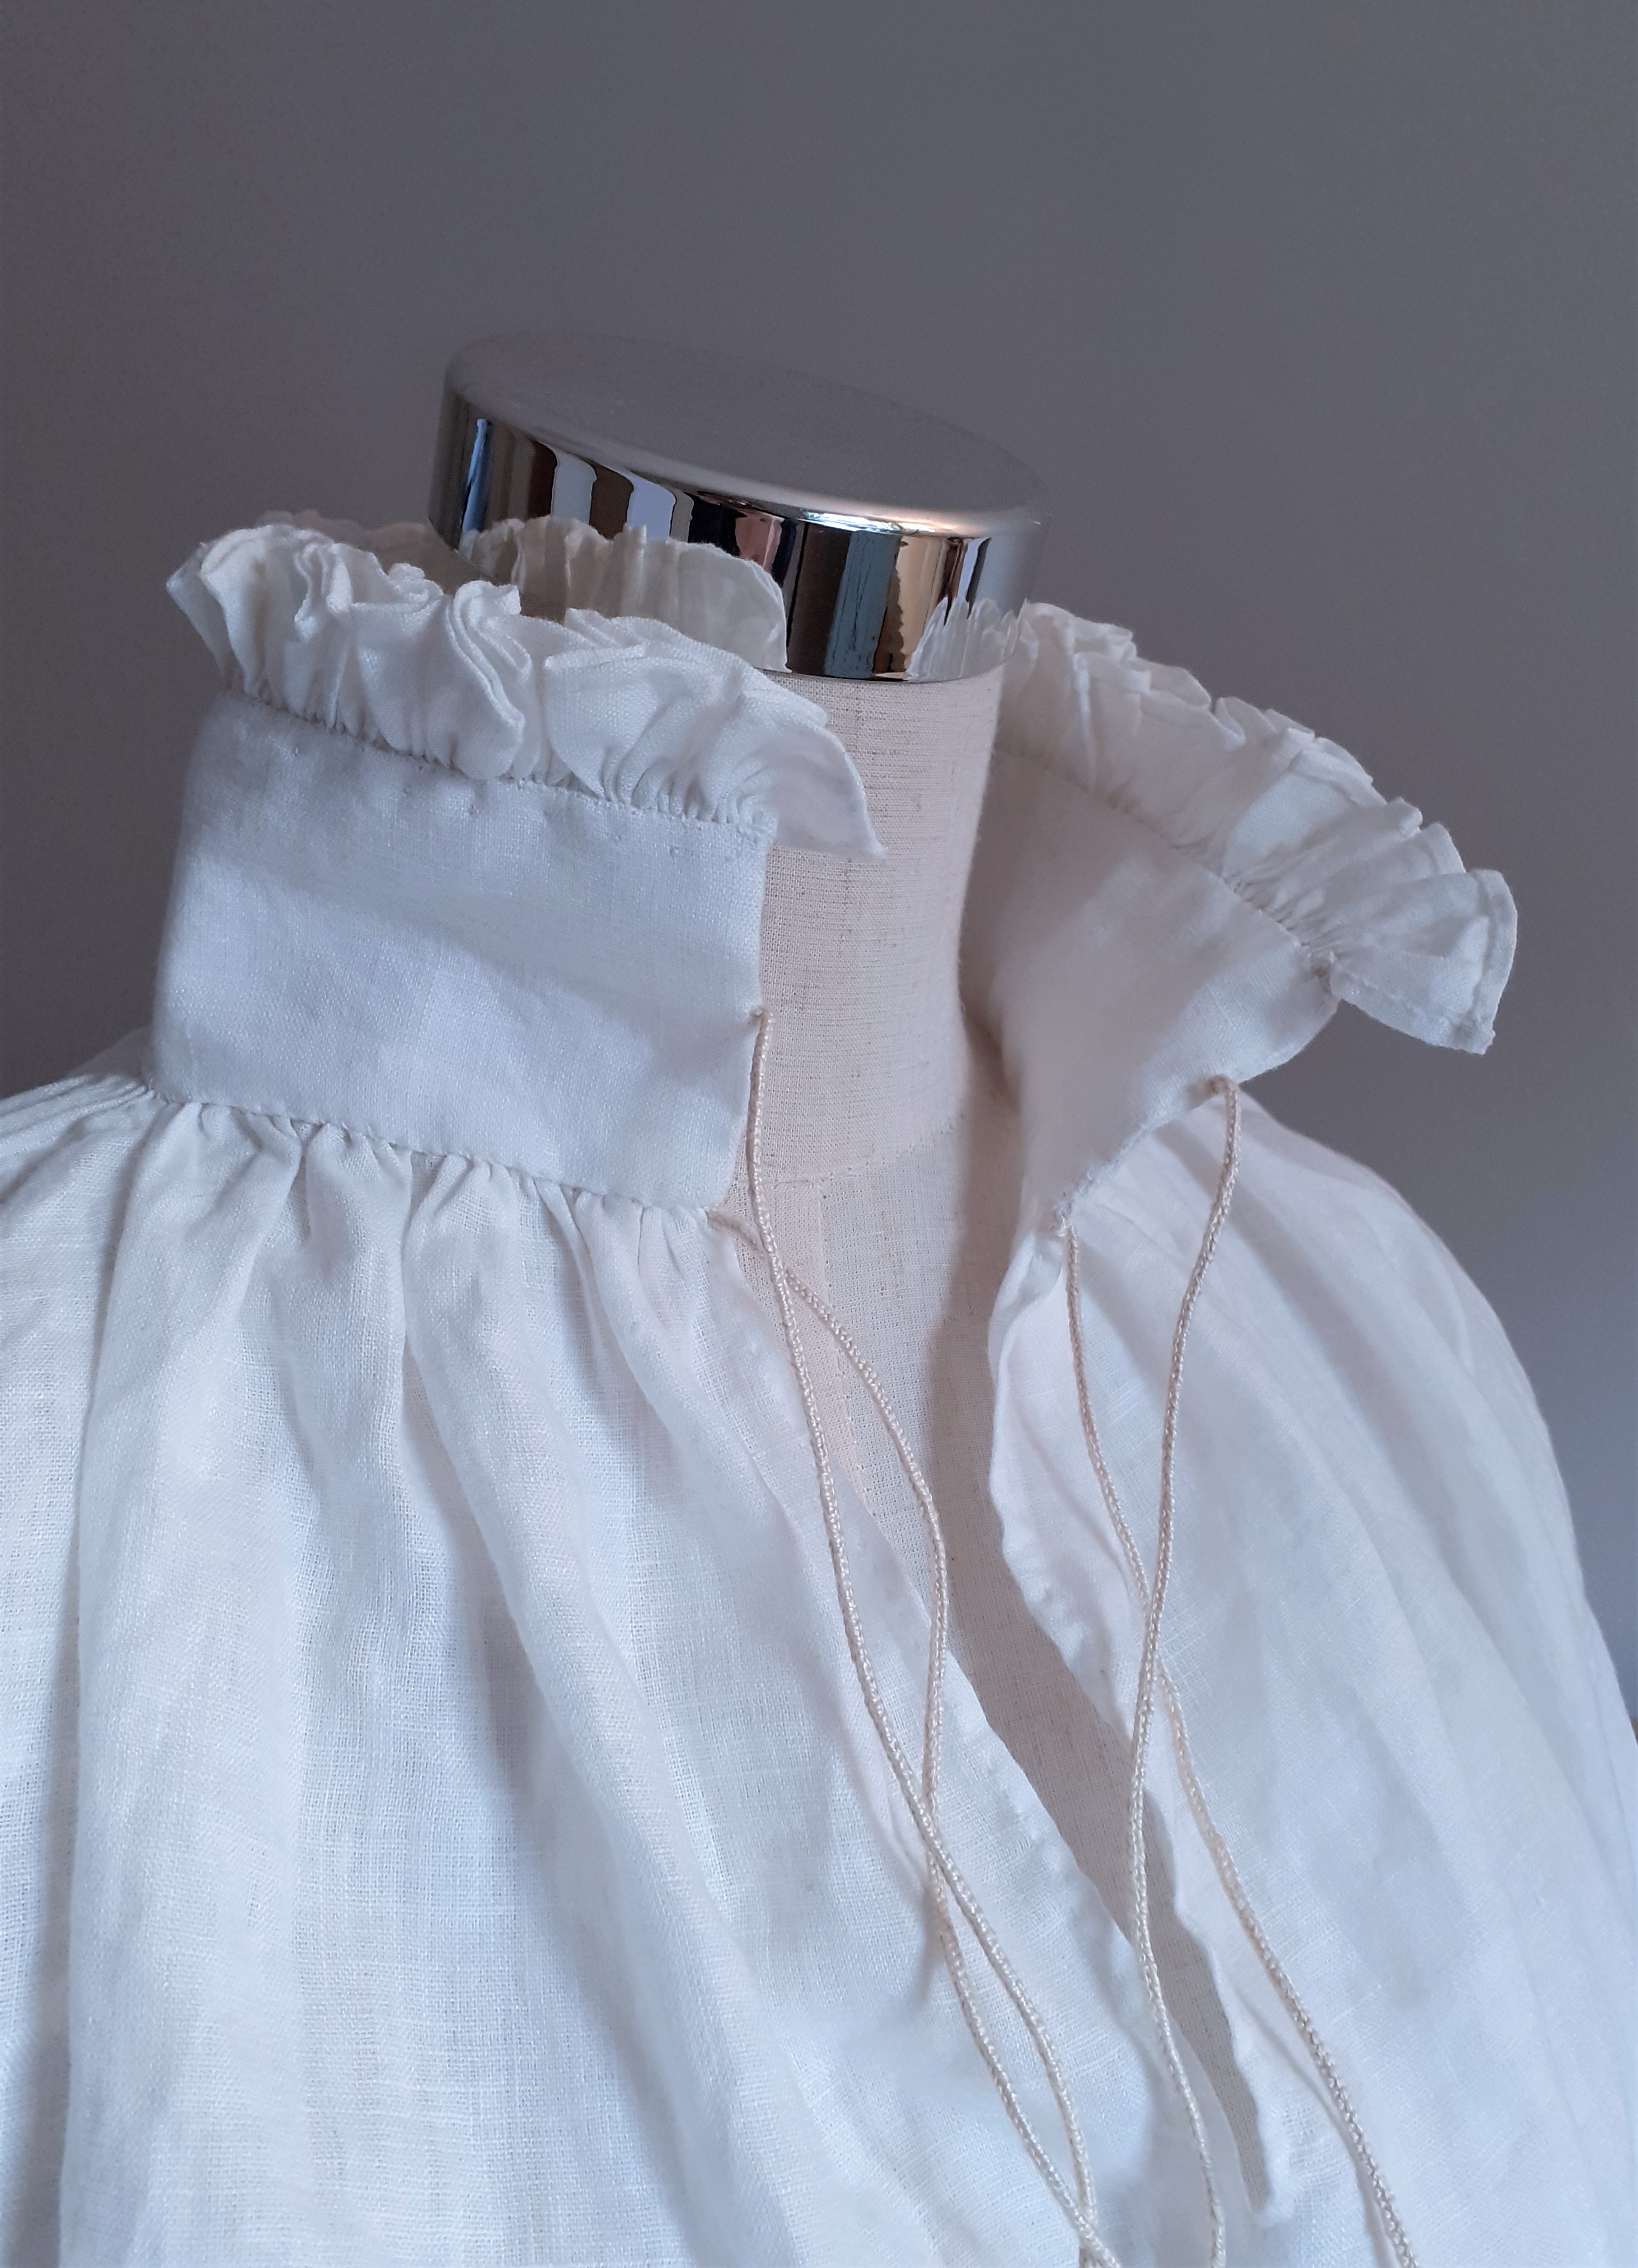
A hand-sewn 16th century shirt inspired by the Sture shirt (without decorations and embroidery). This shirt took over 40 hours to make, more than most dresses… Is it pretty? Yes. Was it worth it? Give me another year before I answer…
I have also worked on 18th century clothing, learning more about the period and the methods in use. There’s a couple of skirts, a jacket in wool and one in printed cotton, as well as a small linen cap. I am looking forward to going to new kinds of events and trying out the kit to see if it will work.
I made a new short-sleeved kirtle with a waist seam, similar to the blue Weyden-inspired dress from years ago. This dress is rather loose (I might need to take it in a bit in the side seams) and it’s made with a curved front seam. It is going to be a great working kirtle! The long-sleeved green 15th c dress also got sold, they mysteriously shrank in the wardrobe during last winter)
Apart from sewing I also dived into some video making, filmed lectures for the digital Medieval Week as well as setting up a new Youtube channel, and working with content for my Patreon page. Video editing and voice-overs still make me sweat, but my plan is to continue to improve in these new areas, creating more and better content for you readers. Patreon makes this possible since I get support to work with my content, and my hope for 2021 is that my page will continue to grow, inspire and teach handcrafting ideas to everyone interested!
It feels like it is early yet to plan for this year, but of course, I am hoping for a market season of some kind, and I have so much new content for sewing workshops and material for a new viking lecture as well. As for the blog, there is a long list with tutorials to make, as much as I have time for. All concluded, it really feels like 2021 will be a Great Year!