I have a new digital workshop/masterclass; how to learn tablet weaving! This masterclass is created after several of my followers and friends told me they would love to attend my weaving workshops, but the sites/schedule didn’t add up. So I remade my popular workshop that I have run for 10 years, and made it digital! I am very happy with it, and I hope you will enjoy it too!
from a video clip
In the online masterclass, you will learn everything you need to start weaving: how to set up your warp, weave, solve problems and design simple patterns. The Masterclass is online; log in and follow the instructions at your pace with video clips for every step. Revisit them as many times as you need, and learn more theory in the included PDF booklet. Ask questions in the community and share your experiences with others.
How does it work?
Purchase the masterclass either by email or on Etsy. You will receive a password to the login page here on my website where you will find 25 instructional video clips and the 15-page booklet. Follow the instructions and work your way through the videos one by one, at your own pace. You will have access to the Masterclass for the rest of the year!
Starting kit: I offer a starting kit if you don’t yet have all the tools that you need!
If you don’t order the starting kit you need the following: 8 tablets, a shuttle, and a tablet lock. I use wool yarn 20/2, 40 meters of each colour.
Other tools: scissors, pen, measuring tape, sturdy ribbon.
Online Masterclass: Masterclass pdf booklet. Access to the masterclass page with video clips + bonus clips. Access to my online community, chat with others and get feedback from me.
Online masterclass + starting kit: Masterclass pdf booklet. Access to the masterclass page with video clips + bonus clips. Access to my online community, chat with others and get feedback from me. +All tools you need to start weaving: 8 Paper tablets, tablet lock/pin, shuttle and weaving fastener. Wool yarn for your first project + more weaving. 400 meters of each colour, a total of 800 meters. Pick your 2 favourite colours or get a surprise mix (write a comment). Additional 12 tablets for future projects (20 in total). The starting kit will be shipped to your address.
There are two cool finds of sewn mittens available at the National Museum of Iceland’s webpage and you can see them here and here. They are both sewn in wool cloth and constructed with a separate piece making the thumb. I adore the Garðar Mitten and decided to make a pair for myself.
My first thought was to make them as a type of over-mitten to be worn over my regular needle-bound ones, but then I got sidetracked while making the pattern and made the grey ones the exact size for my hands. So I made another pair in red, for really cold days.
The outside of the mitten is larger than the inside, meaning you will shape the outer side around the inner, creating a gathered effect that is both pretty and practical.
The tumb is inserted in a round hole in the hand, making it both fun to do and comfortable to wear.
Tips for working with the pattern:
Add seam allowance to the mittens, 1-1,5 cm. Remember to sew with the correct seam allowance, small garments really differ in size if you are lazy with the seam allowance.
The tumb seam can be made in different ways; by using a backstitch and sewing the pieces right side together, or:
If you find it difficult to make the thumb insertion seam, try treating it like an “inserted gore” from my tutorial, and press the seam allowance on the inside piece, before sewing it to the thumb piece. (I will show you how to do it below, on the red mitten).
Or go inspired and fasten the thumb piece from the outside as I did with the grey mittens, adding a decorative seam to protect the fabric edge.
Step by step instructions
Place the paper pattern pieces on the fabric with some space in between for seam allowance, and pin the paper in place.
Trace around with a fabric marker, 1 cm outside the pattern. Use a ruler/measuring stick to guide you.
In small projects, some extra seam allowance can make a big difference. To help yourself making the garment the right size, you can trace around the pattern pieces with a basting thread.
It is fast, and you will know exactly were to place your seam. Here the basting line is blue, and I moved the pattern piece for it to show better on the photo.
Cut out all your pieces (remember to check that you have a left and right mitten before doing this).
Tip: it is always easier to cut a sharp line if you have a sharp scissor, and cutting the fabric with the scissor resting on a table.
Pieces ready for basting and trying on!
Start with basting the tumb together at the top, down to the start of the semicircle shape.
Use your blue basting lines, pair them together and pin the tumb in place on the inside piece. Work from the right side of the mitten, the blue lines should line up on top of each other.
Variations: If you want to sew your mitten according to the seam in the original, use a backstitch and attach the pieces right side to right side. If you want to use the “attached gore method”, scroll down to the red mitten photos.
Bast the tumb in place, with the raw edge of the inside piece visible.
Baste the inside seam of the wrist, and continue up basting the tumb to the outside piece.
Before basting the rest of the mitten together, put in a gathering seam around the top piece to to gather it to match the inside. If you have already basted the seam allowance to guide you, you may use this thread and pull it gently to gather the top of the outside fabric together.
Gather the fabric so it fits to the inside piece, and distribute the folds evenly. Sew a basting seam holding them together.
Baste around the top and continue down to the gore. Put this in place, baste both sides, and then you are ready to try the mitten on!
Looks nice! Remember to try your mitten on with the right side out.
I chose a linen thread 35/2 and backstitches, to make the seam sturdy. I follow along the basting threads, and rip these out as I go along (or afterwards if you prefer). Place the seam 1 mm inside the basting seam instead of on top of it, to avoid sewing the basting seam to the mitten.
The tumb is secured with whip stitches, this is on the inside while felling the seam. You can see some red thread which is the decoration from below. I felled the seams to one side after sewing them, to make the mitten more comfortable and the seams more resistant to water.
To secure the raw edge of the inside piece where the thumb is, I chose to make a decorative stitching with wool thread, sewing on the right side. I used a blanket stitch for the edge, and then an embroidery stitch for added decor. Instead of doing this, you can whipstitch the tumb in place on the right side.
Decorating mittens are fun, but don’t show in the historical sources I used.
Soon finished, now I need to finish the embroidery and hem the bottom edge!
The historical red mittens
I made another pair of mittens to be used for medieval reenactment, big enough to be able to insert a smaller mitten or lining for added warmth. These are made without embroidery, and instead I made the thumb hole seam like this:
Cut the pieces out as above, and then fold the seam allowance in, but only in the tumb hole. Press with an iron to make it lie flat.
Work from the right side and pin the tumb in place. If the tumb seem a bit large for the hole, don’t mind that but just follow the seam allowance. This will create more space for movement for the tumb.
Whip stitch the tumb in place, from the right side. (This is what I referred to when I wrote that you can use the “inserted gore” method.)
Another round of whipstitching on the inside to secure the seam allowance. Make the tumb on the other mitten the same way, and finish the rest of the mittens as above.
Felling seams inside small garments: It is often easier to finish one seam before making the next one. Sew one seam, press and cut it, then sew it down with whipstitching. After that, take the next seam etc.
If you want to sew the mitten together first, I find it easier to work with my hand inside the mitten while felling seams. This way you can adjust the seam and seam allowance while sewing, and keep the fabric stretched out. You are also sure not to accidentally sew throught the next layer of mitten.
Stretching out the fabric and seam with my hand, while sewing with the other.
If you want to make a pair yourself, the pdf including a pattern, can be found on my Etsy and Patreon. If you have 2023 years Advent Calendar, you will find the pattern in there. If you have larger or smaller hands than size 9-11, you might need to make a mock up/test the mittens in cheap fabric to adjust the sizing (mainly the width and lenght of the front and back pieces).
Heh, see what I did there? Pattens- step to step, as you can step with them and this is also a guide and…
Yeah. Sorry, let us step to the actual content.
15th-century style pattens
I had been trying to get myself a really good pair of wooden pattens for a couple of years, only to discover that they didn’t fit very well. So I got my hands on a new pair of wooden soles, and this time I made the straps and fitted them myself. It is a little more work than ready-made, but Wow did this make all the difference!
This project was started over 3 years ago and along the way, I lost photos from the handcrafting process. This means that this tutorial is far from the best one I have made, but I decided to finish and publish it since some friends were asking for tips for making pattens.
If you want to know more about historical pattens, check out this blog post.
Good things to make medieval pattens.
Tools for this project:
hammer
scissor
pen
knife
ruler
awl
needle
leather clips
Materials you need:
wooden soles
thick leather 2,5-4 mm
thin leather 1-2 mm
waxed linen thread
nails
tape and regular paper
two buckles around 1-1,4 cm width (optional)
Wooden soles:
You need a pair of wooden soles first, and your medieval shoes. Measure your foot with your shoes on, so you know how long the wooden sole needs to be. I didn’t make my wooden soles so I won’t walk you through (hehe, walk…) how to do it, but if you have patience and a few woodworking tools just draw your foot on a piece of wood, and carve out something that looks like the historical pattens or my sole above. The joint is not a must but I find it really comfortable.
When you have a pair of wooden soles, it is time to connect the pieces with a joint of sturdy leather and nails.
Use a paper draft to fit in the joint, mark it and copy to leather. The leather should be as thick as the cut-out for the joint, between 2,5-4 mm.
Hammer the leather joint in place with nails, and then start working on your strap. Paper and some tape is a good way to test out the pattern and fit.
My goal was to make a strap that both looked plausible and was comfortable. I started by attaching my foot to the wooden sole with tape and then tried to move around. This was not the right fit.
But it was a good starting point to achieve something like this! I cut away the tape that was uncomfortable or in the way, until I got a fit that was working. Last, I taped the buckle in place to check the fit. Try to position the tape quite high on your foot, not over your toes.
When you are happy, cut off the tape and convert them to two pattern pieces, one for each side of the foot.
Next step is to cut them out in thin leather, 2 of each.
Thin leather needs some kind of reinforcement to last, so cut out strips of leather to sew on the edges.
Use an awl to make holes in the leather before stitching. Note that the strip should reach all the way up, this was just a test piece I made before doing my finished set.
Use a cobbler stitch and waxed linen thread to sew the leather strip in place.
Turn the piece to the inside, fold over the leather strip and sew it in place with a whip stitch. Don’t work through the leather piece, just enough to fasten the strip. To shape the edge and make it stay in place, you can hammer it down gently.
One piece is almost done, one to go. This was my finished pair, note how the strip goes all the way up and it is really narrow at the top to accommodate for the buckle.
After I made the reinforced pieces, I attached the buckle by sewing it in place, and made a hole in the other side for closing.
Trying out the fit of the finished pieces, by using a stapler to fasten the leather to the sole. You can also use some more tape. Love tape.
Hammering the leather in place with small nails. These are modern nails for roofing paper, but you can use any flat, shorter nails. It would be pretty to use historical nails, but I did not find any narrow enough.
That’s it! Give them some leather oil and then you are ready to go out adventuring.
Trying them outside in some water and grit.
There are lots of sources without buckles on your pattens. It is possible to just make a plain or decorated leather piece around the foot. The best part with buckles is not that they are pretty, but that you may adjust the fit to the shoes (or hose without shoes) that you are wearing.
Beeswax cloths are a really simple way of storing food or a picnic snack during your historical event, and they are also nice to cover bowls and jugs!
After this year’s Double Wars event when our encampments got overrun with aphids/lice, I really had it and promised myself to make some protective cloths for next year. And here they are! It was so easy and practical so we use them as everyday items at home, too.
To make some for yourself, start with measuring the sizes you want to have; I made two for covering jugs, a couple for bowls and some bigger ones for wrapping cheese in. I prewashed the linen fabric, cut it in squares, and hemmed the edges with linenthread and a whipstitch before waxing. (To be fair, I used scraps from earlier projects.)
You can wax cloths in different ways; by melting beeswax in a pot and scooping it over the cloths, or by distributing small pieces of wax on the cloth and then melting it in your oven or with an iron. The important thing to know is that beeswax tends to get sticky and may be hard to remove from your favourite pot, oven tray etc. Use baking sheets to protect your kitchen as well as your oven and iron. An apron might be good too, it is hard to get beeswax stains off your clothes.
I chose to melt the wax in a pot that I have already used for beeswax, this was quicker and allowed me to just dump in a big block of beeswax at once. I melted the vax on low heat and scooped it from the pot over the cloths with a spoon.
To save time, I stacked all the cloths on top of each other, poured over a generous amount of wax, and then covered everything with a baking sheet and used an iron on middle heat to help distribute the wax over and through all the cloths.
As soon as the wax is melted into the fabric your first layer is ready- remove it, put it on a baking sheet to cool, and continue down through your stack. You can do this task on your oven too, just make sure you protect surfaces with baking sheets. The cloths gets darker with the wax on, and while they are hot they look shiny and smell nice!
Don’t use too much heat- you want a generous layer of wax to remain in your cloth rather than soak through. Too much heat or too much time in the oven/under the iron will not give you enough wax in your cloth. If this happens, the waxed cloth will look uneven, and won’t stay in shape after cooling down (try to fold it or make a shape with the cloth, it should stay in place and stick to itself). If this happens, just repeat the procedure; pour on more wax and melt it down.
If you have to low temperature, the wax will not melt in properly but lay in cakes/lumps on your fabric. Try to add a little more heat! Beeswax is nice to work with because nothing gets destroyed if you don’t get it perfect the first time, it will just take a bit longer time.
I calculated 2-3 tablespoons of melted beeswax for a 40*40 cm cloth, but this depends on the thickness/weight of the cloth. In retrospect, I would have liked my fabric to be a bit thicker (around 180-250 grams/meter) than this 120 grams/meter linen. It was so fine it had problems holding enough beeswax, but turned out ok for this round of cloths. Next time, I will make them from other scraps.
If you want to make lids for jars, jugs etc. from leather you could also use this process much the same way. Make sure your leather piece is vegetable-tanned and undyed, and get some extra wax since it often takes more to wax a leather piece than a fabric piece of the same size.
Are you longing for that perfect iron age (viking) look of square awesomeness, yet still wanting to show off some womanly curves? Fear no more, this is how you make your apron dress fit really nicely! (Yes, we are going to be more serious real soon)
This apron dress is the same style as you can find in this tutorial, but back then I never guided you through the fitting, straps or stitching. Kind readers have asked for more details, so now this part 2 is here for you.
Ok, so let’s start with the dress already cut out and basted together (white machine thread). It looks something like this, hanging a bit boring…
Step one- try it on!
I pinned two pieces of ribbon onto the dress to be able to try it on easily. These will later be my guides for making the sewn linen straps.
In the back, I put the straps closer to the middle. I find them more comfortable and less likely to slip off my shoulders.
Now it is time to do some shaping! I like to wear my apron dresses higher up on my body, which means I get fabric bulk under my arms. To avoid that, I draft a curved line under my armpit and then cut away the excess fabric. You don’t have to make a full “arm hole”, just add some space for your arm.
Drafting the curved line in the armpit with a fabric marker.
The next step is to pin away fabric in the seam above the bust. Here the seam stood out a bit, so in order to follow the shape of my body, I pinned away a little fabric. As you can see in the photo it is not much, only to add a soft shape.
Marking the fitting with pins will allow you to feel the new fit.
Next are the side seams in the front. I pin away fabric under my bust, turn at my natural waist and continue out in a soft line to the basting line again. The goal is not to achieve a super snug fit, just to highlight that you have a body underneath.
Pinning the shape loosely.
Continue with the back seams and pin away fabric to add some shape to your waist here too. I hold my hand by my natural waist, and as you can see I did not aim to make the apron dress tight. Just removing a couple of cms to add shape.
My goal here was to be able to wear the apron dress with a woollen kirtle underneath, so I needed the fit to be loose. If you want a tighter fit you can try pinning away more fabric- just remember to try it on with new basting seams afterwards to make sure you can get it on and off. Apron dresses never have lacing or such.
Pinning the back seams by the waist.
Now it is time to check out the new fit! Mark the position of your pins on both sides of the seams, remove them to be able to take off your dress easily, and then bast along the drafted lines.
Basting can be done on a machine or by hand.
Here you can already see the added shape of the bust and waist, even without the seams properly finished. When you are satisfied with the fit, remove the old basting from places with double basting. This is needed to finish the dress by hand with a historical stitch.
Trying on the dress again to check the fit.
Press all seams with the basting still in place. (This step is important if you want to try out the seam below, but if you use a sewing machine for your dress you should first sew all seams on the machine, remove the basting thread and then press.)
Pressing the seam allowance to either side will make the sewing easier.
This is what the new shaping looks like after the pressing.
Sewing with wool thread.
Turn the apron dress so the right side is out (yes, we are sewing the dress from the outside) and start by the hem with a small whip stitch. Work your way up on the outside, fasten the thread on the inside of the garment as needed, and repeat with all four seams.
This is a sketch of how the seam looks, side to side with the actual seam.
The key to making this seam look neat is to make small stitches mainly running on the inside of the garment. I like to start from the bottom up, so I can try out the best thread tension and width between the stitches where it does not show so much. The pressing in the step before also helps a lot, as well as the basting on the inside, keeping the garment together while I sit comfortably on the sofa, sewing.
Close up on the seam. If you sew with wool thread, choose a thread with a high twist and 2-3 ply. Take shorter threads and a needle somewhat thicker than the thread. This will make the thread last longer when you work.
After the seams are closed on the outside, I remove the basting thread on the inside. Then I finish of the seams by cutting down the seam allowance on one side, and pressing the other seam allowance over this side. This way I just have to make one more whip-stitched seam for each long seam, instead of two.
Every seam is sewn two times with whip-stitching. This makes the seams sturdy and flexible!
Finish the dress with a double folded hem and whipstitches. Press all seams when you have finished.
When the dress is done, it is time to make some straps! Use the ribbons from earlier as your mockups /guides to decide how long your straps should be, but remember that the tortoise brooches will take some space too. Add seam allowance (3 cm) and extra for your loops. If you are unsure, make the strap 10 cm longer and then cut away the end you don’t need when you have made the loop and finished off everything else.
Linen fabric going to be apron dress straps.
The measure for my dress straps was approx 30 cm long and 4 cm wide. I made 2, and then 2 really short ones to make the loops attached to the apron dress above the front seams. Then I pressed the straps in the middle, folded them, and then folded in the edges. Very smooth!
Use waxed linen thread for sewing in linen fabric. Linen straps on wool dresses can be found in grave finds from the period.
Whipstitch the folded straps along the edge. When you have finished, press them again but with the seam in the middle. This way the stitching will be protected in the middle and the straps will be looking really nice and even.
Nice and even, I love pressing seams!
Making loops for the tortoise brooches.
To make the loop in the edge of the strap, finish the seam along the line and then fold the edge back and fasten it with some stitches. I like these loops, they keep the brooch in place and look neat. The small fabric pieces for the lower loops get treated in the same way. Double fold, press, whipstitch along the line and fold to a loop.
The loops are sewn to the inside of the upper hem, beside the front side seam.
Fasten the lower loops to the front, and remember to put them where you pinned your ribbons on in the beginning. The placement will help the shaping of the garment. If you wear a modern underwire bra, the placement of the loops is often towards the middle from the bra straps. Remember that your tortoise brooches should have a fairly even place to rest on your body.
Sewing the straps onto the back of the apron dress.
Before attaching the straps to the back, try the dress on with your tortoise brooches, to adjust the length needed for your straps. When you are satisfied, pin the straps in place on your back, and sew them with some waxed linen thread. I like to work my way around the strap and through the wool fabric to make them sturdy.
That’s it! We’re done with all the fitting and sewing, and owners of a splendid apron dress with a perfect fit! Did you like this post? Support me on Patreon to help me make more!
This is a fun garment since it is both practical and in my opinion, also cute. But it took me several years of studying medieval manuscripts and art before I got interested in this type of garment. It seems so modern? But once I noticed it, I found more examples in different places and even a contemporary pattern diagram in Drei Schnittbucher dated from the 16th century. Most sources I have saved originate in central Europe, mainly today’s Germany.
Research
The jacket or short coat can be seen in both late 15thc entury and 16th century artworks, but all examples I have seen are worn by working women, from farmers to ladies’ servants. One source in Drei Schnittbucher mentions a short jacket owned by a burgher class member, which indicates that it might have been a fashionable item and not only something worn for “survival”.
The jacket above is similar to the pattern diagram I found, though it has cuffs. The front closure is hidden but might be hooks and eyes, and the sleeves are S-sleeves put into a shaped armhole. The skirt part hangs in soft folds, probably a circle shape.
In the left corner, the lady wears a green jacket over a dress. She might be a maid or retainer of some kind, based on her dress and position in the picture. The jacket is fitted with a narrow sleeve and a fashionable neckline. The skirt part hangs in soft folds.
The blue jacket is fitted but the sleeve is a bit looser than the green one, and the neckline higher and rounded. I decided to base my jacket silhouette mainly on this picture (late 15th century).
Based on contemporary sources the jacket seems to be a practical garment to keep you warm while still allowing you to go on your daily chores (and keeping that fashionable silhouette!) I have found several sources from the middle of the 16th century onwards, often with the skirt part shortened like the jacket above. The black jacket has a short skirt, straight narrow sleeves and a collar of some kind. The collars seem to belong to the 16th century.
Differences between the 15th century and the 16th century styles:
Late 15th century jackets seen in art are all colourful, with straight sleeves narrow or loose, longer skirts (the lenght of the skirt and the length of the upper body seem to be similar) and with simple, rounded necklines.
16th century jackets transform from this softer style to a more shaped and fitted garment with details to accentuate the tailoring such as collars or sleeves starting farther down the shoulder.
This time I decided to make a jacket to be worn with my 15th century wardrobe. Some years ago, I tried out this pattern by making a black jacket to be worn with my 16th century working woman’s outfit, but I sold it and wanted to try some variations. The blue jacket above became my inspiration, and I used the pattern diagram from the 16th century source to draft the jacket. The side seam is adjusted towards the back on that pattern, but in retrospective I think that is a bit too modern for the late 15th century style, but I got curious to try it out.
Back with the side seams visible.
Drafting the pattern pieces
I decided on a straight S-sleeve to get good movement even when wearing dresses under the jacket, a longer skirt and a rounded neckline. The front closes with hooks and eyes. The original tailoring book states the lining needed for the jacket which is roughly half of the amount needed for the jacket. The fabric widths could be different since the pattern mention different amount of lining for different skirt lengths, or the skirt was not lined. I decided to put lining into the skirt too, to see how it would turn out as well as to make it more wind resistant.
The best way to create a skirt with even, soft folds, like the longer versions seen in the sources, is to use a circular cut on the skirt, rather than straight panels and gores. The contemporary pattern also suggests this style, so I went with that option.
The length of the skirt in 15th century sources seems to be around the same lenght as the torso, around 40-50 cm long perhaps. I decided to go with that. The tailoring pattern suggests a skirt lenght between 39 cm to 52 cm, which can be seen in the woodcut by Beham above.
To draft the correct size for the skirt pieces, measure around your waist and use that measure to calculate the inner circle diameter of the half moon, and draft the piece from there.
Example: Measurement around waist: 80 cm = circumference of the inner circle. That makes the diameter approx 26 cm, and the radius 13 cm. The length of the skirt = 40 cm. Mark 40 cm + 26 cm + 40 cm on a straight line = diameter on the skirt pattern piece (the straight side of the half moon). To draft the rest of the skirt, start with drafting the half-circle waist hole (measure from the middle of the line and draw a half-circle 13 cm from this point all around). Use this line to draw out the bigger half moon shape, by measuring 40 cm outwards all around the curve. Make 2 pieces for the skirt.
The upper body pieces are based on my toile/mock-up I already have (check out my Patreon for a video on how to make a mock-up yourself). To move the side seams I cut off a bit from the back piece and taped this side to side with the front piece instead. After that, I added seam allowance and some extra movement in the sides, shoulder and front to make the garment suited to wear over other clothing.
The sleeves are based on my existing S-sleeve pattern, cut in two. I added new seam allowance and made the sleeves a bit wider than my dress sleeves to get more movement.
Adjustments from the original pattern from the Leonfeldner tailor book (grey) to my jacket (dotted lines).
Differences between the pattern from Drei Schnittbucher and mine: The waist seam got rounded to create a soft fall and looser fit, and the shoulder seams were shortened to make the sleeve fit the anatomical arm, creating a softer look more suitable to the late 15th century style. I removed the collar piece on the back and decided to make the back piece as one, instead of having a seam in the middle back. Both options are represented in tailoring from late 15th century art sources, I just didn’t need the back seam to achieve a good fit. The last alteration I did was to piece the skirt parts to save on fabric. In the tailoring book, the sleeves are made in two pieces, probably to save on fabric, and I wanted to do the same to be able to cut them out from the scraps left over after cutting body and skirt pieces.
My jacket needed around 1,5 meters of fabric with 1,5 meters width for both outer fabric and lining, but I would recommend at least 2 meters of both if you have, if you are not smaller than I am!
Fabric: I decided on a medium thick wool twill for the jacket to keep me warm, with a soft muted madder tone. The lining is made in thin unbleached linen. I aimed to make the jacket a working garment and not too fancy, but neither coarse nor homemade.
Jacket worn open
Sewing order
When I have made all pieces (back, front *2, sleeves *2, skirt *2) I like to cut these out in a mock-up fabric (like an old sheet) bast them together and try the garment on over the dress, to ensure I have enough space for movement. Adjust if needed, and then I use the mock-up as my pattern and draft the pieces on the wool fabric and lining.
I like basting- here are some more benefits:
no pins will disappear or hurt you
no slippery fabric moving, giving you uneven seams
easy to try it on several times
easy to adjust
basting is so secure you can sit on the sofa with your project in your knee, without messing up the fit.
I prefer to sew one seam completely finished before the next, which is faster and more ergonomic than first assembling the garment, and then reaching all the seams for felling the seam allowances.
Sewing thread: unbleached linen 35/2 for most seams, paired with a sewing wool yarn for felling seams and create softer seam allowances. These are the materials I work with fastest. You can also use linen thread for the whole jacket, which would be a bit more historical as far as I have researched.
For me, the most important thing when hand-sewing is to make easy, fast seams without adding unnecessary strain to my fingers. The lining is put in at the same time as I sew the pieces together, in seams that need more sturdiness like shoulders and sides. In the skirt, the lining is fastened in the seam allowance when felling this down. The sleeves are made as 4 separate sleeves, and then the lining is put in. This minimizes the bulkiness in the sleeve seams.
Notes: linen thread if nothing else is stated. Sa= seam allowance.
This is my sewing order for hand-sewing the entire garment:
Start by joining the sleeve linings into whole sleeves with running stitches. Press the sa and whipstitch down to one side or leave them unfinished. Join the wool sleeves with back stitches. Fold down the sa, whipstitch down to one side and repeat with the back seam to get 2 complete wool sleeves.
Sewing the sleeve parts together.
Whipstitch the sa (photo shows the inside and outside of the sleeves.)
Sew the shoulder seams with backstitches, wool + lining at the same time. Press down sa to either side, whipstitch down. I leave the basting in while sewing, and place my seam 1 mm to the side to avoid sewing into the basting thread. This makes it easier to remove the basting thread once I am done.
Backstitching on shoulders 1mm inside the basting seam.
Backstitch the side seams together in the same way. I like to leave these open to adjust the fit if my weight changes, so I just whipstitch the sa but leave it loose from the main body. Then I put the sleeves in the armholes and sew them with backstitching. Cut down the sa and fell it towards the body with whipstitching.
Assembling the garment, with different ways to finish the seams shown.
I sewed the wool skirt parts together with back stitching and pressed the sa to either side. After that, I put the lining into the skirt pieces by folding the sa down to either side and whipstitched the lining in place.
Attach the skirt to the body with backstitches. Try on the jacket and mark out the hemlines; check the length of sleeves and skirt hem.
The skirt is finished by cutting down the lining a bit to avoid a bulky seam, and then the wool hem is double folded over the lining and whipstitched in place.
Trimming down the lining.
The front got a reinforcement strip in wool on the inside before the closure was added. I use running stitches and sew it front to front, then fold it over, press it to a good shape and whip stitch the loose part to the lining. A row of stitching along the edge makes it neat and durable (shown in the assembly photo).
The sleeve wool fabric is folded over the lining by the wrists and whip stitched in place. The neckline is also folded down twice and whipstitched. After that, I like to press it and then add a row of stitching around the opening to make it even neater!
Last, I added hooks and eyes to the front to be able to close the jacket.
This was a really fun project to do, and I have used the jacket a lot this season. It is easy to work in and doesn’t get as heavy as my coat does. Useful for medieval adventures!
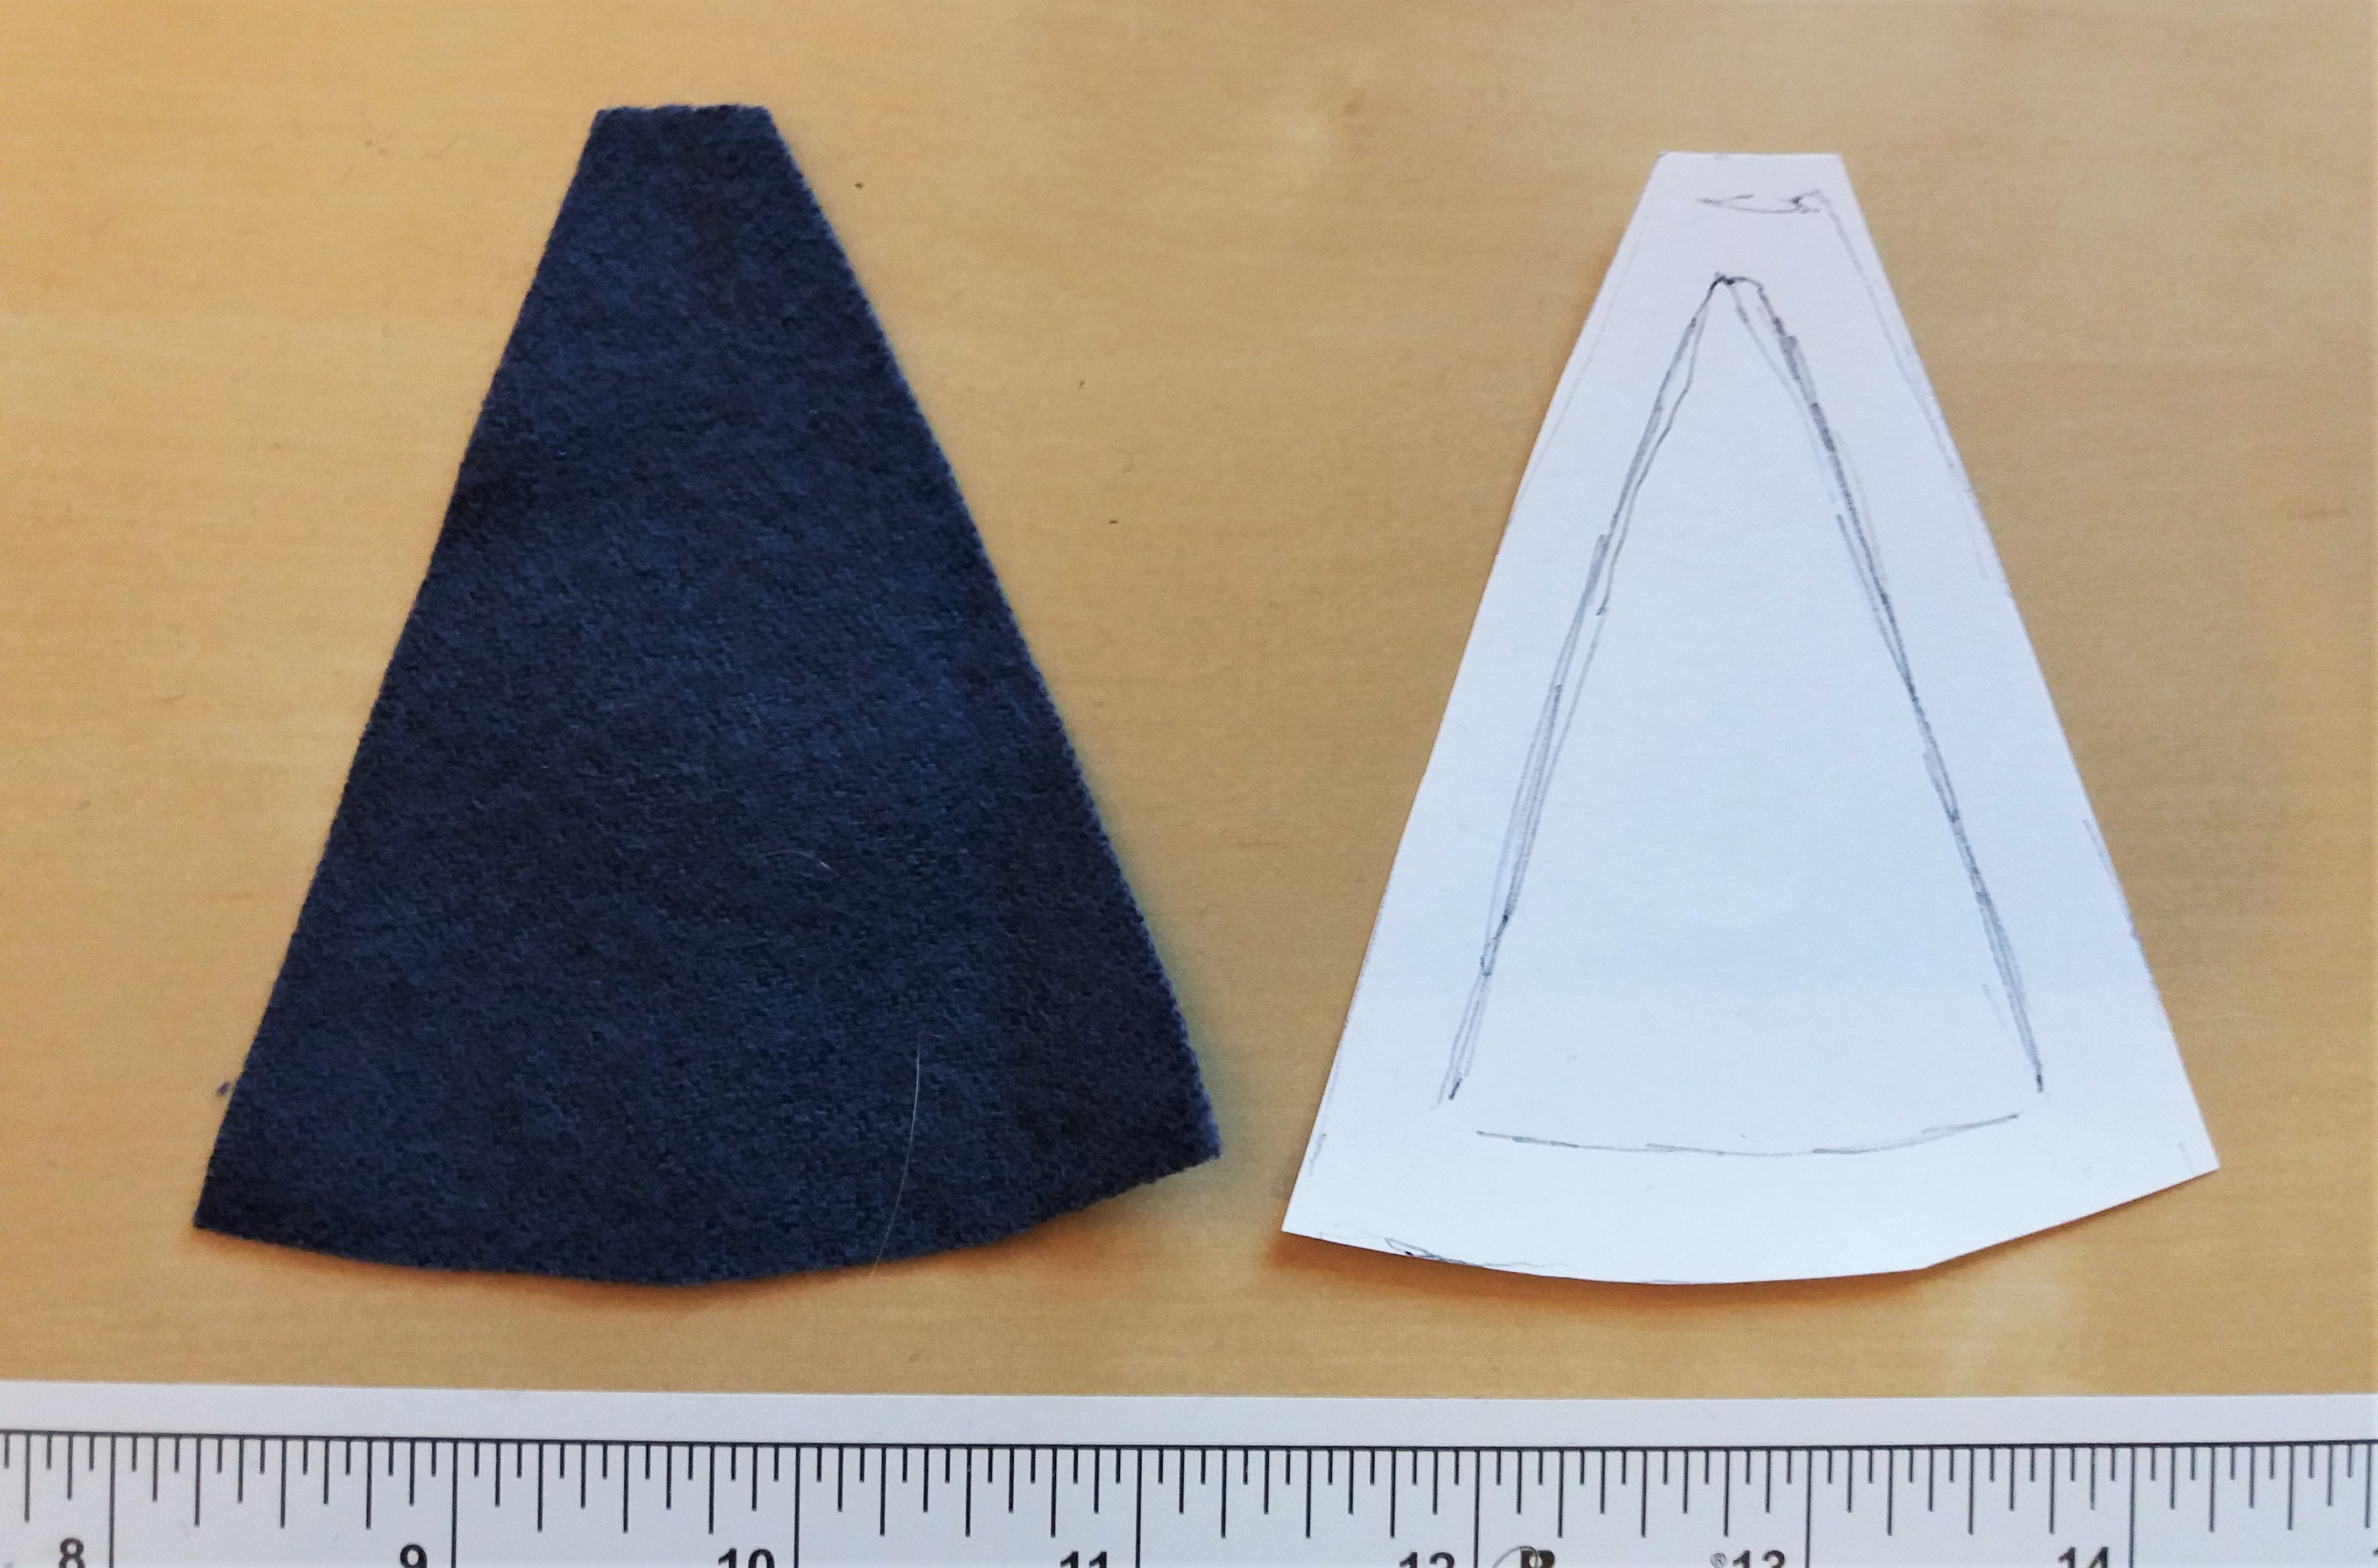
In this tutorial, a gore is a triangular-shaped piece of fabric sewn into the garment. A gusset is a square piece of fabric, sewn into the armpit to add movability and space, used on shifts and shirts to take a few examples.
How do they work?
A gore inserted in your sleeve will add space and freedom of movement. Depending on the placement of the gore in the sleeve, it will add space to different effects, like moving your arm up and forward or adjusting your sleeve to larger muscles in your arms.
Why do you want to use gores in sleeves?
Gores might have several reasons to be where they are:
To save fabric while cutting out your fabric pieces.
To add movability by cutting the gore on another grain than the rest of the sleeve.
To mend a broken sleeve or seam.
To enlargen a sleeve being to narrow.
Gores might be inserted while making your garment, but also afterwards if you feel a need to adjust the fit. This guide shows you how to put in a gore in a cut slit at the front of the sleeve, but you can also add gores to the seam on an S-shaped sleeve. The principle is the same; fitting the sleeve into the armhole and then adding as much gore as you need to make the sleeve ”whole”.
An example of how this method was used during the medieval period is the Moy Bog dress, which has a similar gore. Maybe an adjustment to add space to a new wearer that had more mass over arms and shoulders?
The easiest way to make well-fitted sleeve gores is to cut out a piece of fabric, pin/baste it on the inside of the assembled garment, and sew it in place. Here is a step to step guide on how I do:
14th-15th c short sleeved dress
This dress has a tight fit, and I decided on a small gore in the sleeve front to add a bit more flexibility and movement.
I started with inserting the sleeve in the armhole and then cutting up a slit in the front to make the sleeve fit all around (this means you will have to make a sleeve that has a slightly smaller measure than the armhole if you make a new dress.) When I am satisfied with the inserted sleeve and slit, I press the seam allowance to the inside and start with the pattern for the gore.
Put a piece of paper on the inside of the dress, and smooth the fabric on top of this. Draw a paper draft for the gore by tracing the ”hole” on your paper. Very easy!
Add seam allowance around the draft, and cut out.
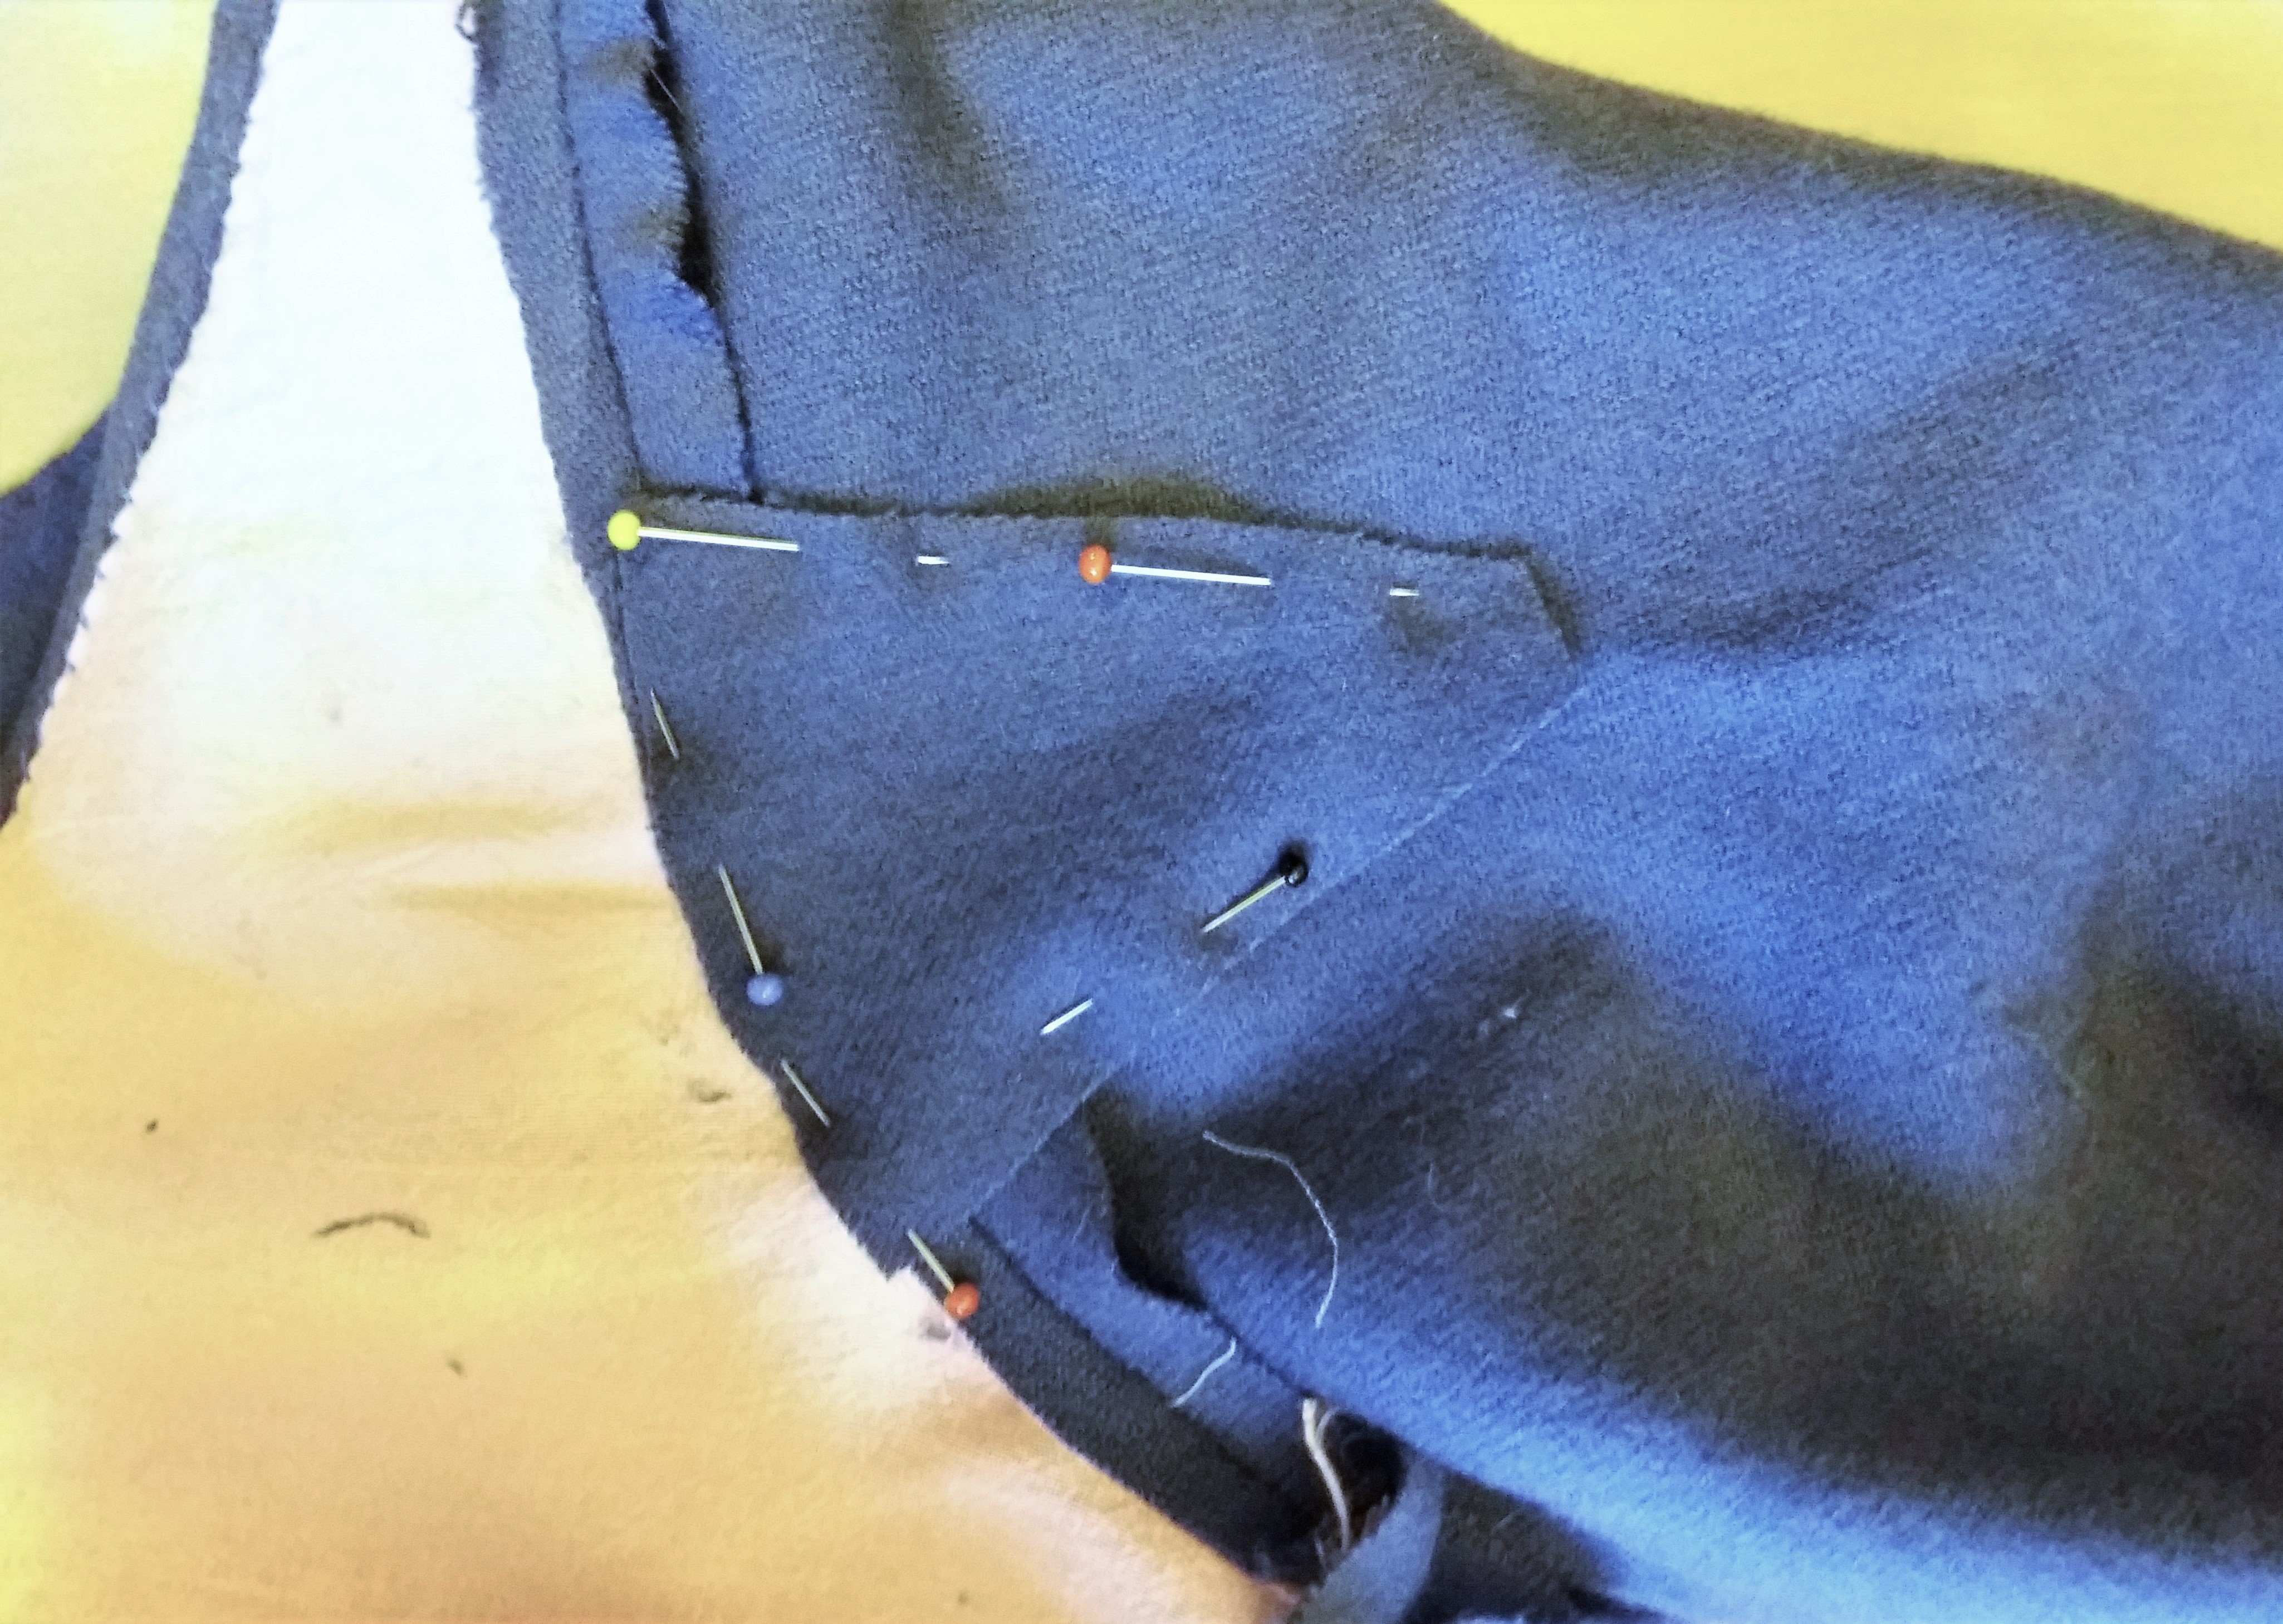
Put the paper pattern onto fabric and draw + cut two gores, one for each sleeve. Remember to mirror the pattern and mark the gore with up/down and front/back.
Fit the fabric gores into the sleeve slits, and pin in place (here I worked on the inside, but if you find it easier you can work from the outside of the garment).
This is what it looks like from the right side of the dress:
With pins in place, baste or sew the gore into your garment. Here I used small whip stitching, not bothering with basting. But if you are unsure or want to test the fit before sewing, basting is a great way to do that. Fastening the gore from the right side of the garment makes it easy to get a good result, since you can see the result while sewing.
When I have inserted the gore, the seam allowance is most often pressed to either side (down to the sleeve) and whip stitched down. I always press the s.a towards the bigger fabric piece. For example, sewing it down onto the sleeve and/or body piece. After that, it is all done!
The new blue gown also has a gore in the front of the sleeve, barely visible but great for movement!
Welcome to this blogpost about luceting! This post was made with the support from my Patreons!
A lucet cord is made out of interlocking loops and is a really practical way to make cords/strings for lacing garments, garters, shoelaces and more since it is stretchy and durable. I prefer working with wool or silk thread, a thin 2ply yarn or an embroidery yarn with a higher twist. Avoid chunky or uneven yarns since these will offer you problems and break.
This is how my luceting fork looks, but you may use practically anything with two pointy things and a handle, for example, a regular fork with the middle part removed. The historical finds looks quite different, here is one medieval example from Historiska Museet:
I find this a bit harder to use, but with a crocheting needle or pointy stick, it is easier. Lucet forks can be found from both the late iron age/viking age and medieval period. Susanna Broomé writes about viking finds in her booklet Cords and braids (I recommend her booklets.)
Finds of lucet cord are made of wool or silk (and in one case even silk and gold thread). If your thread of choice is too thin and you want a thicker cord, you can use two threads at the same time, treating them as one. But learning with a single thread is faster at the start!
Here is a written instruction:
Start with a thread, making an 8 figure around your fork. Hold the thread end with your hand, and twist the lucet fork ½ a turn, while you make a new loop with the other hand and pull the old one down into the cord. The loops should be pulled tightly into knots. Continue with this until you have a cord the lenght you desire. If you lose yourself, the loop that is easiest to tighten is the newest one, so continue with the old loop first.
And here are videos showing you how to start…
…And how to finish!
Also, a photo series showing the finishing if you prefer that:
Cut off your thread, leaving a bit for fastening.
Put this thread through the old loop, the one you would work with next. Remove from the fork.
Pull it tight.
Put the thread through the new loop, and remove this from the fork. Pull tight. Done!
Now your lucet cord is finished and ready to use. If you cut it in the future, you can either redo this finishing by unravelling a bit of cord or just make a knot at the end.
You really like your straw hat, but it´s starting to look a little worse for wear? Here is how I mended love’s hat!
The poor hat looks alright on the head, but take a closer look and you will find several holes and broken straw. The thread around the head was put in to be able to adjust the size of the hat to the head and make it fit snugly. It was a great idea, but have also put some strain on the straw around the head, causing it to break at several points. Time to put in some reinforcements so it will last longer! (Note that this particular material is not the one I am selling, the grass straw I use is a bit different. This hat is several years old by now)
A straw hat doesn’t need any fancy materials, it is after all mainly a working hat. I used unbleached linen, linen thread (waxed) and a little glue. When working with your hat; be gentle if the straw is thin/dry and sensitive. I will make a hatband around the outside to support and protect this area, then glue broken parts together. Lastly, I will put a ribbon inside the hat to make it more comfortable, since the broken straw tends to poke inside.
I started with measuring around the hat and cutting out a strap of fabric 4 cm longer than the circumference and 6 cm wide. This will give me a fabric piece of 60*6 cm.
Fold in the seam allowance (1 cm) and press it down on the inside of the strip, and then pin it around the hat.
Be sure to stretch the fabric carefully and evenly, to keep the size of the hat as it was before. Fold the end of the strip inside to finish it off, and then stitch it into place with linen thread. Use a thin, sharp needle and pull gently on the stitches so you don’t damage the straw while working.
You need two rows of stitches, at each edge of the fabric. Start with the one at the base of the hat.
If the straw is very broken, try to find some whole pieces to sew the fabric onto. Here you can see the seam on the inside of the hat, and me trying to find something to sew the fabric onto.
Add the second row of stitching, and sew the fold down onto the fabric for a nice finish. These steps you may use for decorating or reinforce your new hat if you like, using for example linen or black wool fabric. If the hat is a bit big, pulling the fabric around the hat will make it fit better. Remember to try it on after the initial pinning or first row of stitches so the fit is good.
Fabric strip done! Both decorative and supportive, and great if you want to pin or fasten straps or a badge to your hat!
Let’s move on to the next step! Here I use modern glue to mend rips and broken sections in the brim. Braid the straw together over the broken parts or just gently push the edges together, apply a thin coat of glue and let it sit and dry. Pick a glue that is transparent when dry, and a bit flexible (trying it out on a small piece of the hat is always a good idea). A glue that gets rock hard when drying will only put stress on the straw on the side of the mended hole, causing more damage in the future.
Here is another good method for adding support to your hat; a thin ribbon on the inside. This is loosely glued around the base, covering broken pieces and adding a softer base for the head. After the glue has dried, baste or sew the ribbon to the other fabric layer (not all the way through, use the seam allowance) and you´re done!
If the hat is a bit loose, you could use this ribbon the same way as the fabric on the outside; putting it in with a bit of strain to adjust the size of the hat.
And done! Now the hat is ready for some more adventures. Remember to always take good care of your hats so they may accompany you to many adventures in the future, clean them when necessary and store them in a flat and dry space. Good luck!
This is one of my favourites; the “Fässing” (in Swedish), Martebo-sack (from Martebo church on Gotland) or a Wallet (18-19th century). It is a simple, practical linen bag made for carrying loads. I have seen medieval examples worn over your shoulder like below or larger ones strapped over a donkey.
I actually have several of these for my medieval adventures; for grocery shopping, for the picnic, for my showering things like schampoo…
Martebo bag
The bag is made with a piece of sturdy linen or hemp canvas (chose a sturdy tight-woven fabric in linen, or a piece of tent fabric for a large sack).
Cut out a rectangle with the measure 140 * 70 cm, to make a bag suitable for a picnic and your warm hood. Or design your own measures by laying a measuring tape over your shoulder and let it hang down on either side. Adjust and decide on a length you like on the bag, and then decide on the width; between 60-100 cm (makes a bag that is 30-50 cm wide) might be nice. Add 3 cm of SA (seam allowance) to each measure.
Sewing instructions:
1. Mark out the opening on the long sides on the rectangle. It should be in the middle, and between 30-40 cm wide.
2. Put the long sides on top of each other, and sew a seam on either side of the opening. Backstitches with waxed linen thread (if you are using the sewing machine, start with zigzagging the whole fabric piece, then sewing this seam).
3. Press and fold down the SA and whip stitch it down to one side for extra strenght.
4. Hem the opening with whipstitches, working from the inside. It is also good to reinforce the edges of the opening by sewing a couple of extra stitches through each fabric piece to make it less prone to rip open.
5. Now you have a tube, adjust it so the seam is in the middle of the fabric piece inside out, and pin the short edges closed.
6. Sew the edges with backstitching, and repeat the pressing and folded down SA. Done!
The sack may be carried over your shoulder, or wrap it around your wrist and hand to carry it like a grocery bag. If you have valuables in it, you can also make a knot in the middle over the opening to prevent anything from falling out. Very convenient!