This is incredibly modern to be me, I know! My latest infatuation has totally been the 18th century pattern drafting, mainly jackets, gowns and a whole bunch of skirts. And hats. Who doesn’t love hats?
Jacket in green wool twill and skirt in deep blue wool twill
Anyway, after my first attempt making a 18th century ballgown, I wanted to dive deaper and learn more about 18th-century pattern making and clothing styles, so I have spent the last couple of years on learning a bit about different 1700styles on my free time.
First out after the corset, shift and petticoats came these two jackets, based on an original piece and a drafted pattern from Costume Close-up (which is an incredible interesting and fun book that I recommend). I altered the pattern a bit, both to fit my measures but also to another style that fitted the extant pieces and fashion plates I was inspired from. Then I made a jacket in printed cotton, lined with linen and with linen ruffles on the sleeves. It came out really well both in pattern drafting and seams, and I was happy…
Reproduction cotton printed fabric with flowers
So I just had to try to make it in wool to experience the difference in fabrics. I choose a scrap from an old project; a thin wool twill that I lined with striped linen from another project. I love small but complex projects that means lots of sewing on a small fabric budget!
Green wool jacket, front.
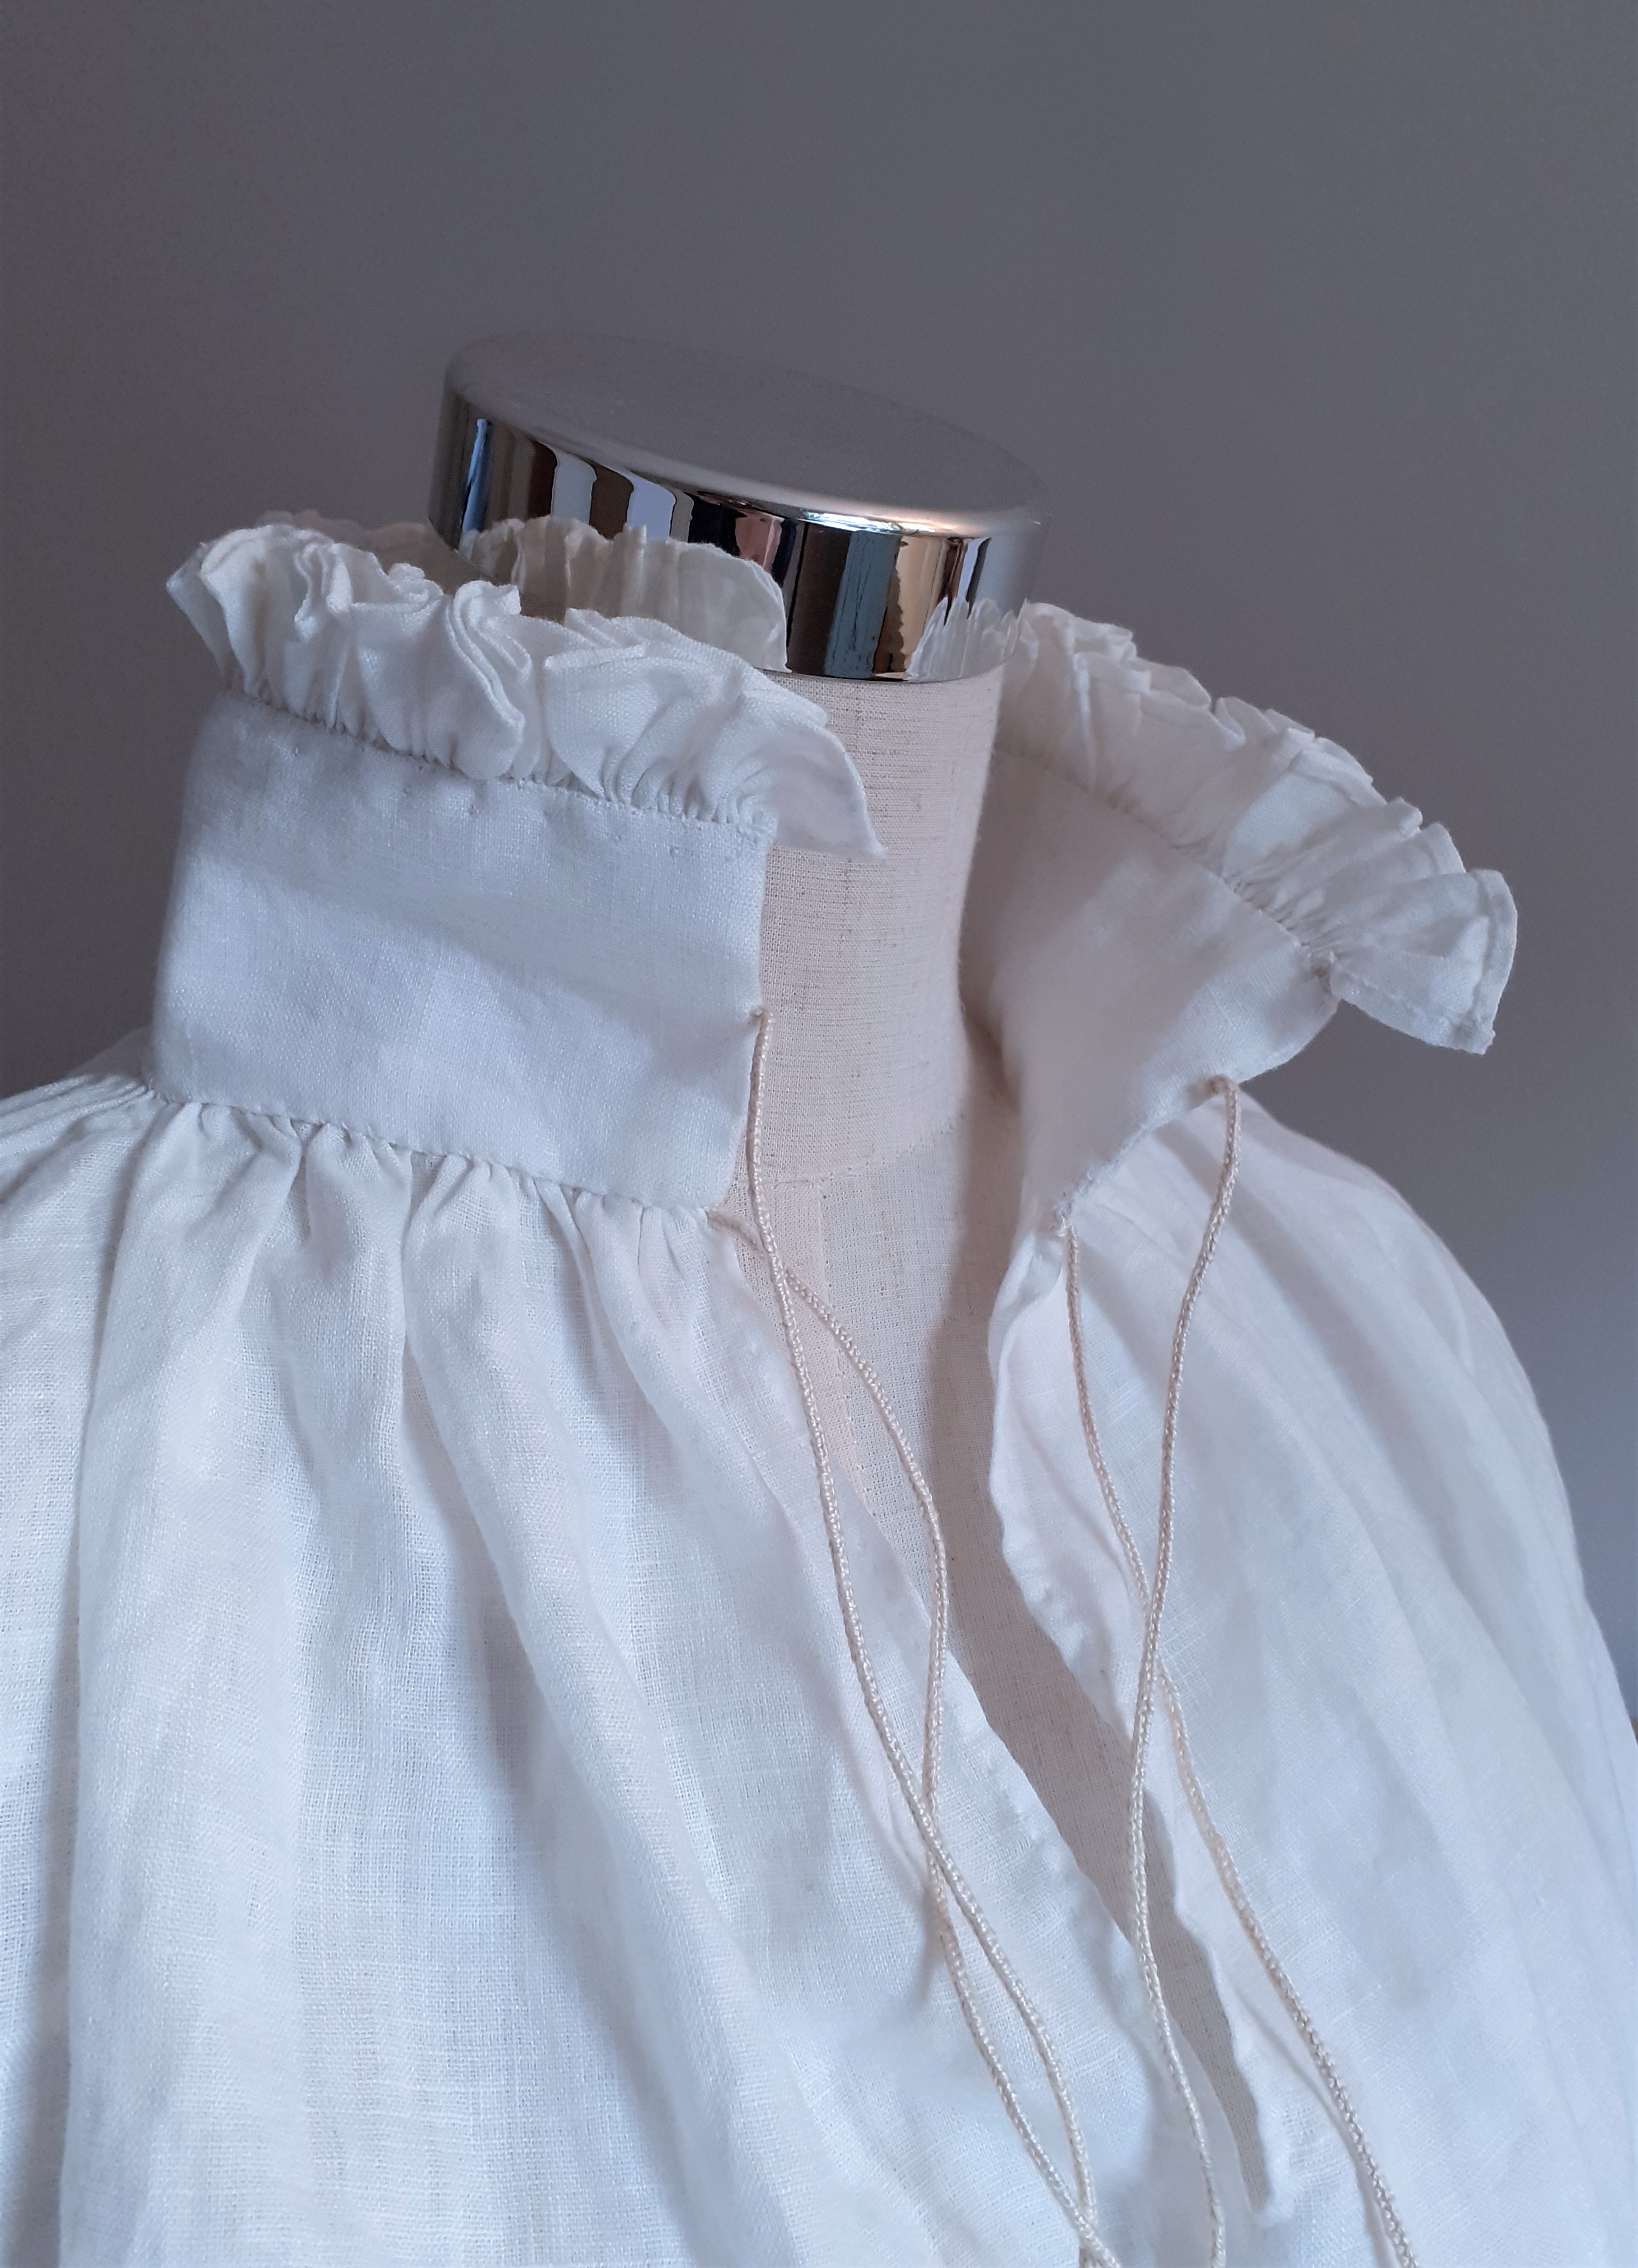
Since I found the pattern with the stomacher pinned onto the jacket difficult to put on fast, I tried another style for the wool jacket with the stomacher fastened behind the ribbons in the front. To make it even easier, I basted the stomacher to the jacket on one side, and added two hooks and eyes to the other side to be able to fasten it before pinning and tieing the ribbons. The hooks are not a historically based solution as far as I have seen but a very convenient and fast one.
Front lacing before stomacher.
The cotton flower jacket was laced in the front before pinning the stomacher over, covering the lacing and the corset. It is perfect for adjusting the size and the lacing strips with the eyelets where fun to made.
Pinning the front in place.
Fashionable autumn outfit to keep warm
I made a whole outfit to go with the jackets (except shoes, I need to get me good shoes)
linen shift
corset
under skirt
wool skirt
fishu
bergere hat in wheat straw
linen cap with a lace edge
cape/cloak in red fulled wool
white fine knitted socks
The linen shift and corset are the same that I made for my ballgowns, but since they are not showing I intend to go with them until I do more serious 18th century adventuring than a photoshoot or a picnic.
The underskirt is a simple cotton skirt, and the overskirt in wool is slightly longer and wider to make the silhuette nicer and make sure the undergarments are not showing. I had to piece the skirt together from several scraps of fabric, which of course is historical even if it doesn’t show in photos. I am planning to make an apron to go with the outfit in the future.
The fishu was great for consealing a modern tattoo
The fishu (scarf) is a trangle of thin silk which you tuck into your jacket to look modest and warm (and fashionable too!) The hat I made with wheat straw and silk fabric cut and sewn (and maybe a bit of glue too) to the hat in a fashionable pattern, and then I added broad pieces of silk fabric to tie it in the back.
The linen cap pattern comes from the American Duchess book, but I adjusted it a bit to fit well. The cloak pattern comes from a pattern diagram from Costume Close-up but I had to adjust that too, to be able to use it with the piece of wool fabric I had left. I also added slits for the arms and a small, almost invisible closure with hooks and eyes at the front in order to be able to wear it closed while doing things outside.
The garments are handsewn with the exception of some longer inside seams machinesewn to save time, and I used linen thread and silk threads for everything.
Dressed and ready for autumn!
The redrafted pattern for the jackets in size Eu 36-38 is available, send me an email if you are interested!
I am Linda, and Handcrafted History is my one-woman business located outside Sundsvall, in the middle of Sweden. Follow me on my handcrafting and historical adventuring here on my blog!
My business offers You made-to-measure historical clothing, handmade by me with high quality materials, and designed together with you from historical sources.
During lectures and workshops from Iron age (Viking age) to Late medieval period I share my knowledge from more than 20 years of sewing and research, and help you create the outfit from your dreams.
You can also find historical hats here, or shop away from my historical tent during markets around Sweden, and abroad.
Here is information on How to order clothes, Book me for workshops or browse the free Tutorials on Sewing or Swedish Larping. Below, you find the blog that I’ve been writing for about 10 years. I share research projects as well as fun guides and inspiration for your handcrafting.
Please contact me by email at linda.handcraftedhistory @ gmail.com for invites to markets, ordering clothing, booking workshops or for collaborations regarding the blog.
There’s a lot to say about this year, but at least I’ve been having plenty of time for sewing. Unfortunately, a bad shoulder gave me some pains, but with rest and a training program, I think we are mostly friends again!
I thought it would be fun to share some projects with you here, as an inspiration and a kind of journal to myself: I always forget what I have been sewing, and find myself longing to finish yet another personal “small project” but not understanding why I don’t make any progress…
72 garments finished during 2020; both for customers, friends and myself. I am not going to write about them all, and many have not been photographed yet. I also have a whole bunch of things not yet ready; commissions, old projects known as UFOs (unfinished objects) and some rather new ideas I have been working on.
It was time to make some new viking clothes and I managed this blue dress, the red apron dress and some matching items, like the handwoven and woad plant-dyed shawl. I am really pleased with how the outfit turned out, even if the outfit might not be sexy to the modern eye… I love experimenting with different historical cuts that could have been in use, trying out how they look and feel when I make and wear them.
Later I made this early 14th century outfit as I finally, after a long period of 15th century-romance, have laid my eyes on new conquests. The 13th and 14th centuries are very nice, and I want to get to know them a little more. The next project will be something from the Maciejowski/Morgan Bible.
I have made several complete outfits for customers based on viking age and medieval clothing, and this was the year when I only met GOOD CUSTOMERS! I kid you not! Everyone has been polite, fun to work with and sent their payments. For those of you working regularly in customer service; you know my feeling here! How did I get to be so lucky? And, will this continue during 2021?
A hand-sewn 16th century shirt inspired by the Sture shirt (without decorations and embroidery). This shirt took over 40 hours to make, more than most dresses… Is it pretty? Yes. Was it worth it? Give me another year before I answer…
I have also worked on 18th century clothing, learning more about the period and the methods in use. There’s a couple of skirts, a jacket in wool and one in printed cotton, as well as a small linen cap. I am looking forward to going to new kinds of events and trying out the kit to see if it will work.
I made a new short-sleeved kirtle with a waist seam, similar to the blue Weyden-inspired dress from years ago. This dress is rather loose (I might need to take it in a bit in the side seams) and it’s made with a curved front seam. It is going to be a great working kirtle! The long-sleeved green 15th c dress also got sold, they mysteriously shrank in the wardrobe during last winter)
Apart from sewing I also dived into some video making, filmed lectures for the digital Medieval Week as well as setting up a new Youtube channel, and working with content for my Patreon page. Video editing and voice-overs still make me sweat, but my plan is to continue to improve in these new areas, creating more and better content for you readers. Patreon makes this possible since I get support to work with my content, and my hope for 2021 is that my page will continue to grow, inspire and teach handcrafting ideas to everyone interested!
It feels like it is early yet to plan for this year, but of course, I am hoping for a market season of some kind, and I have so much new content for sewing workshops and material for a new viking lecture as well. As for the blog, there is a long list with tutorials to make, as much as I have time for. All concluded, it really feels like 2021 will be a Great Year!
With the world as it is today with covid outbreaks everywhere, a lot of us finds ourselves at home, more or less bored and without our usual friends and pastimes. I know it may feel uncertain and depressing to not know how the world will be in a few weeks, months or even half a year. But instead of feeling down, I will do my best to lighten your mood and as a handcrafter, I will shamelessly take this opportunity to inspire you all to more handcrafting!
I mean, lots of time (and internet) on our hands, and a season to look forward to with magical events, cosy markets, lots of friends… (Yes, I know it might be a late-season, but the world will rotate back sooner or later.)
So, look at these photos- don’t you get inspired? Longing for some summer vibes?
What are your goals for this season? Do you need to update or mend your wardrobe? Or make some practical changes to your camping gear? Here are all my shifts washed, mended and ironed. Ready for fun adventures! (Also, welcome to a photo of some sexy medieval lingerie. It is here you’ll get all the tastiness!)
I have a long list of things I need to do before buying fabric or planning new projects. As I wrote the list in New Years, I kind of felt that I would Never Get It Done. But now, being home full time without any extra jobs, markets and uh, well…income I have decided To Get Things Done. Yes, all the things! Some serious sewing will happen in this home in the coming weeks.
If you need more inspiration to get started or know what to make, here are some really good tips:
Pinterest might be full of advertisement, photos and medieval-ish things but there’s really good inspiration too. My favourite is to search for different artists or painters from the period I want to know more about, or for earlier periods search for different finds, like “Birka graves Viking” and see what comes up. Pinterest will show you more of the things you click on and save, so as you go along you will find more and more. Check out where the sources come from, follow others with lots of good folders and get inspired!
Go through your historical wardrobe and sort things out. Clean/air, mend and iron things to make them look neat. Try them on if you feel like it, play, get inspired! Think back to the previous season- did everything work? Were those shoes comfy? Need to make adjustments to any garment or sew a new warmer one?
Mending might be boring, but feels great when it is done!
Sell things you don’t need or like. The second-hand market for reenactor wear is large and you can find lots of groups on Facebook for buying and selling things. Get rid of things from your wardrobe you don’t like, get some new money, use the money to make more things you really love!
Get yourself outside! No, I didn’t mean exercise, but even if there are no historical events right now you can gear yourself up and bring a friend out for some fun playing time. Take photos of your outfit in the forest, go for a hike, or cook over an open fire for lunch. Share all those photos on social media and share the new energy! (also, going out with your gear makes you see if everything’s working well or if you need to make adjustments.)
Warm and comfortable Viking, ready for a cold event!
Get yourself some new handcrafting things! With more time on your hands, you will have time for a really fun and inspirational project. (No, you don’t need to make all those boring things first, sometimes it is more important to get new joy before being practical.) Also, you purchasing new fabrics, threads, tools etc from small businesses will make all the difference for them now when many are struggling with survival due to cancelled markets etc.
And if you don’t feel like sewing everything for the coming season- consider ordering a new garment (pick the one you felt would be boring to make yourself) from your favourite business. It will support them, you will get a new fun garment, and new inspiration for the coming season.
(Hey; remember that I have lots of free tutorials for you here on the blog? And also, on my Patreon you can access all my tutorials for a good deal that I also sell on Etsy. This is kind of a commercial for my own stuff you know. Buy some stuff!)
And remember that even if you can’t go out to fun meetings and events all those lovely people are just a few clicks away, so why not start a sewing circle with skype, join a fb group or facetime with your friends while handcrafting! Spread the joy and happiness- handcraft more!
This is a dress I made several years ago, to have as a simple working kirtle. I never got around to take photos and write proper documentation about it, but now I got some feeling! In these photos, the dress has been used for a couple of years and it has seen wear, washing machines and mending. So here’s my first tutorial for the autumn, and thank you for visiting and reading! (Both old friends and newcomers!)
This is a very simple working kirtle or dress, made to be practical as well as historically possible. The fabric is a plain wool weave, dyed to look like walnut dyed fabric. The skirt is partly pleated, partly flat sewn to the waist, and the upper part of the dress is fitted for bust support, side laced and has short sleeves.
I wear it with loose sleeves, pinned to the short sleeves and a gollar for warmth, under another fancier dress, or as it is if I am going to do lots of work or if the weather is warm.
The dress is hand sewn with wool thread in the same colour as the fabric, and it was one of my first garments made with wool thread instead of linen thread. I really recommend it! At first, I was a bit unsure if it was going to be durable enough, but after several years of using it, washing it in the machine (yeah, because lazy and dirty…) and treating it rather rough, it stays together really well, with only some minor mending.
I used running stitches on all long seams and folded the seam allowances to one side before whip stitching them down. The waist seam and all edges were made with whip stitches, and the sleeves and upper body seams made with back stitches to be a bit more durable than the running stitch is. The running stitch is way more durable than many believe and common in extant finds, but for heavy support, I like whip stitch and backstitching better.
The fabric is a medium tabby weave and I used around 3 meters for a dress. If you are much longer than me (1,6 m) consider buying another half metre. I did a quick pattern outlay for you, since it is old I’m not sure if I drafted the pattern along the selvedge or across the fabric but you will get an idea of what pieces you need to make one for your self.
The dress was made using two front pieces (to have a supportive seam in the front was a good choice since I didn’t have any lining in the dress.) One back piece, two sleeves and the skirt panels. I drafted S-sleeves, but the dress is made with regular sleeves with the seam under the arm. That seems to be the most common in artwork from the time on short sleeves. Your choice!
Some thoughts on skirts:
Do you see that the skirt has way more fabric in the back, while the front is straight? This will give you a nice fall as well as enough width and volume, but if you bend forward to pick up things or work by the fire, this construction will make the skirts remain away from the flames closer to your body, rather than draping forward with your movement. Hard to explain, but try it! It gives you a very practical garment.
The front panels are marked C at the centre front. The back piece is “upside-down” to use as much of the fabric as possible. You could of course piece the skirt together with more panels if you like. On my dress, the front panels lie smoothly in the waist, with only a couple of pleats to allow room for hips and stomach, while the back part is pleated around the back.
This is (I think) my only wool garment so far that has bust support, but no lining whatsoever. This is possible only because of the plain weave since it is not very flexible across and along the threads in the fabric. A twill weave would not have worked without lining.
The drawing with the front piece has two arrows marking out small details in the fronts seams. At the centre front there is a small bend going in under the bust, and at the side seams there’s another, making the seam run in a bend, and then changing direction after the bust and running straighter over the stomach. This way of sewing will make the bust stay better in place, allowing for bust support without lots of sturdy layers. But the bust will have a rounder form and not as much steadiness as a garment with lining.
I did however put in a narrow strip of linen around the neck opening on the inside, to avoid it getting stretched. There is plenty of ways to make hems sturdier, such as a narrow strip of fabric, running or stab stitching or using another layer or quality of fabric on the inside, for example. You can find this in extant finds such as Herjolfnes and finds from 14th c London, as well as in paintings. It is an easy way to finish your garment, make it last longer while being historically made.
The side lacing is made with sewn holes and a lucet braid in plant-dyed wool thread. A wool thread will be a bit stretchy, and won’t run as smoothly as silk, which makes it a bit slower to lace, but the cord will stay in place. In this photo, you can see the lacing which starts at the sleeve and reaches to the waist seam, a gap where the shift is visible (did I have too much good food this winter?) and also some mending is done on the sleeve. After the waist seam, I tie the cord (I lace it from sleeve to waist) and the skirts are opened another 15 cm to allow for easy undressing. The skirt is not laced, it stays closed anyway, and by sewing some folds in the sides, the opening will not be very visible.
A note on fitting a dress like this:
I always make a fitting for every single item I make, and that is especially important if it is supposed to be tight fitting. I do have a basic pattern, drafted on my own body (a toile) but after I have basted the pieces together I need to try them on before sewing the garment. Every fabric you work with is slightly different, some more stretchy, some supportive and stiff, and by trying the pieces on you can adjust the garment to your taste.
The method for adjusting and fitting a dress like this is the same as I use while making a supportive upper body toile, and you achieve the support by taking in the upper body in the sides and front, sometimes also by stretching the shoulder seams upwards a bit.
A front laced kirtle is a bit easier to adjust to a bigger bust, but you can make it work with a side lacing as well, just remember to make the same adjustments to the laced side as the sewn together side, and maybe lacing it double one turn just below the bust for greater support.
For a complete outfit; linen shift, wool hose and leather shoes under the kirtle. A simple belt to hang the money purse from (change is very important for today’s trader) and a veil on the head. Here I have a simple cap under the Great Veil, to have a base to pin it on. The veil can then be worn in many different ways, depending on how you like to wrap or fold it. 2-3 brass pins secure the veil to the cap under it.
Whoho! Finally documented this dress a bit, so now I don’t have to feel “bad” about forgetting it all the time. As you have noticed, this is not a complete step-to-step tutorial but rather a post with guidance if you want to make a similar dress.
Many readers ask me to share more sources and such material on the blog, but according to copyright laws I am not free to post all the stuff that inspires me on the internet, and therefore you will often find links, reading tips and Pinterest notions where you can find artwork and resources of your own. Hope you understand my take on this!
The sewing machine is a tricksy being, with a mind of its own. On the paper, it promises to make whatever your heart desire, but home alone it tends to do as it pleases… Happened to you? It does not have to be like that!
In my Sewing Machine School, I will give you all my best tips for making friends with the sewing machine. As a sewing crafts teacher, I have lots of experience dealing with struggling pupils… And struggling machines too.
in the beginning:
Before sewing, make sure the machine is correctly threaded. It is easy to miss a part, get a loop or lose the tension. Use the instruction manual if you are unsure, or even better-check out youtube to find a video on your model! Older models may be available on the internet as free pdfs, or check in with the sewing machine store.
To check the tension of the threads, pull carefully at the top and bottom threads. They should be moving but with slight resistance. If everything seems fine, try sewing on a scrap bit of cotton fabric. Fine? Then try out a scrap bit of the fabric you intend to work on. Check to see if you need to make adjustments in the stitching length or the presser.
A short note about caring:
It is very important to take care of your sewing machine! Wipe it down and clean it after each project. A can of compressed air is perfect for blowing away dust inside the machine, and a small brush can be used to remove threads etc.
You can also grease your machine with a special sewing machine oil, to make it run smoothly for longer periods of time, between the paid services. Do this after each sewing project or sewing period, and you will have a machine that runs smoothly. (Note; it is very important to use sewing machine oil and to only apply small drops of it in order to not stain your fabrics after. If you are unsure if you might have applied too much, sew in a scrap fabric piece first.
Change the needle after each big project (like a dress) or if you have accidentally pulled your fabric so the needle touched the machine going down. A sharp needle will make the seem prettier, more even and make the sewing easier.
While working:
Always start with a scrap bit of fabric to check the stitches and the tension. The threads should lock with each other in the middle of the fabric. If not, try adjusting the tension of the upper thread first.
Adjust the presser according to the fabric. The thick woollen fabric needs a lighter presser than thin silks. If the presser is too hard, your upper fabric will be pressed forward during sewing. If you have a problem with the fabric pieces always ending up different in lenght at the end of the seam, this could be your problem.
The feeder teeth underneath your fabric move the fabric during sewing, but some machines also have an upper feeder that you can attach to the presser. Check to see if your machine has one, or if you can buy one. This is a very good device as it helps get the fabric even during longer seams. (If you don’t have one, pinning the fabric pieces before sewing helps really nice too)
Use a needle fitting for your project. Thinner needles for fine linen and silks, a bit sturdier for wools.
Are you unsure about thick layers or sharp corners? You can always sew “by hand” on your machine. Instead of using the pedal, use the wheel on your right side, pulling it towards you. This makes the machine go very slowly and you will have plenty of time to check where you go and if the needle can take all the layers without breaking. Once past the hard part, just use the pedal again!
Be attentive to the sound of your machine. It should run smoothly and even if everything is ok. When you have learned the sound of your machine, you will quickly discover if anything is amiss.
If sewing together two pieces for a dress (like a straight panel and a diagonally cut gore) always put the part that stretches the most (gore) under the other part. This will lessen the risk of the parts stretching out uneven, and make the seam a bit nicer.
To turn in a corner: Stop where you want to turn and lift your foot from the pedal. Move the needle down into the fabric with the wheel, lift the presser and adjust the fabric to the new direction. Let down the presser, and continue forward with the pedal. The needle holds your fabric in place while turning and make sure the seam continues nicely.
This was my first part, and whenever I have the time I try to translate more sewing tip for you. Do you like it? Consider supporting me by Patreon, to make it possible for me to create more free tutorials!
The last tutorial was about how I made my first Houppelande (medieval overdress) that was an early houppelande, with a pattern layout that saved in on the fabric.
Now we move on to the opposite; a full circular houppelande dress that was the high fashion during the 15th century, and were worn by both men and women (with different lengths and fashion details of course) The construction method for this one is open for discussion; there might have been gores and more pieces according to different fabric widths during the medieval period. This layout is practical and simple if your fabric is 150 cm wide and you want the houppelande to be of as much fabric as possible, the small pieces allowing you to save in on the fabric a little.
The construction idea is from an article I found ages ago (that is now lost on the internet?) And later tailor’s books which shows very full dresses for women and coats for men. The shape, style and drape of this method also look similar to paintings of houppelandes.
First, you need a lot of fabric! How much depends on your length, in this example, I make a pattern that gives you a dress around 150 cm long; good for the shorter woman or for a man (since houppes for men usually leaves at least the shoes visible) That means you will need 5,2 meters of fabric for the dress itself, and then another 1,5 to 3 meters for the sleeves. Oh, and maybe a full lining too?
The pattern is basically 4 quarters of a circle; forming a full circle when put together. The small pieces save you some fabric, but you may cut out the full quarter circles if you prefer. If you go with the pieces, then sew them together with the quarters the first thing when you have cut them out, so you have 4 whole quarters.
Then, sew the shoulder seams together, that is the short straight seams above the arrows. Leave the armholes (on the pattern they are cut out as half-moons) and sew the sides together. To know how wide your armholes should be; measure yourself loosely around your armpit, or use a previous pattern. Add extra cm for movement; at least 5-6 cm.
The seam length of the shoulder should follow your shoulder; between 10-14 cm depending on how long shoulders you have. The armholes should be laying on the body, not falling down from the shoulder to your upper arm. Cut away what you don’t need, a little at a time if you are unsure.
When you are satisfied with the shoulder, armholes and side seams, sew the back and front together with each other, front to front, back to back. In the front, you leave an opening big enough so you can dress and undress easily. On paintings, some dresses are open almost to the hip. In the back you need to leave an opening big enough for your neck, try it on and you will understand! The open seam will give you the neckline on the back, and can then be cut for a rounder style if you like, or you could add a collar.
So, that was it- quick and easy yes? Now the dress should look something like the sketch above, and you can attach the sleeves to the dress. Sleeves? Well, that is for the next part of the Houppelande tutorial series. Stay tuned!
During Hägnans Medeltidsdagar in Luleå this summer, (that the local SCA group Frostheim organized) I had the over all responsibility to make the handcraft camp work out well. We had a camp outside (or inside if the weather was bad) with different kinds of handcrafts that each participant brought (so you could do whatever was in your interest and current project, as well as trying out some new things others had.) My work was mostly about saying “yes, good job!” and checking that the guard schedule was working. And reminding people of lunch – lunch is important!
Basically, it’s not that much work – happy handcrafters of different kinds gather and sit down during the days to craft, talk and show different kinds of handicraft to interested visitors. I usually try to make them bring many different things to work with, and to show different stages in the handcrafting process so that visitors can grasp what it really is about. Good ways of doing this is showing step-to-step pictures or unfinished objects, talk about the handicraft, lay out your tools etc. People get really interested when handcrafting is actually done – my love even got attention for winding yarn by hand when he sat down and helped me…
I also brought my market shop with me; but as usual I’m just not that interested in selling things from a specific place, when there is an opportunity to go around, talking handicraft, taking photos, sewing on projects and drinking coffee. So my market stall was mostly empty (but my friends checked it for me – thanks!) Anyway, it is good to have the shop with me because it usually spread the costs and make me afford all the traveling expenses.
Johan and Erik from Trix were performing just behind us during the week- first class entertainment while you are sewing!
I really recommend visiting handcrafting areas if you are a visitor on a medieval/viking market. Bring a project, some snack or just questions about different handcrafts and you will be almost sure to find someone who is willing to share and talk about how things are done.
I’ve been working on this new booklets for months now, and now they are finally done and ready to send out. I know that many of you readers have asked me about new tutorials, preferably in English, but the truth is that tutorials takes a lot of time to make. I’m counting on around 8 h/tutorial and that doesn’t include the time it takes to handcraft the actual things. As you can imagine it’s quite impossible for me to continue to make a lot of tutorials for free, though there will be some new ones at the blog this year.
If you like the tutorials page and want to support it, or if you want to learn more about sewing, I can offer these new booklets as a way of doing that. They have basically the same structure as my online tutorials, but are even more hands-on and easy-following with text, pictures and useful tips. I include both instructions for hand sewing and machine sewing in each one, and you don’t need any previous sewing experience. They also include patterns in full size and a list of what you need for each project.
I’ll put them here, but you can also buy them on my facebook page or at my Etsy shop (for shipments outside Sweden).
Prices: 5 E/piece + 2 E shipping (so for two 5+5+2 E and so on) Sv: 50 kr + 15 kr frakt inom Sverige.
My friend A visited some time ago and since he is the one making all my folders and paper handouts it was time that I made him a new medieval outfit. A really likes the 13th and early 14th century, so we decided to make a “bladkjortel”- a rather long kirtle with an opening at the front. The kirtle is made of two different colours since A bought the fabric on a second hand store for a bargain, and I added some buttons by the wrist to make it more fashionable for the period. The slits at the front is really common in different paintings, and good to have on a warm day. There are also two slits at the front of the sleeve seams, which is another thing very common in paintings from the period.
I got some fabric left, so I also made him a pilgrim bag and a hood. Under is a simple linen shirt. I think the whole outfit took about 2 days to make, with lots of coffee breaks. It will be nice to see the whole outfit with the pieces A already had, maybe I could get him to take a photoshot when he’s home…


 Mending might be boring, but feels great when it is done!
 Warm and comfortable Viking, ready for a cold event!


")


")


