I made love a new pair of summer hose, in really thin wool twill. The hose got some though love during the summer and come autumn the soles looked like this:
Not much left. When your soles are this worn, it is easier to just change them for a new pair. This round, I choose a thicker and more sturdy wool twill, hoping they would last more than one summer. I ripped the old soles out, and traced around them on a new piece of pre-washed fabric.
Tracing the old soles to new fabric. Remember to add seam allowance if that is worn away.
The top fabric was in pretty good condition, but worn thin in some places. I reinforced those spots with patches on the inside, sewn with running stitches and wool thread.
Soft fabric and a thin wool thread will make the mended areas comfortable. This is the right side of the hose.
All worn areas mended; horizontal and vertical running stitches to secure the patches to the hose, and backstitched soles in place. I did not bother felling the seams, I predict these will soon need to be ripped again…
You really like your straw hat, but it´s starting to look a little worse for wear? Here is how I mended love’s hat!
The poor hat looks alright on the head, but take a closer look and you will find several holes and broken straw. The thread around the head was put in to be able to adjust the size of the hat to the head and make it fit snugly. It was a great idea, but have also put some strain on the straw around the head, causing it to break at several points. Time to put in some reinforcements so it will last longer! (Note that this particular material is not the one I am selling, the grass straw I use is a bit different. This hat is several years old by now)
A straw hat doesn’t need any fancy materials, it is after all mainly a working hat. I used unbleached linen, linen thread (waxed) and a little glue. When working with your hat; be gentle if the straw is thin/dry and sensitive. I will make a hatband around the outside to support and protect this area, then glue broken parts together. Lastly, I will put a ribbon inside the hat to make it more comfortable, since the broken straw tends to poke inside.
I started with measuring around the hat and cutting out a strap of fabric 4 cm longer than the circumference and 6 cm wide. This will give me a fabric piece of 60*6 cm.
Fold in the seam allowance (1 cm) and press it down on the inside of the strip, and then pin it around the hat.
Be sure to stretch the fabric carefully and evenly, to keep the size of the hat as it was before. Fold the end of the strip inside to finish it off, and then stitch it into place with linen thread. Use a thin, sharp needle and pull gently on the stitches so you don’t damage the straw while working.
You need two rows of stitches, at each edge of the fabric. Start with the one at the base of the hat.
If the straw is very broken, try to find some whole pieces to sew the fabric onto. Here you can see the seam on the inside of the hat, and me trying to find something to sew the fabric onto.
Add the second row of stitching, and sew the fold down onto the fabric for a nice finish. These steps you may use for decorating or reinforce your new hat if you like, using for example linen or black wool fabric. If the hat is a bit big, pulling the fabric around the hat will make it fit better. Remember to try it on after the initial pinning or first row of stitches so the fit is good.
Fabric strip done! Both decorative and supportive, and great if you want to pin or fasten straps or a badge to your hat!
Let’s move on to the next step! Here I use modern glue to mend rips and broken sections in the brim. Braid the straw together over the broken parts or just gently push the edges together, apply a thin coat of glue and let it sit and dry. Pick a glue that is transparent when dry, and a bit flexible (trying it out on a small piece of the hat is always a good idea). A glue that gets rock hard when drying will only put stress on the straw on the side of the mended hole, causing more damage in the future.
Here is another good method for adding support to your hat; a thin ribbon on the inside. This is loosely glued around the base, covering broken pieces and adding a softer base for the head. After the glue has dried, baste or sew the ribbon to the other fabric layer (not all the way through, use the seam allowance) and you´re done!
If the hat is a bit loose, you could use this ribbon the same way as the fabric on the outside; putting it in with a bit of strain to adjust the size of the hat.
And done! Now the hat is ready for some more adventures. Remember to always take good care of your hats so they may accompany you to many adventures in the future, clean them when necessary and store them in a flat and dry space. Good luck!
This post is a collab with Korps and contains advertisement for fabrics
Want to own a really nice cloak? Who doesn’t? (yeah, it was a leading question)
Here is my guide to the perfect cloak; we are going to look at different styles, periods, how to wear it and how to choose the best fabric.
Sources:
Let’s start with some local finds, and the oldest one first: The Gerum cloak is dated to 360-100 BCE and is an oval cloak, worn folded over the shoulders. It is a great cloak woven in a patterned twill, and wearing it folded in the middle, it will look a bit like a semicircular cloak. Wearing a big cloak folded in half, is a good way to add warmth if you don’t have a thick fabric or a lining in your cloak.
Rectangular shawl in tabby wool to a simple viking dress
Viking age cloaks can be seen on runestones, decorations, small figurines and are also mentioned in written sources. I usually call it cloak for a man’s outfit and shawl for a woman’s, but since they have the same function we will just call everything cloaks in this post.
If you fold a square piece of fabric into a triangle and wear it, it will look similar to some female figurines. Rectangular cloaks are another option, where figures are shown wearing an outer garment with corners. If you want to learn more about Viking age cloak theory; check out Viking clothing by Ewing, 2007.
Woad blue cloak or shawl, tabby woven wool fabric
The cloak from Leksand was found in a woman’s grave and is dated to the period 1100-1200. It was made from diamond twill wool, and most likely was a semicircular cloak with an opening at the front, it was also decorated with tablet woven bands at the opening (along the straight side).
The cloak worn by the Bocksten man was also semicircular with a cut hole for the neck, and a seam over one shoulder (the opening was not centered at the front) The cloak was made of several pieces of fabric, pieced together. (Kläderna och människan i medeltidens Sverige och Norge, Eva Andersson, 2006.)
How to draft a semicircular cloak on 150 cm wide fabric; it is really easy!
The cloak that supposedly belonged to St Birgitta of Sweden was also made of several pieces of fabric, but this garment is believed to have been remade from a dress.
During the 13th century, you can see lots of cloaks in contemporary sources (such as the Morgan bible), as the cloak was an important part of the outfit. During the 14th century, there are some really pretty examples of statues with buttons down the front or over one shoulder, and in 15th c paintings, they are often artfully draped in biblical scenes, but not very common in everyday portraits.
Simple semicircular travelling cloak in brown wool twill
16th century cloak patterns from Drei Schnittbucher shows examples of circular cloaks with a front opening, slits, collars and even sleeves sewn onto the cloak.
Full circular cloak pattern, look at that piecing!
Full cloak with sleeves, collar and decorative borders
Interestingthoughts:
In written sources, cloaks go under many different names depending on the time, period, appearance and who the wearer is. There is also evidence of cloaks lined with fur or fabric, cloaks with slits or trains, and of different lenght. Clearly, the garment was both used in a religious context as well as an everyday travel item.
I have not found evidence of hoods or head covering sewn onto the cloak in any finds, and when a hood is shown in contemporary art it is commonly separate from the cloak, even though it might be in the same colour as the larger garment. So if you want to make an outfit close to historical sources, make a cloak and a separate hood that correspond with the fashion of the time. (Hoods on cloaks can be seen in 18th c fashion, but let’s leave that century to another time)
Cloaks may be fastened with a seam, pin, clasp, strings, ribbons, brooch, ring brooches or buttons. Choose your method based on which period you would like it to reflect. Cloaks are fairly common in period art sources, so if you browse through a bunch of paintings you might get the idea on what to choose.
The length of the cloak seems to vary with the wearer; a travelling cloak between the knee and below the calf on men, and a bit longer on women, with ceremonial cloaks trailing behind the wearer. But paintings and prints show evidence of shorter cloaks too, with everything from decorated court cloaks to simple peasant women cloaks. Pick the length that suits your need; too much length and fabric will only weigh you down if you want a practical garment.
example of a semicircular cloak
And as always; piecing is very ok to make use of the fabric!
Different models of cloaks:
Oval cloak, square cloak, rectangular cloak, semicircular cloak (or 1/2 circle cloak), cloak with shoulder seams (or 3/4 circle cloak) and full circle cloak. The Viking age square cloak folded in half is not based on finds but more of an experiment, as is the shoulder seam cloak ( I included that in the picture though, so you may see what I am talking about). The latter I often use when I need to make a larger cloak than the semicircular one but don’t have fabric or historical evidence for a full circular cloak. The seams or piecing could as well be made on other parts of the cloak.
I have found no evidence for the cloak with vertical sections/seams to create a fit (which is popular when buying modern cloak patterns) instead, I would recommend you to choose a simple cut and then drape it on your body to your liking. Small shoulder seams or darts can be made as a more modern solution to make the cloak stay over your shoulders.
The cloak does not need to have an even hem, many examples are just draped over the body or longer back. If you want to make a full circular cloak more even by the hem, you may cut the neck hole nearer the front hem than the back hem (my full cloak is 70 cm at the front, and 80 cm long at the back). Putting the cloak on the body and adjusting the hem afterwards is another method.
Decorations:
Finds, paintings and statues indicate that embroidery, woven bands, silk or a combination of these were used to decorate the cloak, however, these examples are mainly seen on religious or high-status garments. For an everyday cloak, I would go with a sturdy, fulled fabric without decorations. If you want to decorate your cloak; try to find artwork from the period you want to recreate.
Fabric choises:
Wool, unlined or lined with wool or fur is both practical, and the most used material in cloaks during the medieval period. There are examples of velvet and silk cloaks, but only for ceremonial or high-status wearers. A sturdy, dense wool fabric that has been fulled would do well for a cloak, and beyond that, it is more a matter of when you need it (a lined winter cloak or a thinner, fashionable draped summer cloak?) There are examples of both twill and tabby woven cloaks, so again- to find the perfect cloak fabric for your period, status and adventure you would have to do some research for yourself.
Generally speaking, the right kind of fabric and the way you drape your cloak is more important than which model you choose, if you want to look dramatic. Buy enough fabric to give you the size of the cloak you need!
If you just want a good, affordable fabric right now; I include some links here to Korps.se that sells good thick woollen fabrics for cloaks. Very thick and warm fabric, or a softer and warm choice.
Colours:
The best colours for your cloak is: “yeah, it depends on..” you are starting to get this right? Period, area, status, wearer… like with all the other garments the medieval person would buy or make a garment according to what they could afford and what was available/allowed for them. Use artwork again; blues, reds and browns are seen often, and during the late medieval period dark hues and black seems to be popular. A commoner or person living in rural areas maybe had an undyed homemade cloak, while a fashionable burgher would wear something bought, dyed and cut to their taste. The cloak also differed between a garment of fashion and an everyday outer wear for bad weather; let this reflect the colour you choose.
Or, if you prefer, use this information to inspire you into making an awesome fantasy cloak for your next fantasy adventure!
Welcome to this step-by-step tutorial, perfect for beginners. It might seem long, but explains everything you need to know. Follow it as you go, or look up the section where you might need extra guidance.
This is a great project to begin with! Easy, straight forward and the fabric won’t be too expensive.
Examples of medieval shirts with slits, gores and seams.
Most people wore linen underwear during the medieval period, and a man’s kit was made up of breeches or a type of loincloth, and the shirt. While you are at it; make two shirts! It is really nice to be able to change and wash your clothes during longer events, and a pleasantly smelling shirt will make it easier to make new friends…
Linen shirt with a slit at the neckhole
Buying fabric:
The amount of fabric you need depends on your size and the width of the fabric. This example will use cloth 150 cm wide. To decide how much you need to buy, calculate the measures on your pieces and how much fabric you need for those, then add another 10% minimum to allow for shrinking or uneven edges. (Fast tip: just buy 2 meters up to XL, a bit more if you have a larger size. Extra fabric may always be used for other projects.)
Look for linen fabric of 120-180 gram, I prefer a thin and even weave. (That is more historical and comfortable than a coarse and lumpy weave.) Bleached or unbleached linen, according to the status you would like to aim at. Bleached linen was a bit more expensive, but don’t go for the super-white ones in modern stores.
Pick a shirt model of your choice
Preparing the fabric:
Zigzag the raw edges to prevent them from fraying while washing, or buy a bit of extra fabric if you don’t want to bother with machine work.
Pre-soak, wash and iron your fabric before starting to cut and sew your shirt. Washing will avoid future shrinkage, make the weave even and remove any pesticides. Pre-soaking the fabric will lessen the wrinkles and make it easier to iron. 40-60 degrees c machine washing, hang dry.
Things you will need:
Needle, linen thread, beeswax, scissor, measuring tape and something to mark your fabric with (fabric chalks or just a pencil). A ruler or straight piece to draw against is nice, but not necessary.
Tools for handsewing
Measure:
1. Lenght of finished shirt from shoulder to hemline.
2. Circumference around the widest part of your upper body, often the chest.
3. Length of sleeve from shoulder to wrist.
4. Circumference around your hand/wrist (make a loop with the measuring tape, and try to pull your hand through it, it should be big enough to be easy, in order for you to be able to take the shirt off.)
5. Armhole (measure around your should/arm as the picture shows, then make the measuring tape into a loose circle, and when you find it comfortable-check the measurement.) I usually add about 25% extra from my body measure, from 40 cm body measure to making the sleeve hole 50 cm.
Example (with measures) so you can see how I do this:
1. Lenght of finished shirt from shoulder to hemline: 100 cm
2. Circumference around the widest part of your upper body, often the chest: 100 cm.
3. Length of sleeve from shoulder to wrist: 70 cm
4. Circumference around your hand/wrist: 28 cm
5. Armhole: 60 cm. This means the sleeve base will be 60 cm, and the armhole on the body parts will be 30 cm on front and 30 on back.
Add ease of movement:
What is that? If you were going to cut out your pieces with the above measures, the shirt would fit tight along your skin, making it impossible to move, or take it on and off. Therefore, we will add extra space for movement. I usually calculate 6% of the circumference around your body, 10% if I want a loose fit.
Example: 100 cm + 6 cm (6% of 100 cm) =106 cm. Split this measure in 2 for front and back: 53 cm each.
That’s it! (we already added ease into the sleeve by making sure we could pull the hand through, and the sleeve base by adding extra room there)
Add seam allowance:
What is that? Seams always need to be a bit from the edge of the fabric in order to be durable. The space between seam and fabric edge= seam allowance. Short= SA. I will add 1 cm, between 1-2 cm is recommended.
Example: Add 1 cm to all edges around your pieces, like this:
Seam allowance can be added directly in your calculating and drafting the pieces, to paper pattern pieces, or drafted on the fabric outside the pattern. We use the first method here.
Example:
1. Lenght of finished shirt: 100 + 2 cm SA= 102 cm (I like to add another 1 cm to hems; so 103 cm)
2. Circumference around chest: 100 + 6 cm movement + 2 cm SA= 108 cm
3. Length of sleeve from shoulder to wrist: 70 + 2cm SA= 72 cm
4. Circumference around your hand/wrist: 28 + 2 cm SA= 30 cm
5. Armhole: 60 + 2 cm SA = 62 cm sleeve base. Armholes: still 30 cm *2.
Draft your measures into a pattern:
Now you are ready to draft your pieces! I like to do this on paper first, to save as a reference, for future projects, and to determine how to save on fabric. I draw my piece of fabric onto paper, making 10 cm=1 square:
Nr. 1 is the front and back pieces, nr. 2 sleeves. As you can see; if you would like to have side gores instead of slits in your shirt, nr. 3 would be excellent to use. This is just an example, do a draft with your measures and lay out the pieces in a way that suits you.
I recommend drafting the front, back and side gores either along or across the length of the fabric (do all these in the same direction) the sleeve may go along or across, depending on what is more convenient (the shirt will look better with this method).
A note on sleeve measures: this sleeve doesn’t sit on top of the shoulder when finished, it hangs on your upper arm (see photo at the beginning), which makes this measuring method work. When measuring for a fitted sleeve, always measure around your bent elbow.
Design your neckhole:
These are my general measures: small-medium: 1 = 18 cm. large-xlarge: 1= 20 cm. The back I cut out around 5-6 cm deep, the front (2) is cut 10-15 cm deep. If I want a slit at the front (3) I cut it around another 10 cm deep. If you don’t want a slit, you might need to make the neck opening a bit deeper/wider in order to fit your head. You can always draw it out, cut a little, try it on, draw a bit more, cut and so on, until you are satisfied with the look.
Shape your armholes:
If you feel that the shoulders are a bit wide, you may shape the armholes a bit (common if you have a large chest but narrow shoulders). Cut 4 cm (small/medium) to 6 cm (large/xl) from the shoulder top (4) and create a gentle curve to the armpit, or draw a straight line from the top (4) to the armpit (see photo further below). Then sew the sleeves as described. The seam should still be hanging slightly below your shoulder, not at the top of it.
Cut out the pieces:
When you have drafted all your pieces on paper as above, you are ready to draft them onto your fabric! Iron the fabric and lay it down on a flat surface, draft all your pieces and check the measures with a measuring tape. Use a piece of chalk suitable for fabric, or if you don’t have that; a pencil. A ruler, a large book or a straight stick can be used to make the lines even. Everything seems good? Cut the fabric pieces out! (you may also want to mark them Front, Back, Sleeves if you are unsure.)
Sewing time!
The order of sewing is as following, I will walk you through every step below: shoulder seams if any, sleeves to shoulders, side gores if any, sew together sleeves and sides. Adjusting neck-hole, adjusting sleeve length to your wrist, hemming.
1. Start with pinning the shoulder seams. Putting in pins alongside the fabric edge makes it easier to avoid stabbing yourself when handling the project.
2. Cut a piece of linen thread, the length of your arm. Coat it with bee´s vax by pulling the thread over the vax piece a couple of times. Thread a needle (the needle should be as small as possible, but thicker than the thread to make it easy to sew), and make a knot at the other end.
The needle is thicker than the thread
3. Sew the shoulder seams with backstitches. 3 stitches/cm is a good guide, and 10-15 mm seam allowance depending on what you drafted on your pattern. If you find it difficult to make the seam straight, draw a thin line with a pencil where you want it to be.
4. Press the seam allowances to either side. Use your fingernail, a pressing tool or ironing. Fold the seam allowances double, and pin down.
5. Use running stitches (or whip stitches) to sew the folded edge down to the shirt. The stitching should only be visible at the right side as small dots.
6. Try out the neck hole by pulling it over your head. Cut out more if you need, and check in the mirror to see if you like the look. When you are satisfied, hem the neck opening. Start with folding the edge twice and pin it in place. Make the folds as narrow as possible, to make it easier to sew nicely, mine is 5 mm. Sew the edge down with whip stitches.
7. Pin one sleeve to the armhole of the shirt, right side against right side (this photo show a shaped armhole). Sew it in place, using running stitches or back stitches. Pin and sew the other sleeve in place. Press the seam allowance to either side.
8. Now we are going to save some time with a folded over seam allowance! (photos below in 10.) Trim one side of the seam allowance down to approx half-width (5-6 mm) and then fold the larger one over this, press in place. To avoid fraying and loose threads, fold in the edge of the fabric under the seam allowance. Press down, and pin in place. Now you have a neat looking fold, ready to be fastened down. When sewing the seam allowance down like this, you save time and make the seam more durable since the fabrics will be sewn twice to each other. I prefer whip stitching for this seam, it is easy and durable.
Which way should you press the folded over seam allowance? I often go for pressing and sewing down to the biggest fabric piece. So for the sleeve seam, the seam allowance will be pressed down onto the body parts. On side gores, the gores will be pressed out onto the body piece. It makes it easier to sew and gives the garment a nice drape.
9. Time to sew the side seams and sleeves! Lay the shirt down inside out on a flat space, and pin the side seams and sleeves. Make sure the fabric is smooth and the edges lays on top of each other. Mark where you want the seam to be if needed, and then sew from the sleeve wrist, all the way down the side seam. I like to leave the bottom 10-20 cm open on the side seams to create a slit in the shirt, if I don’t have side gores. Backstitching will make the seam durable, but if you are in a hurry a running stitch with some backstitching in the armhole will also suffice.
Slits at the bottom
10. Finish of the side seams by pressing the seam allowance flat, and make a folded over seam allowance. Press, pin and sew this down.
Folded over seam allowance, above the side slit in the shirt
11. Now it is time to fold the edges and sew them down. On linen fabric, I like to make a double fold to avoid fraying threads from the fabric edges. Start with the hem around the bottom of the shirt. Fold two times, around 0,5 cm each (or the SA you choose), and press the fabric in place with an iron or your nail. Sew with whipstitching, travelling on the inside of the shirt, which will make small dots of threads visible on the right side of the shirt.
After that, finish the sleeves in the same way. I like to try the shirt on before hemming, to be able to adjust the sleeve length. If they are a little too long, just create a deeper fold, or cut off the extra fabric. If you have made them too short you can sew on another piece of fabric and make a hem on that one. Piecing is always historical.
How to fasten the thread:
When there is about 10 cm thread left (approx the width of your palm), it is time to fasten the thread and take a new one. Sew another stitch, pass through that loop before pulling tight, and repeat at the same place a couple of times. Then you can pull the rest of the thread down into the fabric before snipping off the leftover, hiding the thread inside the seam. Neat! Take another thread, prepare, and start sewing at the same place you stopped.
Uhm, this is a lot of steps for a simple shirt? Yes, it is. Can you cut the corners, get a bottle of beer and sew it all on the sofa? Of course you can, but each step may not be as easy, and it will be harder to have a nice view of the process. What I mean is- this is just my way of describing the process as easy as possible for you, to allow a handcrafting process where each step is straightforward, and where the sewing will be as fast as possible to do.
General advice:
Always pin on a flat space to make sure your seams will be even.
Be nice to yourself; sit comfortable, take lots of breaks, use tools to make your sewing easier.
Remember to actually try out the fit, the length, the neck hole etc before finishing sewing. It is very easy to just continue sewing once in a flow, but if you end up with a garment you don’t like, you will have to redo lots of work.
Is the measuring a bit off? No worries; in this project, a 1-2 cm difference will not matter. You can probably go on sewing. I sometimes have wonky measures. Medieval finds are full of uneven pieces, wobbly seams or piercings. Don’t worry!
Other types of shirt models:
Shirt with side gores: adding side gores is easy, and give you extra movement on a longer shirt. Sew them in place before sewing the side seams closed. Use the same stitches and folded over seam allowance as above.
Shirt with sleeve gussets: small square pieces of fabrics get stitched in under the arm, to add more movement and to save on fabric instead of making larger sleeves. I usually sew these after the sleeve, while sewing the sleeve and side seams closed.
That’s it on shirt sewing. These techniques will also do well on a number of different projects, and is somewhat of a basic go-to. Enjoy your sewing! Did you like this post? Support me on Patreon to help me make more.
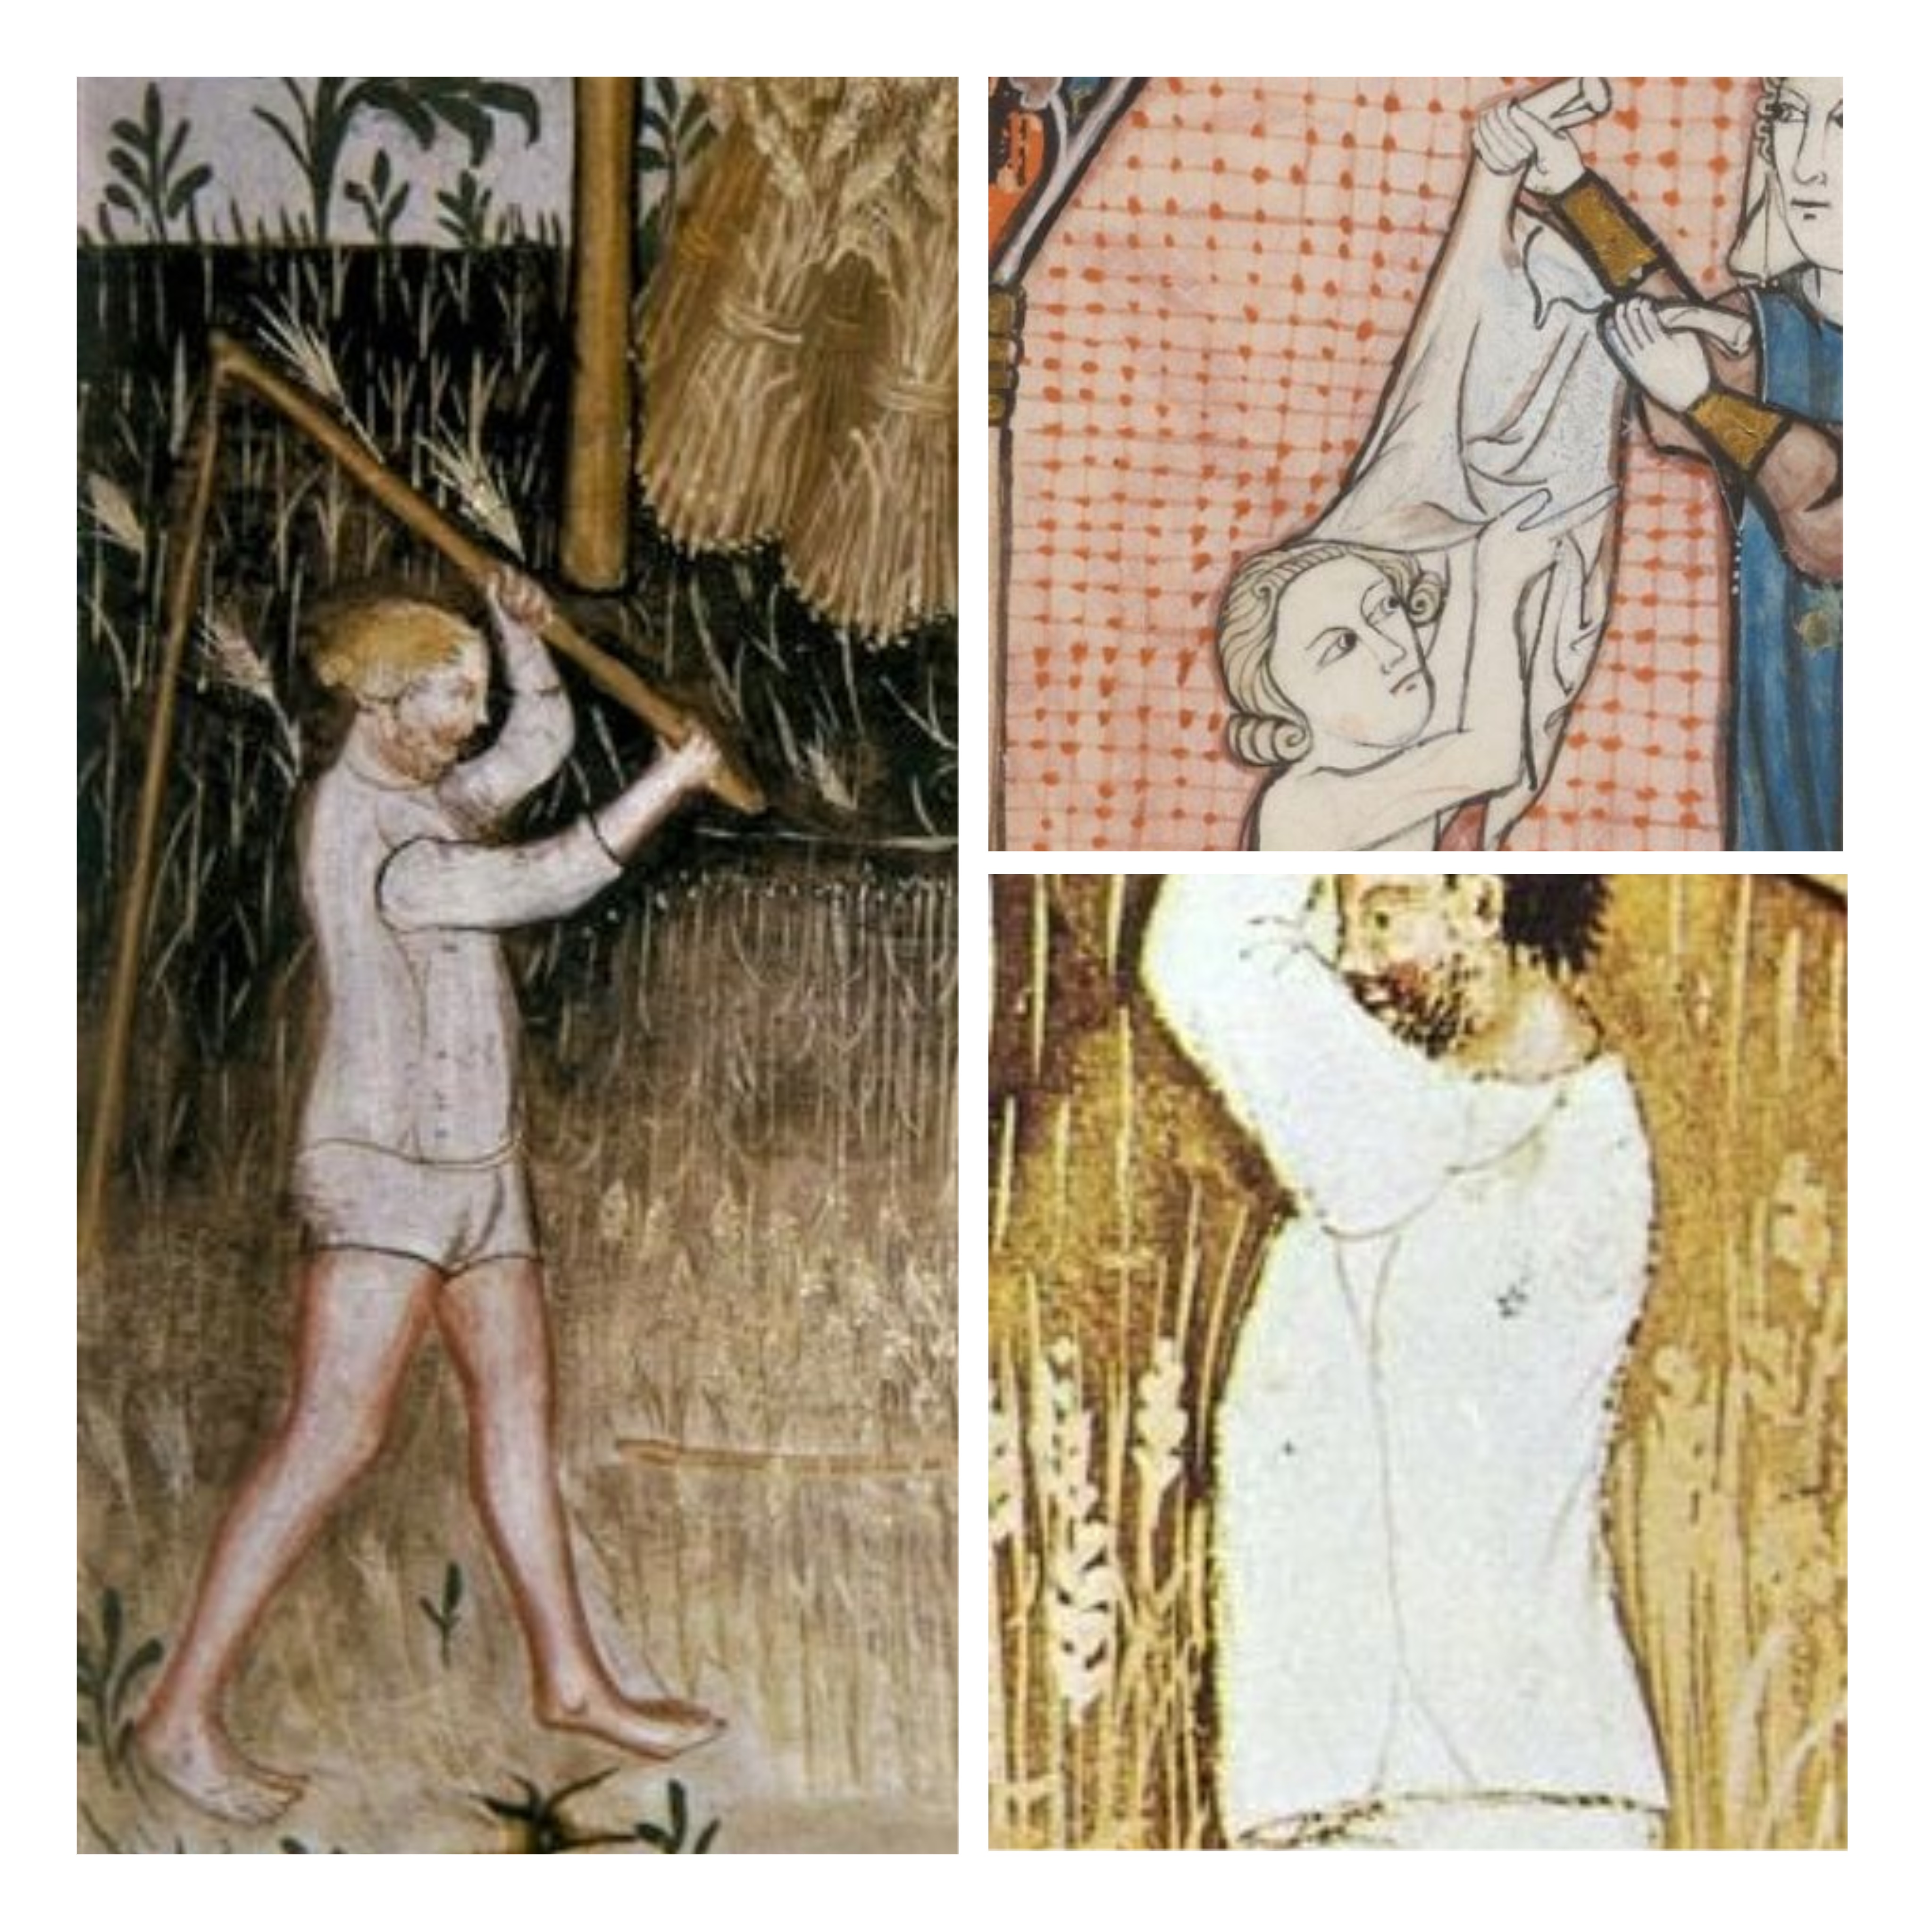
Introduction: Straw hats of different shapes caught my interest a while ago, and I did some research on them. They appear in art from around the 13th century onwards while changing design over the centuries.
My thoughts are that they are mainly seen in rural landscapes and working conditions, with farmers and labourers working outside. They also appear on travellers, commoners being outdoors, harvest time etc. Some examples exist of straw hats on higher social status persons (but the artwork might be allegorical or symbolic rather than contemporary portraits).
Based on what I´ve seen in the artwork, I believe the straw hat to have been in use in a similar fashion as today; as an outdoor option for sunny weather, mainly to act as a sun barrier. They are often depicted in manuscripts like The Labours of the Months (Medieval calendars) during field labour in June, July and August on both men and women. Decorations are scarce, with the occasional headband in black or some other neutral colour the only decor visible.
15th-century harvesting woman
Fashionable shapes? In art, the straw hat appears in many different forms. Some shapes seem to have been used for longer amounts of time (like the round one with a brim or the slightly unshaped hill form) while the conical shape of the 13th and early 14th century (seen in the Maciejowski bible) seems to be out of fashion later.
Maciejowski bible 13th century
During the second half of the 15th century and onwards you can spot a greater diversity in hat shapes and design, possibly mimicking the fashion for headwear during this period. The late 15th century is, after all, a rather crazy fashion period with lots of options in sizes, shapes, designs and silhouettes! During the 16th century, crowns with a flat top and flatter-shaped hats became more common in the artwork I have looked through.
1519-28 man harvesting wines
The artwork in this blog post is mainly collected from today’s Germany, England and Italy, but this excellent webpage has a collection of more hats in period artwork if you are interested.
Differently shaped straw hats made by Handcrafted History
Materials: Based only on the artwork, it is not possible to determine which kind of straws were used to make hats, and it might also have depended upon local traditions and what material was readily available to the artisans. It is not impossible to weave or braid straw yourself even if it takes practice to make it look good, and since the material is available for free in most areas I think it likely that these hats were commonly made in the local community rather than imported. Most hats are also seen on workers in the field (though the occasional more fashionable straw hat appears in city settings), supporting the theory of local manufacturing.
Detail from the Merode Altarpiece, Robert Campin
Book of hours, Morgan Library
Different kinds of straw available today:
Wheat straw is soft, shiny (and if you ask my horse, super cosy come winter) and very possible material for hats, at least in those parts of Europe cultivating wheat regularly. Oat straw I have no handcrafting experience with, but the horse likes it in his bed, and there’s always some oats left to munch on. Barley was a common grain in Sweden during the Middle Ages and is a rather stiff and durable straw, like rye.
Rye straw is a traditionally used material in Sweden for making straw crafts because of its length and durability, and rye is a hardy crop. For handcrafting material today, rye is being grown for its straw and harvested before giving grain, whereas the medieval straw was probably taken during the grain harvest.
Wheat straw hats made by Handcrafted History
One important difference between the straw today versus medieval straw is the mechanical machines munching up straw during harvest, making it usable mainly for animal bedding or farming. Before machines took over, the harvest was done by hand and a scythe takes off the straw at the ground without crushing it. After the grain was collected, you would have great amounts of material. Very handy!
Wild straw from grass and reed are easily available, free and often quite easy to use for braiding straw hats. The downside is you have to venture out into the wilderness to take it, and the straws are not as shiny as wheat. I have found that grass straw may be sturdier though.
Braided and sewn straw hat.
How were straw hats made? Contemporary artwork indicates different methods of use for making straw hats. There seems to be evidence for different kinds of weaving techniques and patterns (when you braid the straw together until you have formed a whole hat) as well as sewn hats with braided straw tape as a base (when you first make a braided tape and then sew it into a hat shape). The find from the 15th century looks to be made from woven or braided tapes, layered on top of each other.
Several straw hats on female field labourers
I have only found one extant find of a straw hat from today’s Germany, rather beaten up but at least you can see what it is. Do you know of any more finds? I would love to check them out!
Kempten, Germany 15-16th c
Conclusions if you want to sport a straw hat yourself:
Go for a hat made with natural straw, such as those mentioned above. Handwoven in one piece, or made out of braided tapes sewn together depending on what you can find. Pick a shape that fits in with the period you would like to reenact, and don’t decorate it over much. Use your hat outdoors as a nice shade from the sun, but replace it with a smarter-looking hat or veil/hairdo during winter and indoor festivities.
Early 15th c Les Tres Riches Heures de Duc de Berry, round crown hat.
Some practical tips from this very experienced hat-wearer:
Straw hats during summer will shade you from the sun and help you avoid sunburn and heatstroke. If it is really hot, use a cap, coif or linen wrap drenched in cold water under the hat. A ribbon may be pulled through your hat at the base to hold it in place on your head, or you could use pins to secure it to your linen layer underneath. If your hats get a bit crooked or bent, spray it with some warm water and set it to dry in the shape you want.
Harvesters, one man is wearing a straw hat, Tacuinum Sanitatis
Do you feel the need for a good straw hat? I am currently making and selling different models; check out my page with hats to look at different models and order. This last bit is totally advertising my own business. Yep. Send me your money.
I wanted to buy myself a pair of really nice wooden pattens to protect my handmade medieval shoes during events, like 6 years ago. I didn’t find any, so then I tried to trade for a pair with some woodworking friends, but none knew how to make a pair or didn’t want to, so I set out to fix my non-pattens-problem on my own. That took a while, and believe me, I have gone through some bad options before I ended up happy.
Making a wooden sole with a leather strap, and then put it on your foot seems like a simple task, but in the end, I didn’t get it right before I researched the extant finds, looked at the artwork and then tried making a pair with some serious hands-on experimenting. I wanted them to both look good, feel right and be comfortable to move in. Now I have finally made a pair I am satisfied with, so I wanted to share my research and process with you! Because of the amount of research, text and pictures I ended up with, I am splitting the posts into research and step-by-step. Easier to read!
Period: Europe, mainly 14th to 15th century.
About pattens
Pattens are a pair of soles with straps, to wear with your everyday medieval shoe to raise the foot above the ground, avoiding snow, dirt and water. Though they might look like sandals their purpose was to protect the wearer and the expensive shoes all year round, and the thick soles meant you came up from the ground, keeping you dry and warm as well as making the shoes last longer. Pattens were shaped after the foot and the leather shoe, changing form as the shoe fashion did.
They may also be referred to as clogs or galoshes, all names for a medieval overshoe meant to protect the leather shoe, though I will use the term pattens like Grew and Neergaard does in Shoes and Pattens. There are finds of pattens from the 12th and 13th century, making them an useful accessory for the medieval person. Finds of 14th century pattens in London are often decorated for the higher classes and gets more common later in the century. In the 15th century, they become increasingly popular, with many different models and variations. Lots of extant finds show this trend, as well as the pattens being frequently showed in contemporary art. Based on this knowledge, I decided to focus mainly on the late 14th and 15th century variations of pattens.
Materials and models
Pattens can be found with soles in joined layers of leather, as well as wood, and with a solid sole or a two-pieced variant, joined with leather almost like a hinge. Examples with a wooden platform on top of stilts or wedges in wood or metal can also be found.
Examples of wood being used in finds; alder, willow, poplar and one example of beech. Aspen was prohibited for use in England in 1416 (which tells us it was probably a popular choice) but 1464 it was stated that it was allowed to make pattens of aspen wood not suitable for arrow shafts (Shoes and Pattens).
15th and early 16th century pattens, both wood and layers of leather were used for soles.
Straps made of leather
All extant examples I have studied have straps made of leather (vegetable tanned cowhide seems to be the choice), though there are lots of different strap fastenings. Some pattens have one strap over the front part of the foot, almost like flip flops, while others also have straps at the sides or behind the heel, joining in a strap around the ankle. The heel straps can be first seen in late 14th century finds.
Looking at contemporary artwork, many working persons from the period wear practical pattens with a sturdy strap over the foot, while higher classes have more formed soles with delicate straps, sometimes decorated, and sometimes with a buckle.
To adjust the fit of the straps there are examples of metal buckles, ties and leather strips secured with a piece of leather or a nail among other varieties. The leather used for straps are generally thinner than the one used to join a split sole, and to make it sturdier a seam, a binding or a folded edge has been used. Two layers of leather sewn together is another method. The leather could be decorated with dyes or edges of contrasting colours and stamps or cut-outs in patterns.
To fasten the leather to the soles iron nails were used, both for the straps and the sole hinge. Sometimes a second leather strap was nailed down around the sole to finish the look and protect the foot straps from wear. Other words used for the nails are dubs, pins and pegs but I choose to follow the item descriptions on the online database of the Museum of London naming them nails. It also seems that the medieval examples have the same shape and size as nails to other kinds of work.
Metal buckles and other fastenings
There are several examples of metal buckles represented in the artwork on pattens from the 15th century, and finds from the 14th and 15th century of similar buckles made in iron, brass, bronze and copper allow to mention some examples. Because most buckles are found loose it is hard to say which ones were used for belts, shoes, pattens and purses. I opted for some examples from contemporary artwork to show you, and if you want to further examine buckles from the period there are lots of finds on online museum collections as well as in Dress Accessories.
Examples of metal buckles in contemporary artwork
There are several finds from sites in Europe like London and Amsterdam as well as examples from Germany. If you want to see more extant finds, the Museum of London online collection is a great source to begin with.
Hugo van der Goes, The Portinari Altarpiece/Triptych, c 1475
Sources:
Grew and Neergaard (2001) Shoes and pattens p. 91-101
Egan and Pritchard (2002) Dress Accessories 1150-1450
Goubitz (2011) Stepping Through Time: archaeological footwear from prehistoric times until 1800.
Love got some new garments for his 15th c outfit this autumn. Do you remember the wedding outfit he had, with the silk doublet?
It is a bit fancy for the everyday outdoor event, so now I made him a wool doublet with linen lining. It is based on period artwork, such as this painting by Rogier van der Weyden (St. John Altarpiece ca 1455-1460)
The doublet has a couple of bronze buttons in the sleeves so he can open them if he needs to pull up the sleeves when doing dishes, and the front is closed with lacing in silk. It is not as tight-fitting as the silk doublet, giving him more freedom of movement (or adding some weight in the gym)
He also got a wool coat with linen lining and fur trimming, based on several paintings by van der Weyden, like this one that is a portrait of Nicolas Rolin (Beaune Altarpiece ca 1450)
The black, fur-trimmed coat seems to be one of the most fashionable garments during this period, you can see it on several men in portraits and religious scenes.
The belt is similar to the one in the painting, made in bronze and black leather. It was mostly this detail that made me do the coat, and since the belt set was a wedding gift from our friend H-G it seemed like a good combination.
In combination with his black pilgrim hat the outfit gets quite striking, but maybe a bit black. A red hat or chaperone perhaps would do the trick? Or red pants?
The last tutorial was about how I made my first Houppelande (medieval overdress) that was an early houppelande, with a pattern layout that saved in on the fabric.
Now we move on to the opposite; a full circular houppelande dress that was the high fashion during the 15th century, and were worn by both men and women (with different lengths and fashion details of course) The construction method for this one is open for discussion; there might have been gores and more pieces according to different fabric widths during the medieval period. This layout is practical and simple if your fabric is 150 cm wide and you want the houppelande to be of as much fabric as possible, the small pieces allowing you to save in on the fabric a little.
The construction idea is from an article I found ages ago (that is now lost on the internet?) And later tailor’s books which shows very full dresses for women and coats for men. The shape, style and drape of this method also look similar to paintings of houppelandes.
First, you need a lot of fabric! How much depends on your length, in this example, I make a pattern that gives you a dress around 150 cm long; good for the shorter woman or for a man (since houppes for men usually leaves at least the shoes visible) That means you will need 5,2 meters of fabric for the dress itself, and then another 1,5 to 3 meters for the sleeves. Oh, and maybe a full lining too?
The pattern is basically 4 quarters of a circle; forming a full circle when put together. The small pieces save you some fabric, but you may cut out the full quarter circles if you prefer. If you go with the pieces, then sew them together with the quarters the first thing when you have cut them out, so you have 4 whole quarters.
Then, sew the shoulder seams together, that is the short straight seams above the arrows. Leave the armholes (on the pattern they are cut out as half-moons) and sew the sides together. To know how wide your armholes should be; measure yourself loosely around your armpit, or use a previous pattern. Add extra cm for movement; at least 5-6 cm.
The seam length of the shoulder should follow your shoulder; between 10-14 cm depending on how long shoulders you have. The armholes should be laying on the body, not falling down from the shoulder to your upper arm. Cut away what you don’t need, a little at a time if you are unsure.
When you are satisfied with the shoulder, armholes and side seams, sew the back and front together with each other, front to front, back to back. In the front, you leave an opening big enough so you can dress and undress easily. On paintings, some dresses are open almost to the hip. In the back you need to leave an opening big enough for your neck, try it on and you will understand! The open seam will give you the neckline on the back, and can then be cut for a rounder style if you like, or you could add a collar.
So, that was it- quick and easy yes? Now the dress should look something like the sketch above, and you can attach the sleeves to the dress. Sleeves? Well, that is for the next part of the Houppelande tutorial series. Stay tuned!
Because the book is in Swedish; so will this blogpost be. It is about a new book about the late 15th century clothing for men.
Jag fick hem en helt ny bok, skriven på svenska, som handlar om den sena 1400talsdräkten för män. Det är så fantastiskt roligt att en sådan här bok görs, på svenska, av skickliga medeltidsmänniskor, med syfte att underlätta för andra att förstå och skapa 1400tal. Förutom att det är en lätt väg till kunskap så är det också ett tecken i tiden på att medeltida återskapande av olika slag blir större och större i Sverige!
Boken har en lättöverskådlig layout, enkel och tydlig text, och stycken som efter en snabb genomgång ger dig koll på dräkten. Det är den typen av bok jag skulle börja med att skaffa om jag ville göra 1400tal, eller ge till en nybörjare som vet *ingenting* men gärna vill vara med. Jag gillar att den tar upp en historisk överblick och talar om formspråk, för att därefter ge förslag på plagg som tillhör perioden. Det finns inga mönster eller steg för steg instruktioner för plaggen, sådana finns istället att köpa via reconstructing history eller görs själv med hjälp av en mönsterkonstruktionskurs eller Tailors assistant. Är du en sådan som vill forska vidare själv, så gräver du i referenslistorna som innehåller både bilder och litteratur. Det är helt enkelt en handbok riktad till återskapare som vill börja med perioden- så himla smart och häftigt!
Anna, som är en av två författare, har jag träffat flera gånger på event och hon är en skicklig hantverkare och återskapare, som också bloggar om mycket 1400tal (Willhelm känner jag inte än, men ring mig så tar vi en fika och nördar 1400tal!) Boken innehåller, förutom referenslistor, också massor av bilder från perioden. Bredvid varje avsnitt om plagg/material osv hittar du alltså både historiska referenser, bilder, skisser och materialförslag från ett modernt perspektiv. Mycket bekvämt med andra ord, eftersom mycket arbete som du behöver för att kunna återskapa dräkt redan är gjort i boken.
Rikard och Helena från Handelsgillet är också delägare i Chronocopia som ger ut boken, och arbetar (förutom att sälja material och produkter) med att sprida kunskap om återskapande. I boken finns det en del produkter från deras shop, vilket kanske kan ses som reklam- eller ett praktiskt sätt att få tag på bra material att fota för att belysa tygfärger, material och vad man kan hitta för att praktiskt återskapa perioden. Jag tycker att det är ett bra initiativ, jag vet att de gör mycket efterforskningar kring färger och val av material de köper in för att allt ska vara historiskt, och här är deras shop Handelsgillet för dig som vill hitta material från boken (den tunna kyperten som syns har jag använt till flera av mina dräkter).
Nästa bok behandlar kvinnodräkten- gissa vem som ska klicka hem den också…
This is what I read right now; The first book of fashion. It is really two surviving dress diaries from the 16th century German, that has been put together and analyzed with comments and introduction to both the art and the time and period. It is a really well put together book, full of interesting reading.
If you are interested in recreating male clothing from this period, it is like a dictionary or bible full of clothing examples, with comments about what materials different garments were made of. It also have a recreated outfit at the end, with lots of information.
This is part 7 in my “reading tip/book tip series”, the earlier posts are in Swedish and you can find them here. Or just type in “dagens boktips” in my search field on the blog. Today’s post was rather short, because the sun is shining outside for the first time in forever, I’m heading out with the horse on an autumn forest ride, and then I’m of to visit some friends for the weekend. Hope you will have a wonderful weekend!


")
")


")


")


