In this tutorial, a gore is a triangular-shaped piece of fabric sewn into the garment. A gusset is a square piece of fabric, sewn into the armpit to add movability and space, used on shifts and shirts to take a few examples.
How do they work?
A gore inserted in your sleeve will add space and freedom of movement. Depending on the placement of the gore in the sleeve, it will add space to different effects, like moving your arm up and forward or adjusting your sleeve to larger muscles in your arms.
Why do you want to use gores in sleeves?
Gores might have several reasons to be where they are:
To save fabric while cutting out your fabric pieces.
To add movability by cutting the gore on another grain than the rest of the sleeve.
To mend a broken sleeve or seam.
To enlargen a sleeve being to narrow.
Gores might be inserted while making your garment, but also afterwards if you feel a need to adjust the fit. This guide shows you how to put in a gore in a cut slit at the front of the sleeve, but you can also add gores to the seam on an S-shaped sleeve. The principle is the same; fitting the sleeve into the armhole and then adding as much gore as you need to make the sleeve ”whole”.
An example of how this method was used during the medieval period is the Moy Bog dress, which has a similar gore. Maybe an adjustment to add space to a new wearer that had more mass over arms and shoulders?
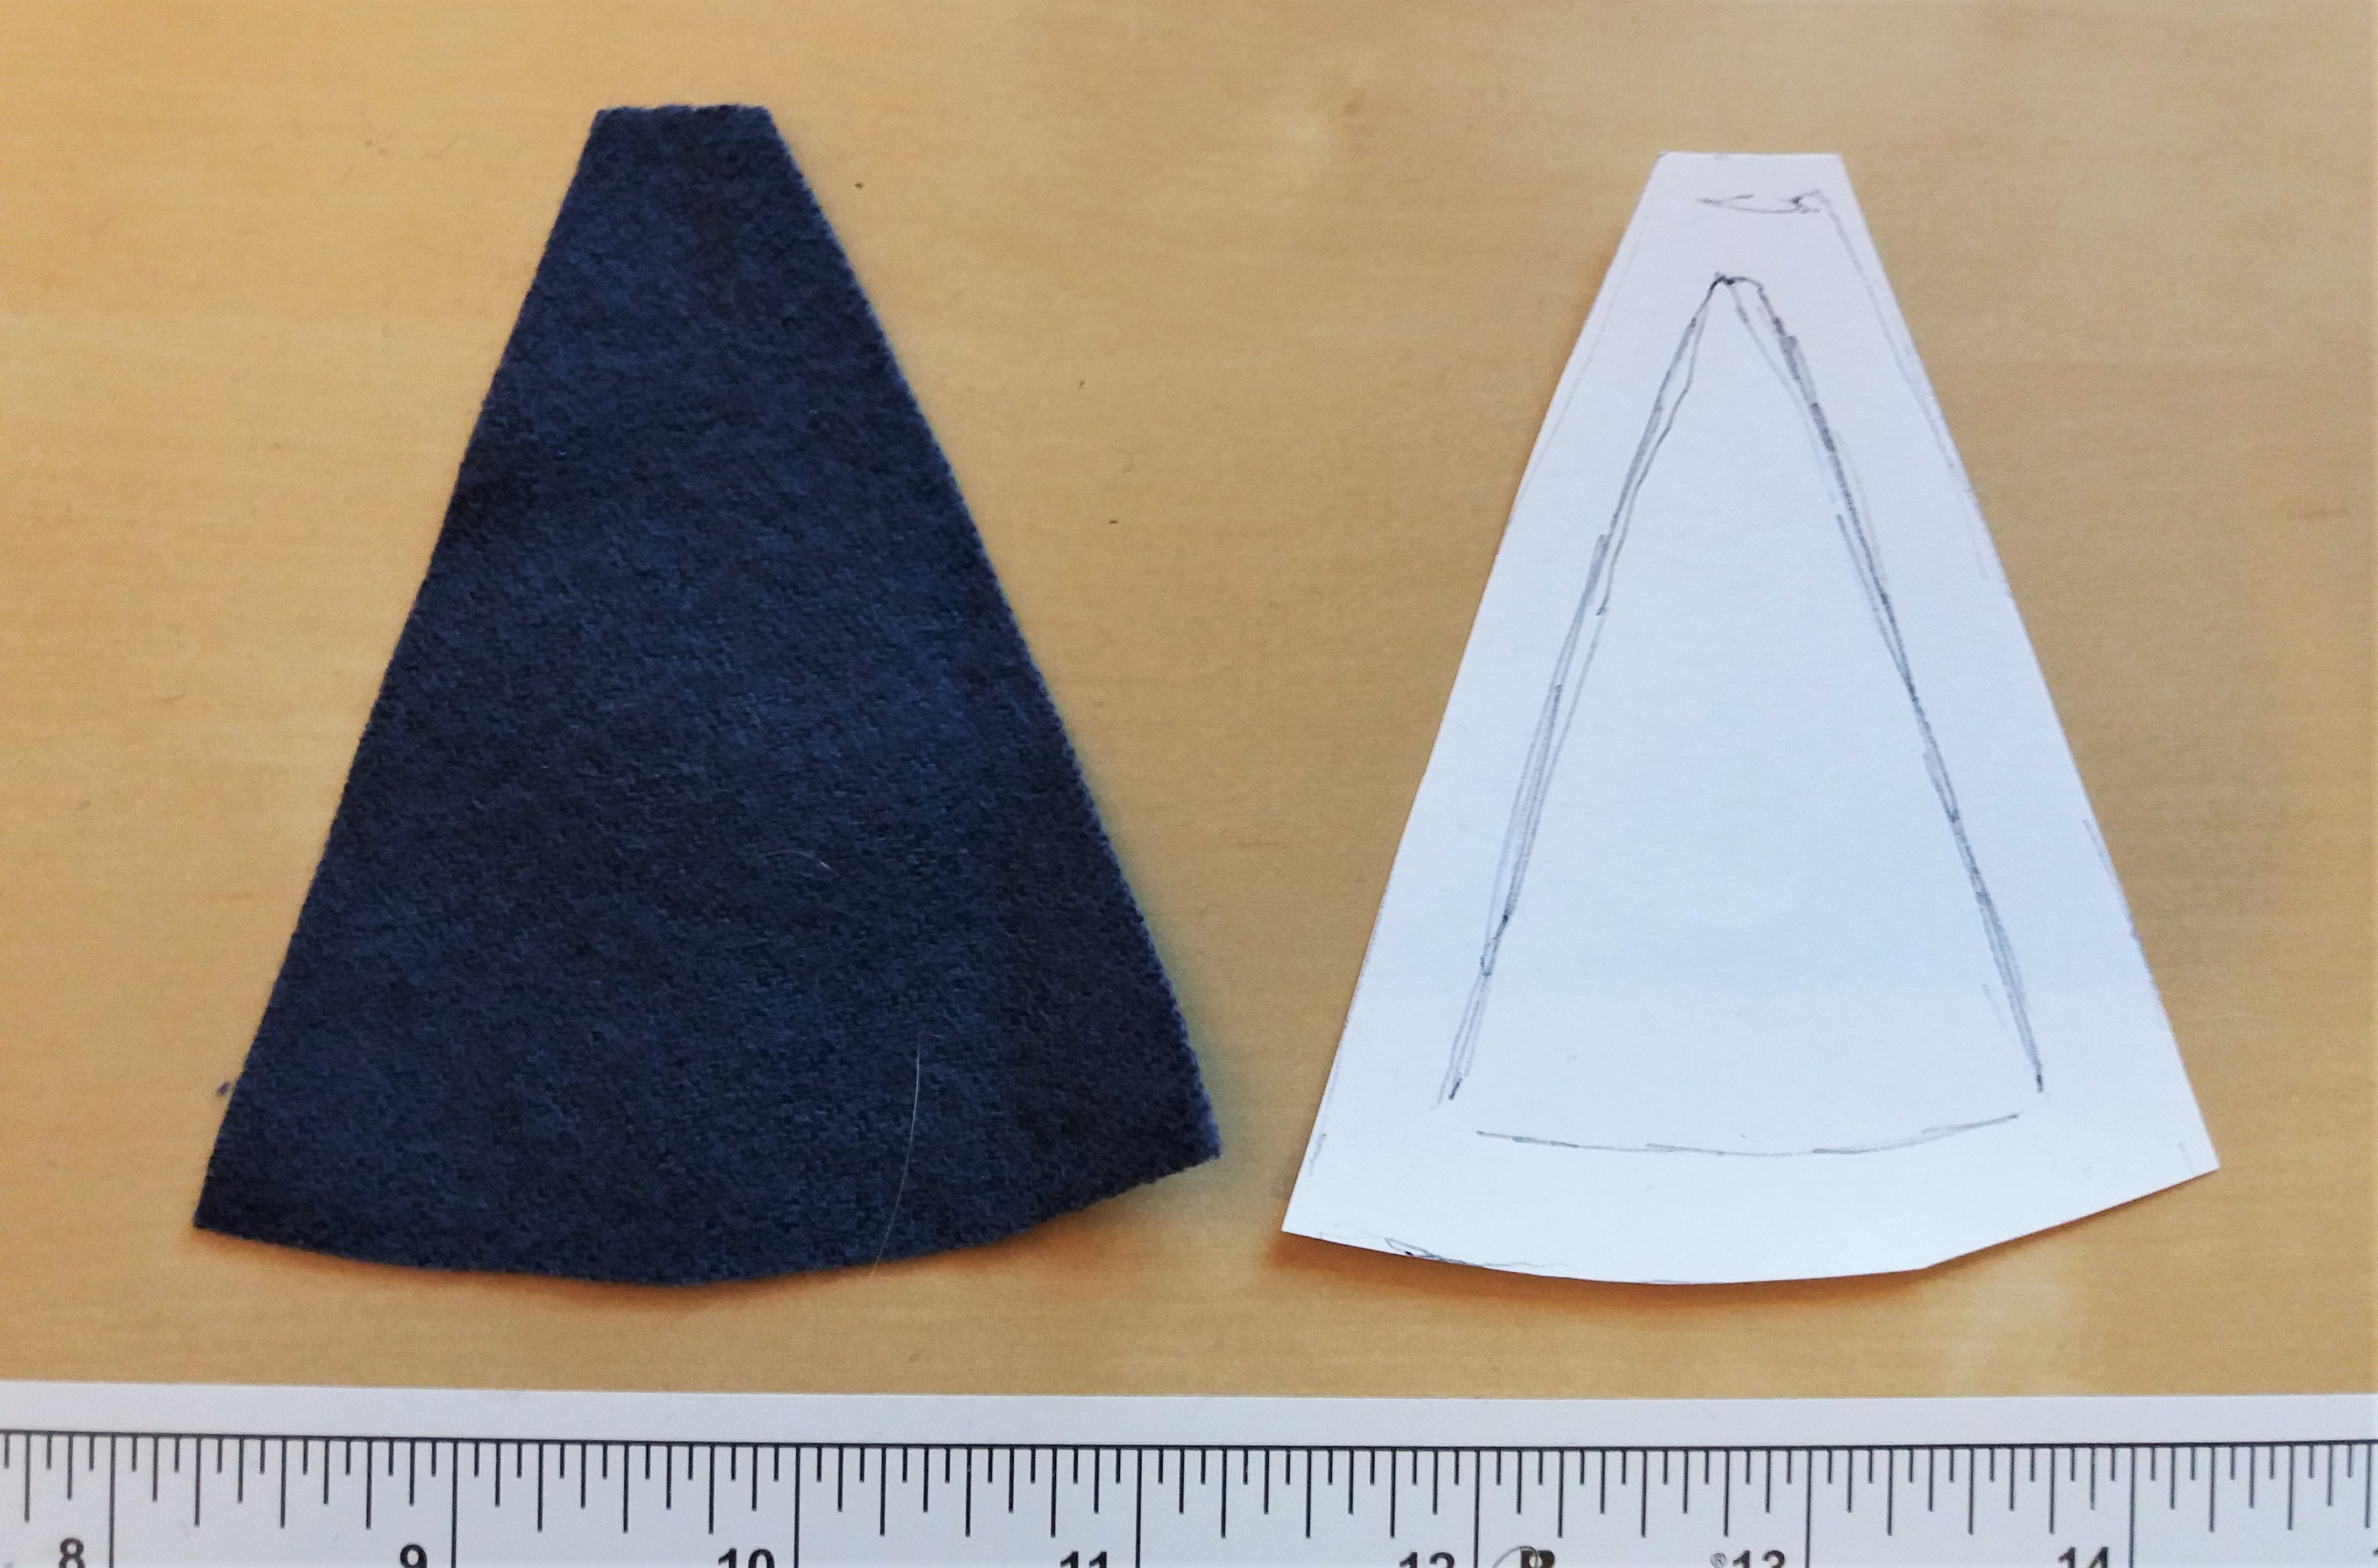
The easiest way to make well-fitted sleeve gores is to cut out a piece of fabric, pin/baste it on the inside of the assembled garment, and sew it in place. Here is a step to step guide on how I do:
14th-15th c short sleeved dress
This dress has a tight fit, and I decided on a small gore in the sleeve front to add a bit more flexibility and movement.
I started with inserting the sleeve in the armhole and then cutting up a slit in the front to make the sleeve fit all around (this means you will have to make a sleeve that has a slightly smaller measure than the armhole if you make a new dress.) When I am satisfied with the inserted sleeve and slit, I press the seam allowance to the inside and start with the pattern for the gore.
Put a piece of paper on the inside of the dress, and smooth the fabric on top of this. Draw a paper draft for the gore by tracing the ”hole” on your paper. Very easy!
Add seam allowance around the draft, and cut out.
Put the paper pattern onto fabric and draw + cut two gores, one for each sleeve. Remember to mirror the pattern and mark the gore with up/down and front/back.
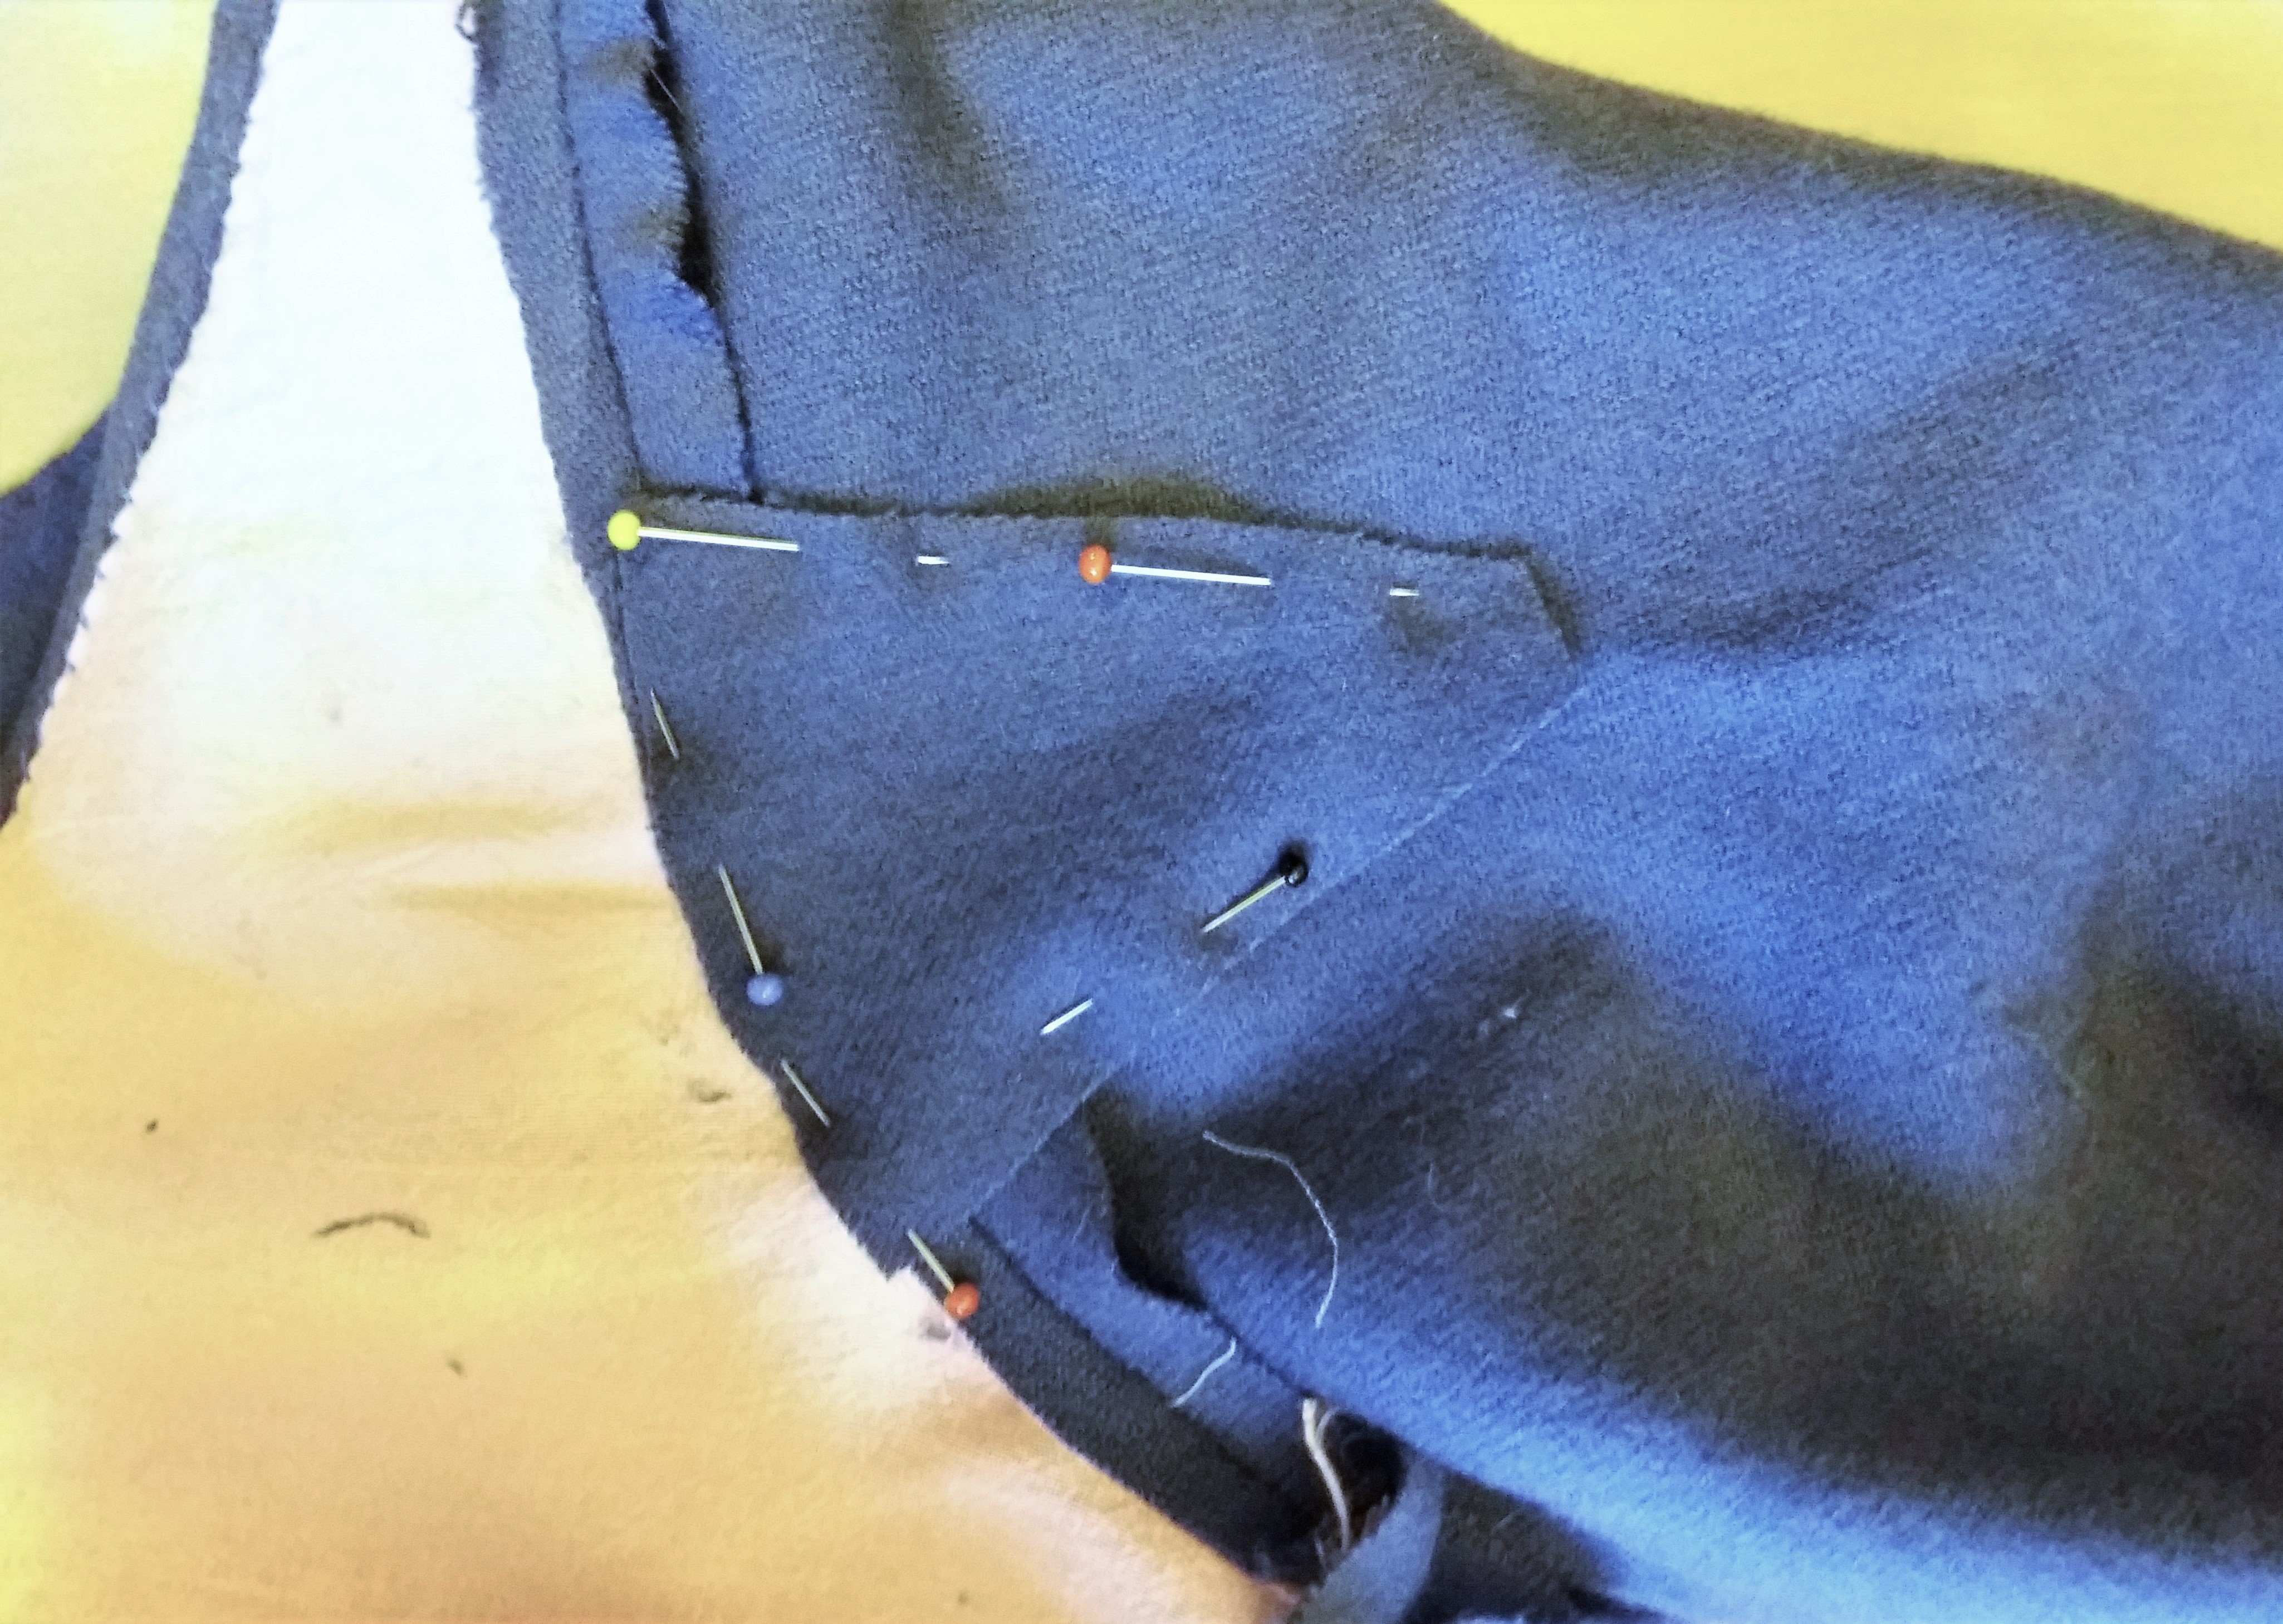
Fit the fabric gores into the sleeve slits, and pin in place (here I worked on the inside, but if you find it easier you can work from the outside of the garment).
This is what it looks like from the right side of the dress:
With pins in place, baste or sew the gore into your garment. Here I used small whip stitching, not bothering with basting. But if you are unsure or want to test the fit before sewing, basting is a great way to do that. Fastening the gore from the right side of the garment makes it easy to get a good result, since you can see the result while sewing.
When I have inserted the gore, the seam allowance is most often pressed to either side (down to the sleeve) and whip stitched down. I always press the s.a towards the bigger fabric piece. For example, sewing it down onto the sleeve and/or body piece. After that, it is all done!
The new blue gown also has a gore in the front of the sleeve, barely visible but great for movement!
Back in 201something (2016 maybe?) I made this outfit with a brown woolen overdress, based on Drei Schnittbücher by Katherine Barich/Marion McNealy. I wrote a research post to summarize my background research and thoughts but never got around to writing about the finished outfit. The research focused on middle Europe in the early 16th century, but when I found the book with pattern drafts I took the sidestep to try and make the gown after one of the models presented, even though it might be more probable to have made a dress with a waist seam like my trossfrau dress. But who can resist a fun pattern draft from a medieval tailoring book?
Since then, I have been wearing this outfit several times and even adjusted the dress with a lower neckline and a piece of mending over one of the skirt folds. I like this outfit since it is both pretty and comfortable for working, so I thought I would share it with you.
Winter event, with all three layers
I start with a basic linen shift in half bleached linen, based on my tutorial. It has a square cut neckline to match the dress and kirtle, and long sleeves.
Over that, I wear a kirtle or middle dress in wool, sleeveless and simple. This is a really practical working garment, and allow me to roll up the shift sleeves when doing dishes. Back then, I had a yellow sleeveless dress, that got sold to make a new one, one size larger.
Unfortunately, I got sidetracked when making that and decided on an Italian styled dress that is also shown in this tutorial. After that, I realised I really needed a middle layer to make this outfit complete, and made another kirtle in grey-blue wool, with a decorative fabric strip in black wool.
Both the middle layer and the overdress is rather tight fitted, giving me bust support when worn.
(This is what it looked like at first before I moved the neckline down a bit)
The overdress is made in brown wool with decorative borders in amber coloured wool. I liked this dress pattern since it is quite different from others I had tried, and I fell for the challenge. Sadly, the tailor books do not come with much information about how one should assemble all the pieces, so you could best describe this as a try on a medieval pattern, rather than something strictly copied.
I adjusted the cutting out of the fabric pieces to fit the fabric I had available, which was around 300*150 cm of wool. I also choosed to widen the skirt at the back to make it look more like the artwork from the period. The tailoring book shows the centre back (and front) straight, but that does not give the desired folds seen on women. Maybe a gore was supposed to go in there, or some other adjustment that was so obvious none bothered to write it down? To accommodate for the skirt width, I had to piece the sleeves with three different fabric scraps to get the dress together.
The front piece is folded at the centre front, making the skirt without a seam in the front.
The back pieces are pieced at the hem for fuller width
One of the sleeves, basted for trying on.
pattern pieces from the book
The overdress (well, the entire outfit) is sewn by hand, and on this dress, I only used linen thread, a choice I based on research for the period. Sadly, I have misplaced many notes and sources so the only reference I have left is a note saying “linen thread common for working-class clothing, do not bother with silk or wool). Ok, I apparently did that…
The skirt panels and some longer seams are made with running stitches, and the rest of the dress is sewn with backstitching, and the seam allowances are sewn down with whipstitching. The decorative fabric pieces are also whip stitched in place. On the inside, the dress is lined with a piece of sturdy linen fabric in the body, and the front closing is reinforced with a piece of linen canvas and closed with hooks and eyes. Another possibility would be lacing, but I like how fast the dressing is with hooks and eyes!
I found this model harder to fit than the 16th c models with waist seam, since you can’t adjust the waist placement during fitting. It has to be cut out at the beginning. I like to raise the waistline 1-2 cm above my natural waist to achieve the early 16th c silhouette, and that was more difficult here. But the dress made up for it by being really fun to assemble with the skirt folds.
I folded the skirt part that stretches outside the body in several folds and fastened these to the sides and centre back of the body. This gave a lot of strain on specific parts of the dress, causing the folds to rip when someone accidentally stepped on the dress hem. So I mended that side with a piece of fabric.
Here you can see the folds in the centre back and sides.
If I were to remake this whole pattern, I would choose to cut a slit between the body and skirts and fit the skirt in folds as you do on 18th c clothing. But this was several years ago and I hadn’t tried that technique yet.
Side view showing the gathered skirt fabric in the side; drapey and voluminous!
The greatest thing about this pattern was the drape of the skirt. It is full and generous and the folds look great in the centre back and sides. The front on the other hand is straight, with just an extra 15 cm overlap to allow for getting out of the dress. I just fold the gap shut and wear an apron above, but you could pin or hook it in place, or make a slit in the front. The straightness of the front makes the skirt great to work in; when I bend forward the skirt rearrange itself towards my legs, avoiding any flames or obstacles before me. Someone gave this thought “back then”!
The gollar I already made a tutorial for, and you can find it here. The early photos show an amber coloured English broadcloth gollar, fully lined with fur. The red one only has fur strips, enough to add some warmth but still be conveniently small for packing in a suitcase… Erh, I mean historically stylish yet cheap. Yeah?
The cap is a simplified Birgitta cap, and should be worn with a veil on top to be considered “well dressed for the public”. These caps are unusual in contemporary finds from the 16th century, I have seen a model doll and some “maybe” examples in art- it could be a cap but could also be a folded veil or other headwear. Hairnets, veils, braids, straw hats and other kinds of headwear are also visible. The most important is to have your head “dressed”; either with a hairstyle or headwear appropriate to the period.
You can find my pattern on the Birgitta cap at my Patreon or in my Etsystore.
The hoses are the same knee-high wool hose I use for other outfits, and here is a tutorial to make your own.
The apron is made in handwoven linen and smocked with linen thread. Two double folded strips of fabric were sewn shut to form the bands that I tie the apron with. The rest of the apron is only double hemmed and sewn with whipstitching.
When I went back to my old research post I also remembered that I wrote that I needed a jacket and a cloak, amongst other things. I actually made several examples of wool jackets, but they never made it to the blog for some reason. A black wool jacket based on the same tailoring manuscript book as the dress got photographed at an event, but then I sold it to make another one and try out some variations.
photo: Annika Madejska
Phew! So this was a lot of thoughts, and sewing, and years gone by without finishing up the writing on this project. I seldom return to old projects like this one, but since I still like it I thought it would be fun to share it with you. It is not a tutorial of any kind, more of a diary or a presentation of a project done.
Sometimes when you see others on the internet doing cool projects and posting photos of fancy dresses it is easy to feel like you don’t get anything done, but sometimes the road to finished projects can be long, windling and a bit unsure. It is ok too!
My Patreons wished for more research to be published, and I am happy to do so! Want to support the blog and be able to ask for content? Consider joining my supporters here!
You know when you are browsing fabrics, looking for something practical and discreet to make a working garment with? Yeah, that didn’t go as planned here…
I fell in love with this silk brocade and bought several meters of it during Double Wars. I had no plan at the moment, but it was lovely and the pattern a replica from the 15th century, so I figured I would find it useful. However, it took a couple of years to come around to cutting the fabric and making it into this gown:
15th century silk brocade dress
buying the fabric
Research:
I collected some examples of dresses that I liked that would fit the time period, social status and use for this fabric. This one is a favourite, painted by Pedro Berruguete around 1485, but I already made a tight fitted one when I made my velvet overgrown for the wedding, so I opted for a looser style now.
The weave, material and pattern of the fabric place this project at the top of the social structure in 15th century Europe, something to be worn by royalty. Brocades are most often seen as outer garments, with wide panels and a loose fit (the better to be taken apart and remade for the next wearer?) Here’s my pinterest board with examples. This fits my fabric well, since it is quite stiff, with a dramatic drape.
The model is best described as an overdress or houppelande, with narrow S-sleeves. The panels starts to get wider below the armhole, and adds as much volume as possible to the hem. The neckline is cut in a V-shape and slightly rounded in the back. I made the back panels longer to get a train and cut the middle front straight and floor-length to be able to walk in it without tripping over the hem.
Working with brocade fabric:
When making silk brocade garments for yourself, remember that you need more seam allowance than you use when sewing in wool or linen. First, the fabric will often shred and loose threads everywhere, and second, the brocade is often stiff and does not give any flexibility when worn. I calculated 1 cm extra seam allowance (2,5 cm instead of 1,5 cm) and another 2-4 % of the total measure for movement (if your pattern is 100 cm around the bust, the total will be 102-104 cm + seam allowance).
I do not wash silk brocades before sewing, instead, I steam them with an iron. This will lose the weaving tension without altering the fabric appearance overly much.
When drafting the pattern pieces, remember to adjust them to the fabrics pattern and right/wrong side. This means that if you want to use your fabric wisely, half the dress will have the pattern running in the ”wrong” direction. On my dress, the pattern is ”upside down” on the back panels, and the right way in the front. The fronts are not matched pattern-wise but cut out to maximize the use of the fabric. To the modern eye, this might feel wrong, but never mind modern ideals! Also, piecing in the skirt or sleeves does not have to follow the pattern direction, just use what scraps you have.
zigzag your edges after cutting
After cutting your fabric pieces, I recommend zigzagging or overlocking the edges on your sewing machine, even if you are about to hand sew your garment and will have to rip away the threads while you work. This will prevent the seam allowance to disappear before you have even finished sewing the pieces together.
For hand sewing, silk thread and running stitches or backstitching will do fine. Try pinning only in the seam allowances to avoid damage to the fabric, or use small clamps instead of pins. I also like to bast; here is the sleeve sewn into the armhole with a linen basting thread, before backstitching it with silk thread.
brocade sleeve inserted to armhole
If you prefer to sew your garment on a machine, use a silk thread and a little longer stitches than normal, to allow for a good looking seam. You might want to adjust the thread tension a bit- try on some scraps first!
I press all my seams while working (with steam and a cloth), to make them tidy and easier to sew down. If you don’t want to fell the seams, leave a zigzag or overlock on the inside. If you prefer to fell the seams, use silk thread and try to press and fold the seam allowance as tight as possible for a nice finish. The hem is also pressed and folded over twice before I whip stitch it in place.
The gown, before the finishing pressing with steam. Notice that the sleeves pulls a bit toward the back? The seam is a bit on the tight side, I should have used looser stitches when closing the sleeve. Now I had to adjust it with a good steam and press to reset the shape. Never underestimate steam!
trying the dress on a mannequin
the back of the gown after pressing, the train turned out great!
I have yet to wear the dress to an event, and I am really looking forward to it. This type of dress needs to be paired with nerdy headwear, sparkly jewellery and a great party!
Update summer 2022: I finally took the gown out during Skellefteå Medeltidsdagar! I actually packed it early in the season, but the weather was so rainy and muddy I didn’t want to wear (and ruin) the dress until July. It really turned out great, and was really comfortable to wear during the party.
Lacing is a really easy solution when you would like to make a tightly fitted garment and need an opening to be able to get in and out easily. During the medieval period, lacing comes and goes as a popular fashion and practical solution choice, so if you aim for a historically believable garment make some research first to determine if the lacing is the best option!
Historical garments may also be closed with fabric or metal buttons, hooks and eyes, pins or a regular whip stitch.
spiral lacing with a lucet woven wool cord, on a 14th century dress
Lacing can be seen on male and female clothing, but today I wanted to show you how I make lacing on a dress. The most common lacing method is spiral lacing; one cord for closing the open space by going through lacing holes spaced a little uneven from each other. This is easy and quick, and you only need one cord.
Fastening the lacing; a double round at the top prevents gaping.
To unlace; thread the point back again, or as below: use a loose knot at the start of the lacing (at the bottom) and unravel the lacing from the bottom up.
Use a knot at the start of the lacing, on the inside of the dress.
Spiral lacing up close, and on the finished dress.
I place the lacing holes like this; the first two and the last two are aligned but the rest is spiralled. This gives you a tighter lacing, that looks better and is historical. By making the first and last pair even you will get the front panels even to each other. This kind of lacing can be seen in paintings by Weyden for example.
Lacing holes needs to be quite close to each other; between 1,5 to 2,5 on one side, depending on the fabric and the amount of support you need. A tighter gown supporting a heavy bust needs a closer lacing, while a looser garment might have more space between the holes.
To make lacing holes I use a sharp awl to make a small hole, and then a fitting thicker awl in metal, wood or bone to make the hole bigger. I do have real awls, but since they seem to always be “somewhere else” a bunch of different objects has been used; needle binding needles, hairpins, chopsticks… You don’t need anything fancy, was my conclusion. Yeah…
After the hole is made the right size, I sew around it with a buttonhole silk thread or a waxed linen thread (depending on social status, period, colour etc) I never bother with any fancy stitch, just sew around like this, and cover the hole equally with thread. Practise makes perfect; don’t bother if your first holes are a bit uneven, if you start from the bottom and work your way up they will look really nice by the time you reach the area others actually look at.
A tip for making the hole more even is to first sew one round of stitching around the hole, and then another turn, dense enough to cover any gaps.
On the inside of the lacing, you can see a thin strip of tabby woven, sturdy linen fabric. I always use a piece of fabric on the inside (if I don’t have a whole lining in place) to strengthen the edge and make the lacing look better. You can use linen fabric scraps: cut it in a straight piece, fold in the raw edges and sew in place with whip stitches or slip stitches.
I prefer to make the cord in either wool or silk thread. The wool thread is cheaper, flexible and will stay put. The silk one gives a nice shine, is very strong and easy to lace with. Decide based on your project. To finish the cord (this one is done with a lucet but they could also be braided or tablet woven) I like to use a point. That will make it easier to lace the dress, but if you don’t have one a thick needle will do the trick too! Just thread the cord on a needle, and use that to lace yourself in. Another option is to make a cord long enough to just loosen up, without having to lace up the whole garment.
Here’s an alternative look for you 15th-century geeks out there! I took the photos in 2018 but apparently put them in that “good to have” pile on the computer, and they were forgotten. This happens quite often for me…
Linen shift closest to the body, wool socks and leather shoes. Over the shift I wear the easy 15th century dress, here used as a middle layer/kirtle. I like to be able to use my clothes in different layers, and this dress is a perfect summer over dress, but also works as the middle layer once it gets colder.
The overdress is a wool houppelande, lined with silk and with openings in the sleeves. This style is popular by the 50s and 60s, and can be seen in Rogier van der Weydens paintings. I keep the dress closed with a broad belt with a bronze clasp; a copy from an original find. This is one of my favourite dresses, since it is comfortable to wear but looks fancy. It is quite heavy with the high-quality woollen cloth draping around my body, but hey- you have to give a little effort to fashion sometimes?
The temple braids and turban-looking great veil is perhaps a bit “simple” for the dress, and I could also pair it with elaborate headwear. But I really like this look since it is comfortable and, above all, I can manage it myself in 15 minutes by the mirror. If you want to see how I do them; I have a braid tutorial here and a paper on the 15th-century veils I use here.
If you want to research the 15th c yourself, feel free to use my Pinterest as a starting point! This fashionable period has much interesting things to offer!
Remember my latest spring green wool dress? I took lots of photos during the process so I could show you how I made it, and share some great hand sewing tip if you want to hand sew a garment yourself. This post is a step-by-step on inserting gores in a garment, like front and back gores, small sleeve gores and gores for a hood.
Let’s start with my favourite way of inserting gores! With this method, you will always get a gore that looks nice and ends in a smooth top.
Start with cutting up the back panel, make it around 1,5 cm shorter than the side of your gore.
Press the sides (the seam allowance) of the cut on the inside/wrong side of the dress.
Pin or baste the gore into place. If you are a bit new to hand-sewing, working on the inside might be easier, but you can also do this from the front/outside of the dress. The photo above shows the inside.
Start sewing from the outside, with a version of the whip stitch. Here you can see the bottom of the gore where I start, and the waxed linen thread going in from under the folded seam allowance to hide the knot. Waxed linen thread (35/2) or a thin 2-ply wool thread are my favourite choices, but for an upper-class garment silk is also an option.
To make the seam as invisible as possible, sew it like this; making my progress upwards on the inside of the fabric. The result is a seam that is only visible by small dots.
When I reach the point of the gore I just continue around, sewing small whip stitches all the way around the cut. The result is a set in gore that looks tidy, like this! But we are not finished yet, the seam needs to be finished on the inside to be durable and neat.
This is what the inside of the garment looks like now.
Time to trim and fell the seam allowance! I start with cutting the seam allowance of the back panel down a bit, so the overlaying gore covers it. This looks tidy and makes it easier to sew down.
When I have cut all around, I press the seam flat and whip stitch it into place. This will give me two seams holding the fabrics together, creating a very durable garment.
And the finished gore at the back of the dress. The small shadowed hollows around the gore are where the whip stitch from sewing down the seam allowance shows, these are nothing to be afraid of; it is a result of hand-sewing.
I decided to make another sleeveless middle dress to wear under my velvet houppelande. The other one (similar to this one, also in black silk taffeta) I made before apparently shrank on its own in the wardrobe during the winter, and come spring was a little too small over the waist. Can’t imagine how this could happen..?
This style of dress may also be worn on its own with sleeves, in the Italian style. The amount and choice of fabric and decorations does all the difference in placing this dress on the fashion timeline, as well as the waist seam is a clear indicator of region and time. I fancy the waist seam placement in the natural waist so I took inspiration from these paintings, as well as the Italian examples further down the post.
This kind of dress may also be made in wool or cotton, depending on the area you would like to get your inspiration from. Cotton was more common in Italy, while wool is much more common in Northern Europe. (For more information about cotton dresses, I recommend “The Italian cotton industry in the later middle ages 1100-1600” by Mazzaoui.)
I used a black silk taffeta, because I wanted a cool dress, matching the silk and velvet outfit and taking as little room as possible in my event packing. If you are going for silk fabric, taffeta is more similar to historical fabrics than, for example, uneven dupioni or raw silk. Medieval dress silk should be shiny and evenly woven as far as I have seen.
I also have a similar one in amber wool twill, recreated to be worn by a woman not as high in social status as this black silk one will belong to. I took photos from both processes to be able to show you some different techniques.
Want to see how I made it?
1. This is a basic sketch of the pattern pieces. Really simple; a front and a back upper body + linings. Also, 2 different ways to make the skirt; the black one are made of a rectangle and gathered in the waist. The wool dress is made of panels (opt 2) to create more width in the bottom hem, but wide enough in the waist to gather.
2. Upper body pieces: I started with a front and back, loosely based on my toile/mock-up pattern, and added 5 cm in each side to be able to adjust the fit and have some extra fabric to fold to the inside for support. If you go for side lacing you can have a whole front piece, and the curve from the front seam will instead be moved to the sides. I will show you later!
3. Cut two of the outer fabric, and two lining pieces. Then baste them together to be able to work with the pieces without risking any movement.
You also need to decide if you are going to have lacing on both sides (seems to be usual in Italian portraits and handy if you often change your size) or on one side (faster to sew, allow you to get the dress on quickly).
4. Pin or baste the body pieces together and try them on. Having a friend to help you will be really helpful! Adjust and take in the side seams to create a smooth fit. You can also adjust the shoulders by gently pulling the front upwards if necessary. The fit doesn’t have to be all smooth, if you have lots of curves there will be some room in the dress (just decide on wearing a bra or not, or making the dress supportive before you finish).
Basting the skirt into place for the fitting is really good if you want to see how the fabric falls, and where the waist is going to be placed. Skirts usually “hang down” the bodice and make it look longer. Not the silk though- silk is such a light fabric.
5. Here is the body, inside out, after the fitting above. The line is really curved to make a good fit, and support the bust thanks to the stretch in the fabric and lining (lining is really important, don’t forget the lining!) If you are going to sew one side, use backstitching to create a durable seam.
Or if you are going to lace both sides, press the fabric to the wrong side of the body so you have 4 layers of fabric to sew the lacing holes through (if you work with a medium to thick wool this might not be necessary, you may instead trim some fabric down and whip stitch it into place. Remember that all the sewing allowance needs to be pressed down- don’t be tempted to leave “a little extra” as this might lead to a little bit too loose dress.
6. The bodice during the sewing phase. I closed one side seam with backstitching but left the sewing allowance. It is nice to have if you need to adjust the size or fit in the future. To keep it from fraying you can baste or whip it loosely to the lining of the bodice. The other side gets folded and pressed down.
7. The neck opening and arm openings I fold down (once for thicker fabric and twice for thin and fraying fabric) and whip stitch into place. To make it both pretty and durable, you can then press the openings and sew them one more time with a stab stitch.
Or you may finish the openings with a separate strip of fabric on the inside, as a reinforcement. Here I overlocked the lining and the outer silk fabric together after basting and fitting and finished it off by sewing a fabric piece to the outside around the opening. That one I then folded and pressed down on the inside. This technique is good for sensitive, fraying fabrics and machine stitching.
Here you can also see the clamps; some silk fabrics get small marks by pins, and I, therefore, use clamps when working on visible places like the neckline. But they are very handy for all kinds of fabrics, so if you are not a fan of pins- try them out! (Search for sewing clamps or fabric clamps on an internet or sewing store of your choice)
8. The skirt part of the dress I usually sew separately from the bodice when I make garments with waist seams. Sewing the skirts together with running stitches, occasionally locked with a backstitch every needle lenght or so, will give you a fast and good seam. Press the seam allowance to one side, trim, and whip stitch it down. This is my favourite way of making long seams faster by hand. Or use a sewing machine, it is your choice!
9. After that, I hem the upper lining of the skirt, before gathering it (see the tiny stitches at the top of the skirt below?)
10. There are several different ways to gather or pleat a skirt to a bodice. I use different methods depending on the look I want. The wool skirt got gathered in soft pleats and then sewn onto the bodice. I used a waxed linen thread, to make the seam steady. Silk would have been another option, but as I wanted to create a working-class garment I mainly used linen thread.
The black silk dress got a pleated skirt instead. The skirt part is simply made out of two rectangles that I have stitched together in the sides, leaving the seam at the top open for around 15 cm, to be able to get inside the skirt when it is attached to the bodice (if you have side lacings on each side, leave both side seams open a bit)
I use something to measure with, and then mark the pleats with a pen, or make them at once with pins or clamps. You could also calculate the amount and size of pleats if that is to your taste, but I usually just roll with it. There might be an extra pleat or some unevenness- but it won’t be visible.
In the front, the folds are sewn towards the side of the body, while in the back the folds meet in the back. By arranging them this way you create a flatter front, with more volume at the hips and back. After the entire waist is gathered/pleated, I often secure the folds with a basting stitch, or pins before I sew it to the bodice. (See the photo of the wool dress above, I use this method for most waist seams.)
11. Lacing: if you are a bit unsure, you could save the lacing holes to last and do them after one last fitting with the dress on, with the right shift/chemise under. Otherwise, I like to sew them before attaching the skirt, I feel it is easier to sew with less fabric on my knees. I use a spiral lacing and finish it off at the waist seam. Often my skirt will stay closed enough without any further closure, but if I have a more narrow skirt that fits snugly over my sides I might need to add a fastening like a hook and an eye, to keep it closed.
Spiral lacing on another project, just to show you what it looks like. If you need lots of support from your dress, make the lacing holes tighter together. If you have a looser dress style, you don’t need as many. I usually have 2-3 cm between each hole on one of the sides.
12. Last; finish off the bottom hem. Check to see if it is even and adjust if necessary (a friend is good to help here but modelling yourself and adding pins might work) I usually just finish the hem with a single or double fold and a whip stitch. After that, just try on your new dress!
This is my early 14th century outfit, hand-stitched and made with inspiration from medieval manuscript sources, like the Luttrell Psalter from early 14th c England.
I made the dress for my video project and wanted to put together a whole outfit that would fit in the same time period. It turned out super comfy, maybe I could wear it instead of my comfy pants indoors..?
I also made it so it would be usable in the viking outfit if I would be in need of a thin woollen dress/kirtle under the apron dress. Hence the looser sleeves, shorter length and not so wide neckline. It is certainly not the most fashionable 14th c outfit, rather an outfit for work, like in my market stall. (Uhum, much suitable, very nice thinking there…)
This dress will be featured in my online lecture about Medieval Dress (only in Swedish right now!) and as I know that many of you readers are Swedes or understand Swedish, I will post a link to the lecture here. For you non-Swedish speakers; I have not forgotten you, and will strive to translate interesting parts of the video to English and post it on a Youtube channel in the future.
Until then, here’s a list of the materials used in the outfit if you get interested in making your own.
What items do you need?
For my outfit in size small-medium, based on fabrics 150 cm width
Linen shift, 2 meters. Linen thread and beeswax for sewing.
Wool kirtle as the visible layer. 2,6-3 meters of wool fabric. Wool, linen or silk thread for sewing.
Birgitta cap + linen half circle veil. 60 cm thin linen. Thin linen thread and beeswax.
Linen apron. 100*80 cm of sturdy linen, linen thread and beeswax.
Wool hose/socks. Around 70*100 cm wool twill.
Leather turn shoes.
Garters in wool or silk for the hose. Fabric scraps, woven ribbons or braids can be used.
Purse, here in brick stitched silk with silk tassels and a silk tablet woven band. Made by my friend Jenny!
I promised you some insights into the Herjolfnes dresses with the many side gores, and here’s my take to understand the patterns!
(This guide is a “make it work for you” guide, if you want to make a dress as similar to the extant finds as possible, you might want to use the published materials mentioned below instead)
First, if you have “Medieval Garments Reconstructed”, it might be fun to try these patterns out. But remember that these are just general patterns, and they are not made for your body, nor your measurements. The risk is therefore that they will not fit very well, and you will be kept wondering what to do with this new and mysterious pattern.
Furthermore, the original clothing (and patterns) were made to a very different person, with a different lifestyle than yours, a body marked by another way of living, and the clothes were being worn and as the last thing, used instead of coffins for the dead last rest. Translating these clothing into patterns is important to understand the general pattern construction, but after this, I believe it to be more useful that the dress you finally make is going to fit you well.
To achieve this, I recommend you start with a personal pattern; a mock-up or toile. Once you have this one, you can then transform it into a pattern with as few or many side gores as you wish. To demonstrate this I made a model in paper for you. You can try out this method in regular paper first if you want, or go straight for patterning paper and 1:1 modelling.
Step 1: The shadowed picture is my toile/mock-up for my upper body. I have made a start pattern with the skirt attached to these (by the waistline) and two integrated gores; middle front and middle back. On my standard dress pattern my back piece is whole (no seam along the spine).
Step 2: I cut the front and back out, along with a side gore. This is the pattern for my red cotehardie.
Step 3: Time to go sideways! I mean side gores… I mean, just cut the pattern pieces apart like I did here. I place the cut where the armholes start to bend, or around 10 cm in from the sides. The bigger size you have, the bigger piece you will get.
Step 4: Cut the side gore in half, and tape each half to the new side pieces.
Step 5: To make it easier, I draw the new side pieces on a piece of paper, and add some width to the other “side” of the side gore; where it is straight. I don’t need a lot, between 30-40 cm on a full pattern.
Step 6: The front and back pieces also get added width at the bottom hem. It’s illustrated by the orange part in the picture. The width gets added to both front parts and back parts. This will give you pieces that have no straight vertical lines on the skirt but flared lines resulting in a lot of circumference around the hem (fancy!)
Step 7: Now I have a pattern with added side gores, 2 on each side. The gores at the front and back pieces have been added as a part of the pattern to simplify, but you could also piece everything together.
CF= centre front (where my lacing is on the green dress) and CB on this pattern means you will have a seam along the back since the gore is integrated. You could also keep the back piece whole, and insert a gore in the middle. I will show you how I do this in another post. (Also note that I show you a half dress in these photos; when you do your dress there will, of course, be another half of the dress too.)
Step 8: Want more side gores? Not a problem! Repeat the cutting-party, and cut each of the side gores in two. Here I have done it on the front side gore. I recommend marking your pieces with front, back, and arrows to show where they belong, and I also keep my waistline (dotted line). It can get confusing otherwise…
After this, you can add more width at the hemline to each of the new gores, drawing out more width from the straight side like shown above. You can also add A Lot More Width as shown below if you want to have a fancy dress with a great amount of fabric.
Step 9: Very important. After you have cut all your pieces and redrawn them, it is time to add the seam allowance. Add 1,5-2 cm of seam allowance around all pieces, either on paper or directly on the fabric. If your starting mock-up had seam allowance integrated, do not add more to those lines that you have not touched this time.
Step 10: Whoho, a new Herjolfnes based pattern has emerged! Cut it out in mock-up cotton fabric to try out the fit, or just do like I did and cut out all the pieces in wool, with a bit of extra seam allowance. Extra? Just to be able to baste the dress together and try out the fit + if you are satisfied with all the new side seams. I did not need the extra seam allowance, but I intend to use the photos to make even another tutorial on the subject of fitting a dress pattern.
Remember that the side seams are not “princess seams” which are put over the bust to give it a modern form. The Herjolfnes seams are more on the side of the bust and give you movement, a good drape and lots of hem.
I made the sleeves based on a regular S-sleeve pattern I already had, and for this construction method you should not need to adjust the sleeves much (if you have a working pattern), just check so the armhole doesn’t get too wide; measure your seam allowance when making the dress, and then insert the sleeves after sewing all the side gores and front + back panel together.
The finished dress in medium thick twill wool fabric. The dress is actually quite loose, and I cut the sleeves short, and the hem above the ground, to make it into a good working kirtle for historical markets.
The original Herjolfnes patterns don’t have lacing, but I decided to add that and take in the dress a bit to get a fit I am comfortable with. I also hate pulling a tight dress over my head as I always mess up my hairdo and cap, so the laced ones are my favourites. Once again, if you aim for a recreated pattern rather than an inspired one, you might leave the dress a bit looser and skip the lacing.
Useful notes:
Remember to add seam allowance to your new pieces, I like to add a bit extra (2-3 cm) in order to easier make adjustments during the fitting.
When you have achieved your new pattern in mock-up fabric (or cut it out in your wool fabric) baste all the side pieces together to try out the fit. The many side gores will adjust the weight and fall of the fabric and there might be more stretching that needs to be addressed.
You also have a lot of seams now where you can make adjustments to make the dress fit perfectly to your body. If you need to take it in; don’t take in all the extra width in just one seam, but spread it out between the seams.
Also; remember to wear your medieval supportive garment or modern bra of choice when fitting the dress so the dress will fit the bust nicely.
Sources:
Woven into the earth, Else Ostergaard, 2004
Medieval garments reconstructed, Ostergaard mm, 2011
Hi! So nice of you to drop by to read! This time, I wanted to take you with me on a small tour of my virtual wardrobe, showing you some of my favourite dresses I have made so far. Be prepared to see some really old stuff now, because it wouldn’t be very fun if I just posted photos of the 10 most recent, high-quality dresses I made right?
(Yeah, you wouldn’t think it was as nice sneaking a peek into my actual wardrobe, it’s quite full and maybe not in the best order. Have you seen my sewing box? Then you’ll have a feeling for what my wardrobe looks like…)
Let’s start at the beginning; my first buttoned cotehardie. This one is an old dress (the photo is from an event in 2010) long gone to someone else. It was my first try doing a 14th century dress with a closer fit. I can’t say I really knew how to make medieval fitted garments but somehow I managed this one and I was sooo happy with it. I remember looking up to others at the event, pondering how to make such awesome garbs like they wore, and how to manage a really good sleeve.
This early in my erhm, blogging career (can you call it a career if you are not making any money..?) I didn’t get many photos of my own outfits but rather took photos of everything I saw, trying to capture those magical moments and the cool things others wore. Like these outfits- I still remember thinking I would totally want to be that skilled when I grew up!
Oh, I had completely forgotten about this one; the green herringbone twill wool was a really expensive (in 2011) fabric of awesome quality, and I made some kind of Herjolfnes dress with lots of gores in the side and skirt. It was so comfy, fitted me well and I used it quite a lot before selling it. Actually still missing it. Here I am wearing it as a middle dress under my viking apron dress. Couldn’t find any good photo of just the dress.
Oh, my green Moybog gown! Somewhere around 2010-2011, my real interest in medieval pattern construction techniques began and I wanted to try the Moybog sleeves. I remember that I first made a short-sleeved one, wore that for a while and then remade it with long sleeves and better fitted gores in the skirt. Another dress I was really satisfied with at the time I finished it and wore a lot over several years. Then I wanted to make new experiments and sold it to be able to afford new fabrics.
The 16th century trossfrau dress is one of my oldest that I still use (I tend to get tired of old projects and sell them off…) But I still like it. I put a lot of effort into research and actually making it historically accurate and fun at the same time and finished it in early 2015. It is hand-sewn, the pattern and construction methods still hold up to my standard, and the colour is just sooo… fugly. The purple hue is actually based on a natural dye, so the thing that is least accurate with the whole outfit is the slashing on the hat; I was too fast and made it pretty rather than historical believable.
My wedding dress from 2017. This has a special place in my heart, I don’t know if it is the dress itself (it is rather plain) or the event it got used at… It’s a 15th century silk dress with open sleeves below the elbow, lined with really thin wool muslin, and decorated with silk cords and small freshwater pearls. I would like to redo it a bit as it doesn’t fit right now, and therefore I don’t use it. But I do feel a bit unsettled every time I take it out from the wardrobe and think about cutting it apart to redo it. Maybe I am lazy, or a bit nostalgic. Yeah, I will probably remake it any minute (year)…
I loved this one! It is a 15th century houppelande (overdress) in black velvet with moss green edges. The sleeves got lined with my last pieces of green silk that I owned, and they made for a very good contrast to the rest of the dress I thought. The dress was only worn once during this photoshoot in 2017, and then I sold it to a happy customer abroad. I loved it, but I didn’t need it. I mostly made it to practice sewing in velvet and to try out the pattern, as it was my first try to make a full circular houppelande.
My red 14th century wool cotehardie, completely handsewn, and with 20 pewter buttons in each sleeve. What is not to love? It is red, fancy, a really serious try on reenactment clothing and I feel Amazing every time I get dressed in it. Sometime around here I also started to feel like hand-sewing a whole garment wasn’t such a big deal. Nowadays I hand sew most of my wardrobe, with exceptions for some of my undergarments, and projects that have a short time frame.
Ok, I know, it’s a whole outfit rather than just a dress (I can cheat right?) but I couldn’t leave this one out. The amber dress project was just that; a very serious and creative project which was so much fun to make. The process actually took several years, but somehow this outfit came to be a milestone where I felt that I had learned new things and evolved as a handcrafter.
Yes, I have a thing for green. But you knew this one would show up here right? It is green, comfy, dramatic and 15th century. What is not to love? This was actually my latest houppelande after making several tryouts to explore drape, patterns, construction methods and different fabrics (you can see them below) and it is handsewn in a high-quality woollen cloth, lined with silk fabric. In this photo, I wear it full “Weyden style” to portrait a well of woman from the middle 15th century, dressed in rich fabrics to the height of fashion of the time.
Mmm, this is not a clear participant in this post just by the look of it. It is a really simple dress with panels and gores, handsewn in undyed ecological wool (in 2018 like so many of my other dresses). But it is one of those dresses that makes you feel awesome, comfortable and just warm enough whenever you wear it. It’s magical. If I was going to wear medieval/viking clothing every day I would probably wear this one 9 out of 10 days.
So, there you have it! Some of my projects over the years. It was a bit challenging to pick out favourites, and I know I left my new 15th century wardrobe out (but hey, you’ve seen that one a lot lately) as well as my viking apron dresses I’ve made that I really liked. Sometimes I’ll have to put together another Viking-wardrobe post maybe.
What do you think? You have any favourites that you would like to make a version of, or do you already have “the best dress ever” in your wardrobe? I would love to see it!


")
")
