If you have browsed my earlier tutorials (and videos on my Patreon) you might have discovered that I really looove pressing my seams all the time. But how did they achieve good looking seams “back then” without the use of a modern iron?
A smoothing stone: a flat stone or piece of glass (in Swedish “glättsten”) were used with a flat polished wooden board to smooth out fabrics and seam. I have seen several finds from the Viking age but there are examples dated iron-age to medieval period.
Putting the fabric/folds/seam on the board, and then pressing down with a smooth piece of glass/stone will work pretty well, and give you strong arm muscles too…
A smoothing bone or pointed bone creaser (falsben): A polished piece of bone that you can use for flattening out seams, both in textiles and leather. I wanted to show you some historical examples, but couldn’t find any photos to borrow, which makes me a bit unsure about the history of the tool. I was taught it was a really old tool, basically used since forever (in Sweden, that means at least during the 19th century…) That is not medieval, but since I have seen similar items from earlier periods, I use it. You could use the backside of a knife handle or a bone awl or stylus as well.
This works really well, and makes the seams beautifully flat, smooth and glossy. I actually use mine to finish of handsewn seams in linen, the hemming on fine veils etc. It is a bit of extra work, but quite fast and easy. The pointy tip gives an advantage over small smoothing stones in my opinion.
Heated irons are heated up by fire, and used in the same way as a modern iron with a damp pressing cloth. Historical items are both solid, and with a compartment for putting in pre-heated pieces in. This method is demonstrated in the series “A stitch in time”.
In Sweden, it seems that the iron came in use during the 16th century, placing it at the end of the medieval period. In Europe I believe it to be a bit earlier, and it is found in China during the 4th century.
Apart from having to make a fire and wait for the heating this is basically the same thing as using a modern iron, when you get used to the tool and how to estimate the heat.
My two favourite things for flattening the seams when I don’t have an iron around:
Smoothing bone: for linen, leather and thin wool items. Makes a really glossy and nice finish on linen shirts and veils. If you want one; buy one in bone, not plastic.
Gripping the seam with your hand to flatten it out while sewing down the seam allowance: good for thicker or fulled wool fabrics. You simply hold the seam allowance in place while sewing it, and the fingers on the underside of the fabric stretches it out and create the flat appearance on the outer side.
Both of these methods are nice, but I rarely use them in my everyday work, to save my fingers and joints from strain. Choosing ergonomic methods is also important, but every once in a while it is nice to make an item with no modern tools at all!
This is one of my favourites; the “Fässing” (in Swedish), Martebo-sack (from Martebo church on Gotland) or a Wallet (18-19th century). It is a simple, practical linen bag made for carrying loads. I have seen medieval examples worn over your shoulder like below or larger ones strapped over a donkey.
I actually have several of these for my medieval adventures; for grocery shopping, for the picnic, for my showering things like schampoo…
Martebo bag
The bag is made with a piece of sturdy linen or hemp canvas (chose a sturdy tight-woven fabric in linen, or a piece of tent fabric for a large sack).
Cut out a rectangle with the measure 140 * 70 cm, to make a bag suitable for a picnic and your warm hood. Or design your own measures by laying a measuring tape over your shoulder and let it hang down on either side. Adjust and decide on a length you like on the bag, and then decide on the width; between 60-100 cm (makes a bag that is 30-50 cm wide) might be nice. Add 3 cm of SA (seam allowance) to each measure.
Sewing instructions:
1. Mark out the opening on the long sides on the rectangle. It should be in the middle, and between 30-40 cm wide.
2. Put the long sides on top of each other, and sew a seam on either side of the opening. Backstitches with waxed linen thread (if you are using the sewing machine, start with zigzagging the whole fabric piece, then sewing this seam).
3. Press and fold down the SA and whip stitch it down to one side for extra strenght.
4. Hem the opening with whipstitches, working from the inside. It is also good to reinforce the edges of the opening by sewing a couple of extra stitches through each fabric piece to make it less prone to rip open.
5. Now you have a tube, adjust it so the seam is in the middle of the fabric piece inside out, and pin the short edges closed.
6. Sew the edges with backstitching, and repeat the pressing and folded down SA. Done!
The sack may be carried over your shoulder, or wrap it around your wrist and hand to carry it like a grocery bag. If you have valuables in it, you can also make a knot in the middle over the opening to prevent anything from falling out. Very convenient!
Are you curious about what life is like for historical market sellers and historical interpreters? Let me show you how my workdays and life looks like during a normal market season! (you know, before the pandemic when we actually travelled and met friends)
What everyone sees (hopefully); standing in the market stall in pretty clothing
What life is like, nr 1: Driving
I live in the middle of Sweden so all markets during the season are typically a 4-8 hours drive away from home, and about 12 hours if I want to reach the southern parts. 2 years ago I bought a small van that I can drive on my regular driver’s license and it gives me the opportunity to bring all my market things, sleeping arrangement, restocking items and food. I can sleep in the van if I have to, and a small field kitchen keeps me sustained so I don’t have to stay at expensive restaurants along the way.
Nr 2: Freedom
Driving may be boring and takes a lot of time, but it also gives me a great feeling of freedom, driving across the country, over mountains, and stopping at interesting places to see the view or buy a local drink. Being your own also means freedom to plan, to decide when to work and how, and how much…
But sometimes I plan poorly and end up having to pack away the whole market stall and all my belongings in the heat of summer before I can take the van to go and find food. That happened a little too often in 2019, I will definitely plan better in the future.
Nr 3: Actual working clothing
Regular working clothing when packing the camp; shift (linen underwear) sturdy shoes, working gloves, sunglasses and not much more. Fashionable deluxe!
Or, half-clean pants (they never stay clean for long when packing…) and a sweaty t-shirt after driving for hours without a working AC in summer. We really do save the best looking clothing for visitors and customers!
Nr 4: Lots of really hard work
From unloading the van to the ready-to-open market stall several hours of hard work lies in between. Packing up, lifting, packing down, carrying… If someone would make an employment ad for my work, there would totally be lines like “You really enjoy carrying things around and loading vans”.
I do so much heavy lifting during summer that I need to keep my weight lifting up during the winter so I won’t hurt my back when the summer season comes. Who could have guessed?
Because I am a one-person business, I sometimes travel alone (though I like to bring Love or friends along- it’s so much more fun!) which means I need to do the work myself, and also find some helping hands to raise the tent. We often help each other out which means running around helping with several tents, but also laughter and company while working!
Nr 5: Simple living conditions
Living in a medieval camp. This is the most awesome, and the hardest thing all season. I absolutely love sleeping in the cosy medieval tent, listening to the wind and sounds of camp all around. In the morning there is a fire with fresh coffee, friends to talk with and birds singing all around.
It is also the hardest. 2019 was a really cold and damp year sleeping outside, I regularly wore double woollen dresses and in bed, I had two layers of woollen clothes, covets, blankets, woollen socks and a cap- and was still freezing. When I arrived late at a market I barely got the tent up before darkness, and then there was only a cold meal in a messy space before sleeping. It can be uncomfortable, dark, cold… or a storm threatening to tear your home down.
Still worth it!
Nr 6: Tourists
Not the same thing as customers, or visitors. The tourist will ask you things like “Do you really live in there” (yes) “Is this ware really from the Viking age?” (no) “Where do you take a shower?” (…) and sometimes you can be really, I mean really, tired of those questions. But at the same time, meeting people and making new friends is the best part of travelling.
But it is ok to be tired sometimes. And tell them you never shower… (On some events there are no showers. A lake or a bucket of water might be good for a couple of days, but every once in a while a girl needs a warm shower!)
When the tourists leave… Ok, I admit that some of the best times during the market weekends are the evenings. The work is done, the market stall closed and you have time to cook, hang out with others at the market and enjoy entertainment, feasts, fire shows or just relax.
Nr 7: Moving from the modern world to the historical dream
The mix between the historical dream and the modern world. Vans, heavy work and lots of things you need to build, carry, organise… But after that; a beautiful dress, a cosy area with medieval tents, cooking and that amazing feeling of visiting another time.
Nailed it! Getting that perfect photo that shows you standing effortless in a beautiful surrounding, with your medieval outfit perfectly in order. The wind is right, the light is right. Not showing;
I was sick as a dog
There were one zillion visitors in the garden at the same time, appearing in the background and beside me
Battery remaining in camera; around 4%
Do you think this seems to be the most amazing job ever? (even after reading this whole post?) Well, here are my tips for starting:
Visit lots of markets to see what people want to buy, and what others are selling. Is there a gap in the market you might fill with products of your own? Thinking you can do the exact same thing as others, only cheaper/faster/better is not a good way to start- most markets and events want diversity in their sellers and won’t invite too many shoe/pottery/cake vendors.
What can you make/produce and what do you need to buy? If you have lots of costs (like importing fabrics) you will need bigger markets to sell more, whereas if you sell homemade cookies and honey you have lower costs but need more time preparing products.
Calculate costs; purchases, travel expenses and a salary for yourself, and then make a budget for the market season. How much do you need to sell to get a salary? To pay for all the costs going to a market? Many beginners make the mistake of not charging enough for their products and are struggling to make the ends meet until they get exhausted and quit. You need to charge enough to both cover your costs, get money for yourself and build a small amount for emergencies like a flat tyre or a broken tent.
Patience. No matter if you have a good budget and great products in place, the first season might not be great. It takes time to discover which markets suit your products, what customers want, how to sell things… Be patient. Have a backup plan to cover your living costs (like a side job, savings, etc) while exploring the market life.
Get to know people; everything is easier with friends. Maybe you can collaborate with someone, or help out somewhere in the beginning to make new friends. Being kind and helpful to others is a great first step!
Fun fact about my business: Some time ago I got a call from a television show producer, wanting to know more about my life as a historical market seller and maker. She was very disappointed when I explained that I live my life like most people do, in a house, driving a car and eating everyday food for the better part of the year…
I am, after all, a pretty normal person with a business, that takes me out on adventures and travelling for the summer season, while I am living quite the normal life for the other half of the year.
This post is a collaboration with Korps and contain advertisement for fabrics from their webpage.
Are you longing for some historically-inspired life and camping? Now is a great time to get inspiration and ideas for the next event and plan what you would like your living place to look like!
Look at this lovely place, I am longing to be outside in a camp again! Imagine sitting in that corner while it is raining, having cookies and wine and chatting with friends.
I spent lots of time at the beginning of my reenactment adventure life pondering over what I would need and what I would like to bring to different events. I also collected lots of photos of things that looked practical or just pretty and wrote lists of things that would be good to have next time. Kitchen towel, water flask, bucket and extra wool blankets are things that piled on those lists, helped there by experience or inspiration from other reenactors.
Mmm, look at this cozy place! Wouldn’t you love to eat lunch here? I would put the bread in a basket, have extra napkins and plates for guests ready and decorate the table with some fruits.
My main inspiration to improve my camping life have come from SCA events, since these often are quite long and you’ll meet lots of others that have been in the hobby for a long time, thus having created pretty and comfortable living areas.
Far from everything in these photos is as historically close as possible; most tents are machine sewn, furniture is made with modern tools and practical solutions mostly won over historical ones, when it comes to food prepping and hygiene. With that said, here are lots of options for camping life, with amazing handcrafting and historical techniques and materials.
Capturing all the good ideas
The feeling of homeliness; look at these camps! The furniture, the kitchenware, pennants, lanterns… Even if everything is not based on historical finds from a specific period, the overall look is awesome. The ropes and tent walls actually add to the feeling of spaciousness, of having a living place outside in the woods. (I like the table cloth, thinking about making one to my kitchen)
My best practical ideas;
A good blanket! I put my heavy wool blanket on top of my bed to keep it dry and warm, use it as a picnic blanket, and a cloak during cold evenings. To get a really big, affordable wool blanket; buy a good quality wool fabric and make one yourself! This fabric is a good choice, super thick and sturdy!
Get the fire up from the ground! On many sites, fire safety dictates that the fire pit should be 30-50 cm above the ground. Plan for that by building a fire bowl with legs, and you have a convenient cooking place so you don’t have to crawl on the ground to cook.
The drink’s on the house! Naw, you don’t have to give out free beer, but it’s good to have water available. Bring jugs and bottles for the stylish table, as well as tanks/containers that fit larger quantities of water. If you don’t have historical options, use a plastic one and hide it in a cloth sack.
A fabric roof! Cheap, practical and good for both sunshade and rain. Make your own by sewing two pieces of fabric together (150*400 cm), and add some sturdy holes in them. To put up your new roof you also need some ropes and wooden poles with nails going through the holes. You can find good tent/canvas fabrics here. (You could also use these fabrics to sew your own tent on your regular sewing machine.)
Do you have any goals for your camp, or fun ideas you want to do? Here is my wish-list for improving our camp: (hopefully I will get around to these, and now when I have put them down here I think the probability will be even higher…)
A fireplace like this. Sooo practical! I wish someone would build me a square fire bowl. I would stack the wood neatly underneath, make coffee in the morning and feel like a queen while doing so!
Making the packing a bit less… plastic. It is convenient to store and transport lots of things in plastic bins, but they are Oh So Ugly. I am working on using wooden boxes instead, and cloth sacks.
Painted silk flags! It is so pretty, I want a whole bunch of them hanging by our camp, and then I will give everyone directions to our tent by telling them “just go to the big tent with all the pretty pennants”.
Introduction: Straw hats of different shapes caught my interest a while ago, and I did some research on them. They appear in art from around the 13th century onwards while changing design over the centuries.
My thoughts are that they are mainly seen in rural landscapes and working conditions, with farmers and labourers working outside. They also appear on travellers, commoners being outdoors, harvest time etc. Some examples exist of straw hats on higher social status persons (but the artwork might be allegorical or symbolic rather than contemporary portraits).
Based on what I´ve seen in the artwork, I believe the straw hat to have been in use in a similar fashion as today; as an outdoor option for sunny weather, mainly to act as a sun barrier. They are often depicted in manuscripts like The Labours of the Months (Medieval calendars) during field labour in June, July and August on both men and women. Decorations are scarce, with the occasional headband in black or some other neutral colour the only decor visible.
15th-century harvesting woman
Fashionable shapes? In art, the straw hat appears in many different forms. Some shapes seem to have been used for longer amounts of time (like the round one with a brim or the slightly unshaped hill form) while the conical shape of the 13th and early 14th century (seen in the Maciejowski bible) seems to be out of fashion later.
Maciejowski bible 13th century
During the second half of the 15th century and onwards you can spot a greater diversity in hat shapes and design, possibly mimicking the fashion for headwear during this period. The late 15th century is, after all, a rather crazy fashion period with lots of options in sizes, shapes, designs and silhouettes! During the 16th century, crowns with a flat top and flatter-shaped hats became more common in the artwork I have looked through.
1519-28 man harvesting wines
The artwork in this blog post is mainly collected from today’s Germany, England and Italy, but this excellent webpage has a collection of more hats in period artwork if you are interested.
Differently shaped straw hats made by Handcrafted History
Materials: Based only on the artwork, it is not possible to determine which kind of straws were used to make hats, and it might also have depended upon local traditions and what material was readily available to the artisans. It is not impossible to weave or braid straw yourself even if it takes practice to make it look good, and since the material is available for free in most areas I think it likely that these hats were commonly made in the local community rather than imported. Most hats are also seen on workers in the field (though the occasional more fashionable straw hat appears in city settings), supporting the theory of local manufacturing.
Detail from the Merode Altarpiece, Robert Campin
Book of hours, Morgan Library
Different kinds of straw available today:
Wheat straw is soft, shiny (and if you ask my horse, super cosy come winter) and very possible material for hats, at least in those parts of Europe cultivating wheat regularly. Oat straw I have no handcrafting experience with, but the horse likes it in his bed, and there’s always some oats left to munch on. Barley was a common grain in Sweden during the Middle Ages and is a rather stiff and durable straw, like rye.
Rye straw is a traditionally used material in Sweden for making straw crafts because of its length and durability, and rye is a hardy crop. For handcrafting material today, rye is being grown for its straw and harvested before giving grain, whereas the medieval straw was probably taken during the grain harvest.
Wheat straw hats made by Handcrafted History
One important difference between the straw today versus medieval straw is the mechanical machines munching up straw during harvest, making it usable mainly for animal bedding or farming. Before machines took over, the harvest was done by hand and a scythe takes off the straw at the ground without crushing it. After the grain was collected, you would have great amounts of material. Very handy!
Wild straw from grass and reed are easily available, free and often quite easy to use for braiding straw hats. The downside is you have to venture out into the wilderness to take it, and the straws are not as shiny as wheat. I have found that grass straw may be sturdier though.
Braided and sewn straw hat.
How were straw hats made? Contemporary artwork indicates different methods of use for making straw hats. There seems to be evidence for different kinds of weaving techniques and patterns (when you braid the straw together until you have formed a whole hat) as well as sewn hats with braided straw tape as a base (when you first make a braided tape and then sew it into a hat shape). The find from the 15th century looks to be made from woven or braided tapes, layered on top of each other.
Several straw hats on female field labourers
I have only found one extant find of a straw hat from today’s Germany, rather beaten up but at least you can see what it is. Do you know of any more finds? I would love to check them out!
Kempten, Germany 15-16th c
Conclusions if you want to sport a straw hat yourself:
Go for a hat made with natural straw, such as those mentioned above. Handwoven in one piece, or made out of braided tapes sewn together depending on what you can find. Pick a shape that fits in with the period you would like to reenact, and don’t decorate it over much. Use your hat outdoors as a nice shade from the sun, but replace it with a smarter-looking hat or veil/hairdo during winter and indoor festivities.
Early 15th c Les Tres Riches Heures de Duc de Berry, round crown hat.
Some practical tips from this very experienced hat-wearer:
Straw hats during summer will shade you from the sun and help you avoid sunburn and heatstroke. If it is really hot, use a cap, coif or linen wrap drenched in cold water under the hat. A ribbon may be pulled through your hat at the base to hold it in place on your head, or you could use pins to secure it to your linen layer underneath. If your hats get a bit crooked or bent, spray it with some warm water and set it to dry in the shape you want.
Harvesters, one man is wearing a straw hat, Tacuinum Sanitatis
Do you feel the need for a good straw hat? I am currently making and selling different models; check out my page with hats to look at different models and order. This last bit is totally advertising my own business. Yep. Send me your money.
Here’s an alternative look for you 15th-century geeks out there! I took the photos in 2018 but apparently put them in that “good to have” pile on the computer, and they were forgotten. This happens quite often for me…
Linen shift closest to the body, wool socks and leather shoes. Over the shift I wear the easy 15th century dress, here used as a middle layer/kirtle. I like to be able to use my clothes in different layers, and this dress is a perfect summer over dress, but also works as the middle layer once it gets colder.
The overdress is a wool houppelande, lined with silk and with openings in the sleeves. This style is popular by the 50s and 60s, and can be seen in Rogier van der Weydens paintings. I keep the dress closed with a broad belt with a bronze clasp; a copy from an original find. This is one of my favourite dresses, since it is comfortable to wear but looks fancy. It is quite heavy with the high-quality woollen cloth draping around my body, but hey- you have to give a little effort to fashion sometimes?
The temple braids and turban-looking great veil is perhaps a bit “simple” for the dress, and I could also pair it with elaborate headwear. But I really like this look since it is comfortable and, above all, I can manage it myself in 15 minutes by the mirror. If you want to see how I do them; I have a braid tutorial here and a paper on the 15th-century veils I use here.
If you want to research the 15th c yourself, feel free to use my Pinterest as a starting point! This fashionable period has much interesting things to offer!
There’s a lot to say about this year, but at least I’ve been having plenty of time for sewing. Unfortunately, a bad shoulder gave me some pains, but with rest and a training program, I think we are mostly friends again!
I thought it would be fun to share some projects with you here, as an inspiration and a kind of journal to myself: I always forget what I have been sewing, and find myself longing to finish yet another personal “small project” but not understanding why I don’t make any progress…
72 garments finished during 2020; both for customers, friends and myself. I am not going to write about them all, and many have not been photographed yet. I also have a whole bunch of things not yet ready; commissions, old projects known as UFOs (unfinished objects) and some rather new ideas I have been working on.
It was time to make some new viking clothes and I managed this blue dress, the red apron dress and some matching items, like the handwoven and woad plant-dyed shawl. I am really pleased with how the outfit turned out, even if the outfit might not be sexy to the modern eye… I love experimenting with different historical cuts that could have been in use, trying out how they look and feel when I make and wear them.
Later I made this early 14th century outfit as I finally, after a long period of 15th century-romance, have laid my eyes on new conquests. The 13th and 14th centuries are very nice, and I want to get to know them a little more. The next project will be something from the Maciejowski/Morgan Bible.
I have made several complete outfits for customers based on viking age and medieval clothing, and this was the year when I only met GOOD CUSTOMERS! I kid you not! Everyone has been polite, fun to work with and sent their payments. For those of you working regularly in customer service; you know my feeling here! How did I get to be so lucky? And, will this continue during 2021?
A hand-sewn 16th century shirt inspired by the Sture shirt (without decorations and embroidery). This shirt took over 40 hours to make, more than most dresses… Is it pretty? Yes. Was it worth it? Give me another year before I answer…
I have also worked on 18th century clothing, learning more about the period and the methods in use. There’s a couple of skirts, a jacket in wool and one in printed cotton, as well as a small linen cap. I am looking forward to going to new kinds of events and trying out the kit to see if it will work.
I made a new short-sleeved kirtle with a waist seam, similar to the blue Weyden-inspired dress from years ago. This dress is rather loose (I might need to take it in a bit in the side seams) and it’s made with a curved front seam. It is going to be a great working kirtle! The long-sleeved green 15th c dress also got sold, they mysteriously shrank in the wardrobe during last winter)
Apart from sewing I also dived into some video making, filmed lectures for the digital Medieval Week as well as setting up a new Youtube channel, and working with content for my Patreon page. Video editing and voice-overs still make me sweat, but my plan is to continue to improve in these new areas, creating more and better content for you readers. Patreon makes this possible since I get support to work with my content, and my hope for 2021 is that my page will continue to grow, inspire and teach handcrafting ideas to everyone interested!
It feels like it is early yet to plan for this year, but of course, I am hoping for a market season of some kind, and I have so much new content for sewing workshops and material for a new viking lecture as well. As for the blog, there is a long list with tutorials to make, as much as I have time for. All concluded, it really feels like 2021 will be a Great Year!
Va, kommer inte rollskapandet förrän nu? Borde man inte börja här?
Jag trodde rollskapandet och ett detaljerat skrivande av rollen var viktigt, och ett sätt att vara en bra lajvare på, när jag började min lajvkarriär i tonåren. Det verkade ju viktigt på hemsidan? Efter att ha lajvat i 20+ år har jag dock insett att det finns andra saker som är viktigare, sett till hur roligt lajv jag kommer att få.
Det finns också väldigt många typer av spelare, och spelstilar när det kommer till att utveckla roller. H föredrar att klottra ner namn, yrke och ett par egenskaper att spela på, för att sedan ge sig ut och improvisera resten efter lajvet han är på. Andra älskar att hitta på namn, släktträd, ny mimik eller beteenden eller ge sig in i en roman om rollens tidigare liv.
Det spelar egentligen ingen roll. Vad är det då som gör en Roll till en Bra Roll på ett lajv?
Du är inte dig själv. Att lajva är spännande, händelserikt och rätt jobbigt. Du kommer uppleva allt det som din roll upplever, men filtret med att rollen och du är olika gör det trivsammare, och minskar risken för missförstånd. Det är ju trots allt inte Du som blir förråd, misstrodd, skrattad åt eller dödad- det är bara din roll. Du får nöjet att följa med på resan och uppleva saker som du inte skulle få i ditt vanliga liv.
Att lajva leder ofta till mycket känslor innan, under och efter lajvet som behöver bearbetas. Att då på efterlajvminglet kunna prata med andra om vad era roller råkat ut för är både roligt och skönt. Rollen och du är inte samma, ni är olika.
Din roll behöver alltså ha andra drag än du; en annan personlighet, bakgrund, andra färdigheter, en annan mimik, ett förändrat kroppsspråk. Det är alla olika knep som du kan använda för att berätta för andra, och för dig själv, att du faktiskt bara spelar en roll nu- det här är inte du.
Även om du skrivit och spelat en roll som är olik dig själv, så kan du uppleva det som kallas för Bleed efter ett lajv; det innebär helt enkelt att du har känslor kvar efter lajvet som egentligen hörde till din roll. Det är inget konstigt! Du har precis ägnat flera dagar åt att programmera om hjärna och kropp till att reagera på andra personer (roller), du har upplevt en massa, fått känna en mängd känslor- och helt plötsligt bryts allt. Om du fortfarande känner dig avigt inställd till dina inlajvfiender, eller har det där lilla pirret i magen vid tanke på din inlajvromans så kan det kännas skönt att få prata med spelarna efter lajvet (antingen på plats eller på internet). Tacka dem för att de lajvat mot dig, prata om de scener ni spelat och lär känna personen bakom rollen.
Din roll är spelbar. De flesta erfarna lajvare har nog gjort misstaget att någon gång skapa en roll som är för mycket; för ond, för glad, för skicklig, för olik en själv…För att orka hela lajvet behöver du en roll som är olik dig själv på några punkter (namn, bakgrund, dräkt, mimik, personlighet) men som ändå är nog lik dig för att du ska orka spela. Jag gjorde en gång misstaget att spela en magiker som var för ond; inom en dag hade jag gjort av med all min energi på att spela antagonist mot andra, gjort av med alla elaka saker att göra och var rätt less. Det är ok att göra fel, du kan fixa till det! (tex genom att dö, försvinna eller ändra sin roll med hjälp av arr).
Din roll är lagom svår. Hänger ihop med ovan; men här tänker jag på dina verkliga färdigheter. Om du ska spela en roll med otrolig kondition, skogsvana och vakenhet, så kommer du få ett fysiskt tungt lajv om du vill spela trovärdigt, det kan till och med vara läge att konditionsträna innan lajvet för att orka med att ha roligt (true story…) Spelar du en skicklig bågskytt är det bra att träna med båge några gånger innan lajvet, så du vet hur du hanterar den. Spelar du skrivare, träna med ditt bläck hemma så du vet hur man gör och inte förstör fina dokument. Lajv handlar om att låtsas och att spela, men samtidigt att göra det så pass trovärdigt att du bjuder andra på en upplevelse (jämför med första inlägget och hitta en balans).
Foto från Eterna, Sagors Slut 2014. Här står jag och är en hård skogslevande krigare.
Också med skavsår, träningsvärk och en stukad vrist. Ibland är det hårt att lajva…
Din roll har Intrigöppningar (se även spelyta i del 1). En roll som bott hela sitt liv i ett hus, ensam i skogen och inte har några mål med livet är väldigt svår att erbjuda ett roligt spel. En roll med familj, en förlorad barndomsvän, borttappad skatt, med 2 fiender och ett mål att bli borgmästare däremot- här finns det massor av intrigöppningar för arrangörerna, och andra medspelare, att skapa intressant spel på. Kom ihåg att du som spelare inte behöver skriva in alla detaljer, om det delas ut personliga intriger så kan du be om en fiende, en barndomsvän, gammal bekant osv. En roll blir alltid bättre om den passar in i den fiktiva världen, bland lajvets övriga roller och med din spelidé.
På ett krigslajv kan du spela veteran utan att behöva vara hårdast; andra halvan av lajvet är också krigsveteraner.
Var ärlig med dig själv och arrangörerna. Är ditt största mål på lajvet att uppleva äventyr? Att vara cool? Exempel: Att spela en ny soldatrekryt ger dig möjlighet att möta spel med skräck, upphetsning, spänning eller rädsla. Är du däremot en gammal krigsveteran kommer äventyren rullas upp framför dig utan att du låter dig imponeras, du har ju redan sett allt förr. Ditt kalla handlande och din lugna min får däremot de nya rekryterna att se upp till dig. Bägge spelupplevelserna har sina fördelar; be arrangörerna om hjälp med att välja en roll som passar den upplevelse du vill ha på lajvet.
På mitt första lajv spelade jag piga, fast jag egentligen trodde att jag ville vara soldat. Arrangörerna var genier! Jag blev omhändertagen på värdshuset, fick mat och en varm sovplats, och kunde uppleva allt fantastiskt med lajv och låta mig imponeras, skrämmas och råka ut för äventyr.
När du har lajvat ett tag kanske du blir sugen på att utforska dina begränsningar och utmana dig själv, eller spela roller som vidgar din förståelse för andra. Gör gärna det! Jag har valt roller som är modigare, pratar mer, eller har andra mål än mig själv och därigenom utvecklats både som spelare och medmänniska. Många lajvare provar också andra upplevelser genom att byta status (högre eller lägre) att spela på handikapp (stumhet, skador, enhänt osv) eller att prova nya relationer (kärlek, lojalitet, familjeband).
Att lyckas göra en Bra Roll är inte lätt, och du kommer kanske inte att lyckas på ditt första lajv, eller ens varje lajv när du väl är erfaren. Det gör ju inget det heller- det fina med lajv är ju att du kan försöka igen och prova nya saker hela tiden!
Foto från Skuggsagor 2020, Tinah Ekwall. Ett handelshus innehåller många olika roller att utforska.
I wanted to share some thoughts with you today; things I have learned and things I find important when I design medieval clothing. Both for myself and for customers. Being new in any branch of historical reenacting or costuming can be overwhelming, and just like with all other things in life there’s no simple answers or an ultimate guide. “Just read this book, and then you will know everything”… I haven’t found it at least.
But don’t feel overwhelmed! It is such an interesting journey you have ahead, exploring and experiencing other times and new handcrafting. And there are lots of others that love to share their knowledge in this field as well. Here are some great things I have learned over the years, that I like to share whenever I can!
Choosing materials is clearly one of the more difficult things when starting with historical handcrafting, and often the simplest way to succeed in making a good outfit is to pay the price for good material and buy the same as everyone else. Seems boring at first, right? But instead of wanting to make that perfect deal on super-cheap wool in a really unique colour; think about what historical look you want to achieve with your outfit, and what qualities you would like the garment to have.
The places that sell fabrics especially for reenactors often produce high-quality fabrics, and their customers will come back to buy more if they like it. The chance will also be that they are knowledgeable in historical fabrics so you can find materials, colours and qualities that resemble the historical originals, whilst giving you a fabric that will last for a long time at an affordable price.
The quality of the fabric will differ with manufacturers, places of origin, type of material etc so make sure to read up a bit on what material would be good for your individual project. Look at what others say about the seller and the different fabrics they offer and learn some useful words: tabby and twill are weaving techniques, and twill is often more stretchy. Felted means the fabric has been fulled and is often less stretchy, but more weather resistant and smooth. Thin, medium and heavy are different weights in wool fabrics, whereas 120 grams etc are the weight of an m2 fabric.
Fabric shopping at The historical fabric store
It is always best to be able to see and feel the fabric yourself, and now when we stay at home, fabric samples are a good choice. If you have friends, a group of other people around you that are good at different fabrics, ask them for advice (or use a forum online) and always state what kind of garment you would like to make (a kirtle) for what period (14th century) and for what kind of use (reenactment event during winter etc). That way you may save both money and effort instead of buying the first fabric you find, and then get disappointed.
Preparation of fabric
Wool and Linen
I always prewash fabrics before sewing, even for my customers. I know that many in the field claim that you can’t wash wool fabrics in water, but that’s just bullsh*t. Of course you can wash fabrics, at least good ones. Bad ones? Might shrink uneven, get too much wear or completely change the look, feel and even the colour in contact with water. But you know what? That is not ok for garment fabrics. They should be made to endure everyday wear and wet weather, washing, food stains and so on. Those things totally existed in the medieval ages, it would be strange if your medieval outfit couldn’t endure the same right?
Furthermore, prewashing fabrics will release the weaving tension in the warp, making it shrink slightly and give you the fall it will have after ironing/washing/a rainstorm. You could get the same result by steaming the fabric with an iron before sewing, but that won’t remove the…
Chemicals and anti-mould treatments. Fabric today needs to last for longer times during shipping and warehousing, and look good when arriving on the shelf in the fabric store. To achieve this most fabrics (and ready-made garments) are treated with different kind of chemicals, which will wash out in the washing process. Or rub off on your body… Not a good thought, right? Always prewash your fabrics!
Linen: soak in water a while before washing, to get a smoother fabric. Not necessary, but worth it. Fold it loosely in the bathtub for example. Wash the wet fabric in 40- 60 degrees C (the temperature you would like to wash your linen shift/shirt in later) hang to dry and then iron on a high temperature.
Wool: wash by hand or use the wool setting in the washing machine. Use cold to lukewarm water and wool detergent. If you don’t have that, use a little shampoo, because wool is hair, and will not look its best after strong detergents. Also, hot water might felt it and make it look dull.
Silk and silk velvets are the only fabrics I don’t wash before use, but rather iron very gently and hang out to air before use.
This dress has been washed several times in water, and still looks like new.
Which thread?
That depends on what fabric you want to use, and what you want to make. But I prefer natural materials and “same for same”: silk for silk fabric, linen threads for linen, and wool for wool fabrics. Oh, or silk and linen for wool fabrics too, because that is a historical choice and very easy to work with. If you prefer to use a sewing machine, cotton thread for linen and silk for wool garments work nice. A polyester thread is a bit too “sharp” and might lead to breakage in the fabric rather than the seam if you happen to get stuck in something with your garment. But yeah, it will work on a sewing machine if that is what you have, I just don’t recommend it.
Where to start?
It is always good to start with underwear like a shirt, shift and breeches. They will make up the base, are often easier to make and linen is not as expensive as wool. Also, you’ll get to try out the fit, the seams and some techniques.
After that, it is more a question of what you need versus what you are inspired to start with. Remember, handcrafting should be fun and not only practical! I like to make a middle/base layer next, often in wool, to be worn on warm events or when I work. After this is done, I adjust and finish of necklines at under-garments so they are not visible (if that is not fashionable) and start with some accessories and another layer for warmth and weather protection. The medieval period (and others too) often have an outfit made up of several layers, and that is really practical when going to outdoor events!
Wearing a thin wool gown on a summer event. Photo taken by Catrine Lilja Kanon
Another good tip is to make a mock-up or toile, basically a try out on the garment you desire, made in a cheap/recycled cotton fabric. It might seem as you are doing the work twice, but this is really handy as you get to try out the pattern, fit and look on the garment without risking that really expensive fabric. And if the mock-up gets really good, you just pick apart the basted seams and use it as a pattern!
Basting is also a good investment; long-running stitches will hold together your fabric pieces enough for a final fit before sewing and will make it both faster and easier to sew all the seams by hand. I will confess, when I started sewing medieval clothing I NEVER basted anything and rarely pinned the seams, but after several surprises (Whot, how come I got this fit?) I learned it was both better and faster to check the fit, before sewing the final seams…
How to decide on social class and status?
Ohh, don’t ask me, I always change between working-class garments and fancy party outfits depending on the event, place and what I feel like… But generally, just go for whatever catches your fancy! Or pick clothing after your preferred activities; are you going to stroll around a market fair with friends? Visit a fancy banquet? Or do you prefer mud wrestling, archery, beer taverns or outdoor cooking? Not only will you look much better with the right kind of clothing, but you will also find that your activities will be much more fun with the right garments! A short dress and practical hood for the forest archery, or a thin and cool kirtle with hose for the indoor festivities.
A well of working-class doublet, perfect for active events…
And a silk brocade doublet for those fancy strolls in the garden
Garments you need
This is always a tricky question, as it depends on the weather, the type of event and the gender and social status you want to portray. I thought I did great at my first events wearing a linen tunic, shoes and a cloak, I neither froze too much nor died, but nowadays I confess to having higher standards… Like, I want to both look like I fit in the historical context, being comfy, not getting too many mosquito bites, and not freeze during chilly evenings. I also like to change my linen underwear every day to feel fresh, as well as having some change of outerwear/dresses just because I feel like it. (Oh, now I’m babbling again. You would never guess how much text I always have to delete because of babbling…)
Getting dressed in the morning; linen shift, wool hose and leather turn shoes
1. You generally need linen underwear and a change for longer events. Several changes, if you’re not going to wash the clothes during the event. We want to look medieval, not smell medieval…
2. A thin or medium warm wool layer for summer events, for working or for indoor events.
3. An outer layer for cold evenings, if you get wet or want to look well dressed. I recommend another layer of kirtle/dress/coat rather than a cloak to get more use out of your clothing.
4. Headwear like hats, veils, hoods etc. Both to complete the outfit esthetically, but also because it gives you cover from weather and bugs.
5. Shoes! Don’t forget shoes, make or buy a pair that is looking good and feels comfortable. Hose (long or short) with thin leather soles is also workable on warm events, paired with pattens.
6. Accessories, both fancy and practical: belt, garters, bags, purses, cloaks, headwear, gloves… You name it. These can really set the style and time period, so check out sources before you decide on what to add to complete your outfit!
A 15th c outfit in 3 layers; shift, middle kirtle and overdress complete with shoes, headwear and accessories.
Wear it!
Historical clothing should be worn, because it is awesome and comfy and looks great… You know that you’re allowed to wear it around the house right? Or take the great cloak for that chilly walk, or use the apron when doing gardening work. You shouldn’t need to be super careful with your garments, they will look even better when you have worn them a couple of times. My favourite shift is 6 years old and worn transparent thin over my shoulders and back after months of wearing, but I love it.
And make it last longer:
If you have long skirts, fold them up or pull them up into your belt when walking so you don’t step on the hem, or drag it through the mud. That will make the fabric last longer. Protect the handsewn leather turn shoes with pattens when walking through rain or mud, and always mend holes and rips as soon as you find them on your garments. At the end of the season, I always wash, mend, air and look through all my garments before putting them into the wardrobe. For this covid-year though, I recommend taking them out for airing a time or two to avoid dust and bugs.
Getting dressed in historical clothing is actually a bit different than getting dressed in your favourite comfy pants and T-shirt. If you are used to wearing stretchy clothing, you will need to be a bit more careful getting dressed and undressed with woven natural fibres. Imagine it more like a suit, pull it carefully over your head, always open lacing and buttons before removing the garment, and never “jump” into your medieval joined hose. Another tip to make your hose last longer is to always pull them up before kneeling or sitting and to wear garters under the knee to make them stay in place.
Early 14th c outfit with accessories
Yeah, I think I got the most parts down here, and it became quite the long blog post. Maybe I am tired of sitting at home, talking to the cats and love all the time? Who am I kidding? I am REALLY tired of sitting at home, I miss events, adventures and being able to go out and do fun stuff. But most of all, I miss you friends, readers and fellow history travelers! Stay safe and take care so we can meet each other soon!
I de två tidigare delarna har jag talat om spelteknik och gett er mina bästa packtips, nu tänkte jag prata lite om det jag tycker är roligast innan lajv; dräktskapandet. Förutom att jag tycker om att sy och skapa med händerna, ger lajvdräkter ofta möjlighet till att vara kreativ och att lägga till delar i dräkten som ska vara kommunikativa.
This blogpost is in Swedish like the ones before, but might be of interest to the international larping scene too. To translate, you will have to copypaste this into google translate. Feel free to do so if you would like to read it! (Sorry, as Swedish is my native language these posts were much faster to make in Swedish. Which gives me more time for the tutorials to get translated, I guess?)
På de allra flesta lajv behöver du en lajvdräkt, som ska följa lajvvärldens dräktkrav för den roll du skulle vilja spela. Att komma utan dräkt är inget alternativ, så du kommer behöva låna/hyra/sy/leta/göra en dräkt som passar åtminstone till lajvets lägsta krav (oftast enkla raka plagg i bomull, linne och ull) men helst vill man ha en dräkt som också passar till rollens folkslag, kön, status, personlighet och uppgift.
Var kan man hitta dräkter till medeltid/vikingatid/fantasylajv?
Sy själv, köp begagnat på köp/säljsidor på internet (ex fb) låna/hyr av andra lajvare (föreningar och arrangörsgrupper erbjuder ibland alternativ), leta delar på secondhand (ex enkla vita skjortor, strumpor, yllebyxor, filtar), köp på internet från sidor som säljer färdigproducerat, eller beställ av personer (som mig) som syr på beställning åt andra.
Det skiljer så mycket mellan olika lajv/kampanjer/tider på året så det går inte att säga något generellt. Men tänk gärna lager; linne underst, sedan ett eller flera lager ull beroende på väder. Skor som passar, samt accessoarer, regnskydd och tillbehör. Testa den tänkta dräkten utomhus, flera veckor innan lajvet.
Vad kostar det?
Du kan hitta en komplett lajvdräkt begagnat för 300 spänn. Eller beställa en helt ny med extra lyx-allt för 10 000 kr. Det är svårt att ge ett bestämt svar, så bestäm dig hellre för en budget och jobba utifrån den, eller börja att samla på dig tyg/delar under vintern för att ha bra kläder klara till sommaren. Jag har sällan kommit under 1000 kr för en dräkt (jag gjort själv, samt köpt in begagnade delar till).
Var hittar jag material och rekvisita?
På internet; idag finns det massor av bra tyg och rekvisitasidor på internet som säljer enbart till lajvare och liknande intressen. När jag började köpte vi tyg på loppis, gjorde egna vapen genom att slakta gamla liggunderlag och löste många problem med tejp. Idag kan du som lajvare välja dräkt, svärd och tillbehör efter genre; alv, steampunk, 1500tal, möjligheterna är oändliga! Men var lite misstänksam, en tysk sida som säljer lajvvapen superbilligt kanske inte har nog höga säkerhetskrav för att tillåtas på svenska lajv. Och alvmanteln på w*sh är förmodligen sydd i billig syntet, smälter om den utsätts för gnistor och håller inte värmen. Ställ frågor, prata på forum, kolla med lajvet du vill åka på innan du köper. Längst ner på Tutorials här på bloggen hittar du shoppingguider.
Var hittar jag hantverksbeskrivningar och inspiration?
Åter igen på internet! Pinterest, Youtube, bloggar, filmer, serier… ofta har lajvet en egen hemsida med information och egen inspiration. Börja därifrån och leta vidare. Det finns till exempel massvis med filmer som beskriver hur du sminkar dina alvöron bra. På den här bloggen hittar du massor med gratis sömnadsbeskrivningar för att sy egna plagg.
Foto från Eterna; Trons makt 2013, en av de dräkter jag skapat som jag känt mig mest nöjd med. Att lyckas med att kombinera praktisk, och tydligt kommunikativ är inte alltid enkelt, men ger en bra effekt på lajv.
Det var grundnivån; nu tänkte jag prata om hur du får din lajvdräkt att gå från “godkänd” till “fantastisk”. Fundera igenom punkterna här under; och anteckna dina ideér:
(Som exempel tänkte jag använda rollen från mitt senaste lajv, en mörkeralv som tillhörde en historisk japansk/koreanskt inspirerad kultur. Hon föddes in i rikedom och ett bekvämt leverne, och är politiskt bildad. Det blev ingen fantastisk dräkt kanske, men den uppfyller alla punkterna!)
Lajvvärlden/kampanjens förutsättningar: vad anger lajvet att du behöver för att spela en viss roll? (Exempel: Elgarin är japansk/koreansk influerade. Dräkten ska vara svart och blå/svart och lila. Håret svart/mörkt, hyn bleksminkad, öronen spetsiga.)
Rollens bakgrund och personlighet: vad har rollen gjort tidigare i sitt liv, var kommer den ifrån? Vildmarken eller storstaden? Är den praktiskt lagd, eller rik? Äger den viktiga personliga saker såsom smycken, förfädernas svärd, en helig sten? (Exempel: vida ärmar som gör praktiskt arbete obekvämt, komplicerad frisyr som passar hov och stadsliv, dyra smycken.)
Genus/kön: ibland anger lajvet att olika dräkter gäller för olika kön/genus, ibland kopplar de enbart dräkt till funktion. Är du mest bekväm i byxor eller kjol? Eller vad passar din roll bäst? (Exempel: vi valde genusneutral klädsel och hade alla tunika, byxor och lång kimono i gruppen. Dels för att skapa enighet, dels för att markera att genus inte var intressant för oss att spela på.)
Ibland är det mer intressant att vara lika, än att vara olika
Estetik: titta på massor av bilder/inspiration innan du börjar skapa din dräkt. Vilken stil? Vilket formspråk? Vilka plagg används? Vilka färger/toner/nyanser? (Exempel: jag samlade bilder från kulturerna vi skulle inspireras av, och valde en japansk frisyr, kimonos inspirerade av historiska plagg, raka siluetter, höga midjor och detaljer som är asiatiskt influerade.)
Praktiskt: materialval är viktigt. Linne andas och är svalt, ylle värmer. Välj bekväma skor i skinn som du kan gå i en hel helg. (Exempel: underst hade flera av oss underställ, sedan byxor i ull eller linne och en tunika. Kimonon syddes i ett varmt ylletyg eftersom lajvet var på hösten.)
Färg: har oftast symboliska betydelser i lajvvärlden, men kan också användas som allmän färgkodning. Svart/rött/lila används ofta för att signalera ondska eller magi, djupa färger (mörkblå, lila, vinrött) för att signalera rikedom, skogsfärger (grönt,grått,brunt) för att signalera naturfolk eller skogsvana roller. (Exempel: färgerna var redan valda på förhand i lajvvärlden, men de svarta dräkterna hjälpte oss med att framstå som lite onda, snobbiga och osympatiska)
svart är en enkel färg att använda om du vill spela ond eller osympatisk
Symboler och symboliska tillbehör: med symboler menar jag både sådant som används i lajvkampanjen ifråga. Till exempel religiösa symboler, men också saker som används för att beskriva grupptillhörighet såsom spetsiga öron på alver, synligt smink på adel. Symboliska tillbehör förstärker delar av din roll. Den praktiska livvakten kanske har ett kortare svärd, den mäktiga krigaren ett långt svärd och rustning, lönnmördaren dolda knivar i dräkten. Egentligen är det samma typ av föremål (ett vasst vapen till för att dräpa andra) men du skulle inte gärna kunna byta plats på föremålen utan att de förlorar sin trovärdighet. (Exempel: solfjädern påminner både om kulturell inspiration men ger också rollen en känsla av rik, bortskämd och någon som inte arbetar.)
Patinering: ska din roll vara ren, eller smutsig? Att medvetet fläcka ner, förstöra och laga din dräkt ger en känsla av trovärdighet. Jag har skrivit mer om patinering och hur du gör i tidigare inlägg på bloggen, till exempel de här: (Exempel: håret borstades varje dag för att förstärka en ordnad känsla.)
Val av plagg: praktiska plagg signalerar en rörlig roll, kanske spejare, arbetare, bonde, krigare. Långa kåpor, mantlar, rockar kan betyda rikedom, hög status eller helighet/magiska utövare. Mängd tyg symboliserar ofta rikedom, såsom vida ärmar, breda byxor. Hattar och huvudbonader är tacksamma för att förstärka en dräkt; en magiker, religiös ledare, kung/drottning, en rik handelsman… Titta gärna på vad som används i dagens kultur/film/serier/konst och lajvifiera/skapa fritt efter dessa. Det ökar möjligheten att andra lajvare förstår vad du vill kommunicera med din roll. (Exempel: långa kimonos med långa ärmar signalerar status, bekvämlighet, rikedom). Men de påverkar också kroppshållningen och rörelserna till att bli långsammare, mer noggranna och innebär att varje arbetsuppgift inleds med att ärmen flyttas undan, och sedan rättas till igen.
rättar till kragen
Sist av allt; ingen föds till en expert på att göra lajvdräkter! Till mitt första lajv sydde jag en underklänning av ett lakan (förlåt mamma!) och en grön linneklänning med vida ärmar… till rollen som piga. Tillsammans med en brun mantel och stallskorna utgjorde det här mer eller mindre hela min dräkt, och jag både överlevde och fick mersmak. Vad jag ville säga? Våga börja sy!


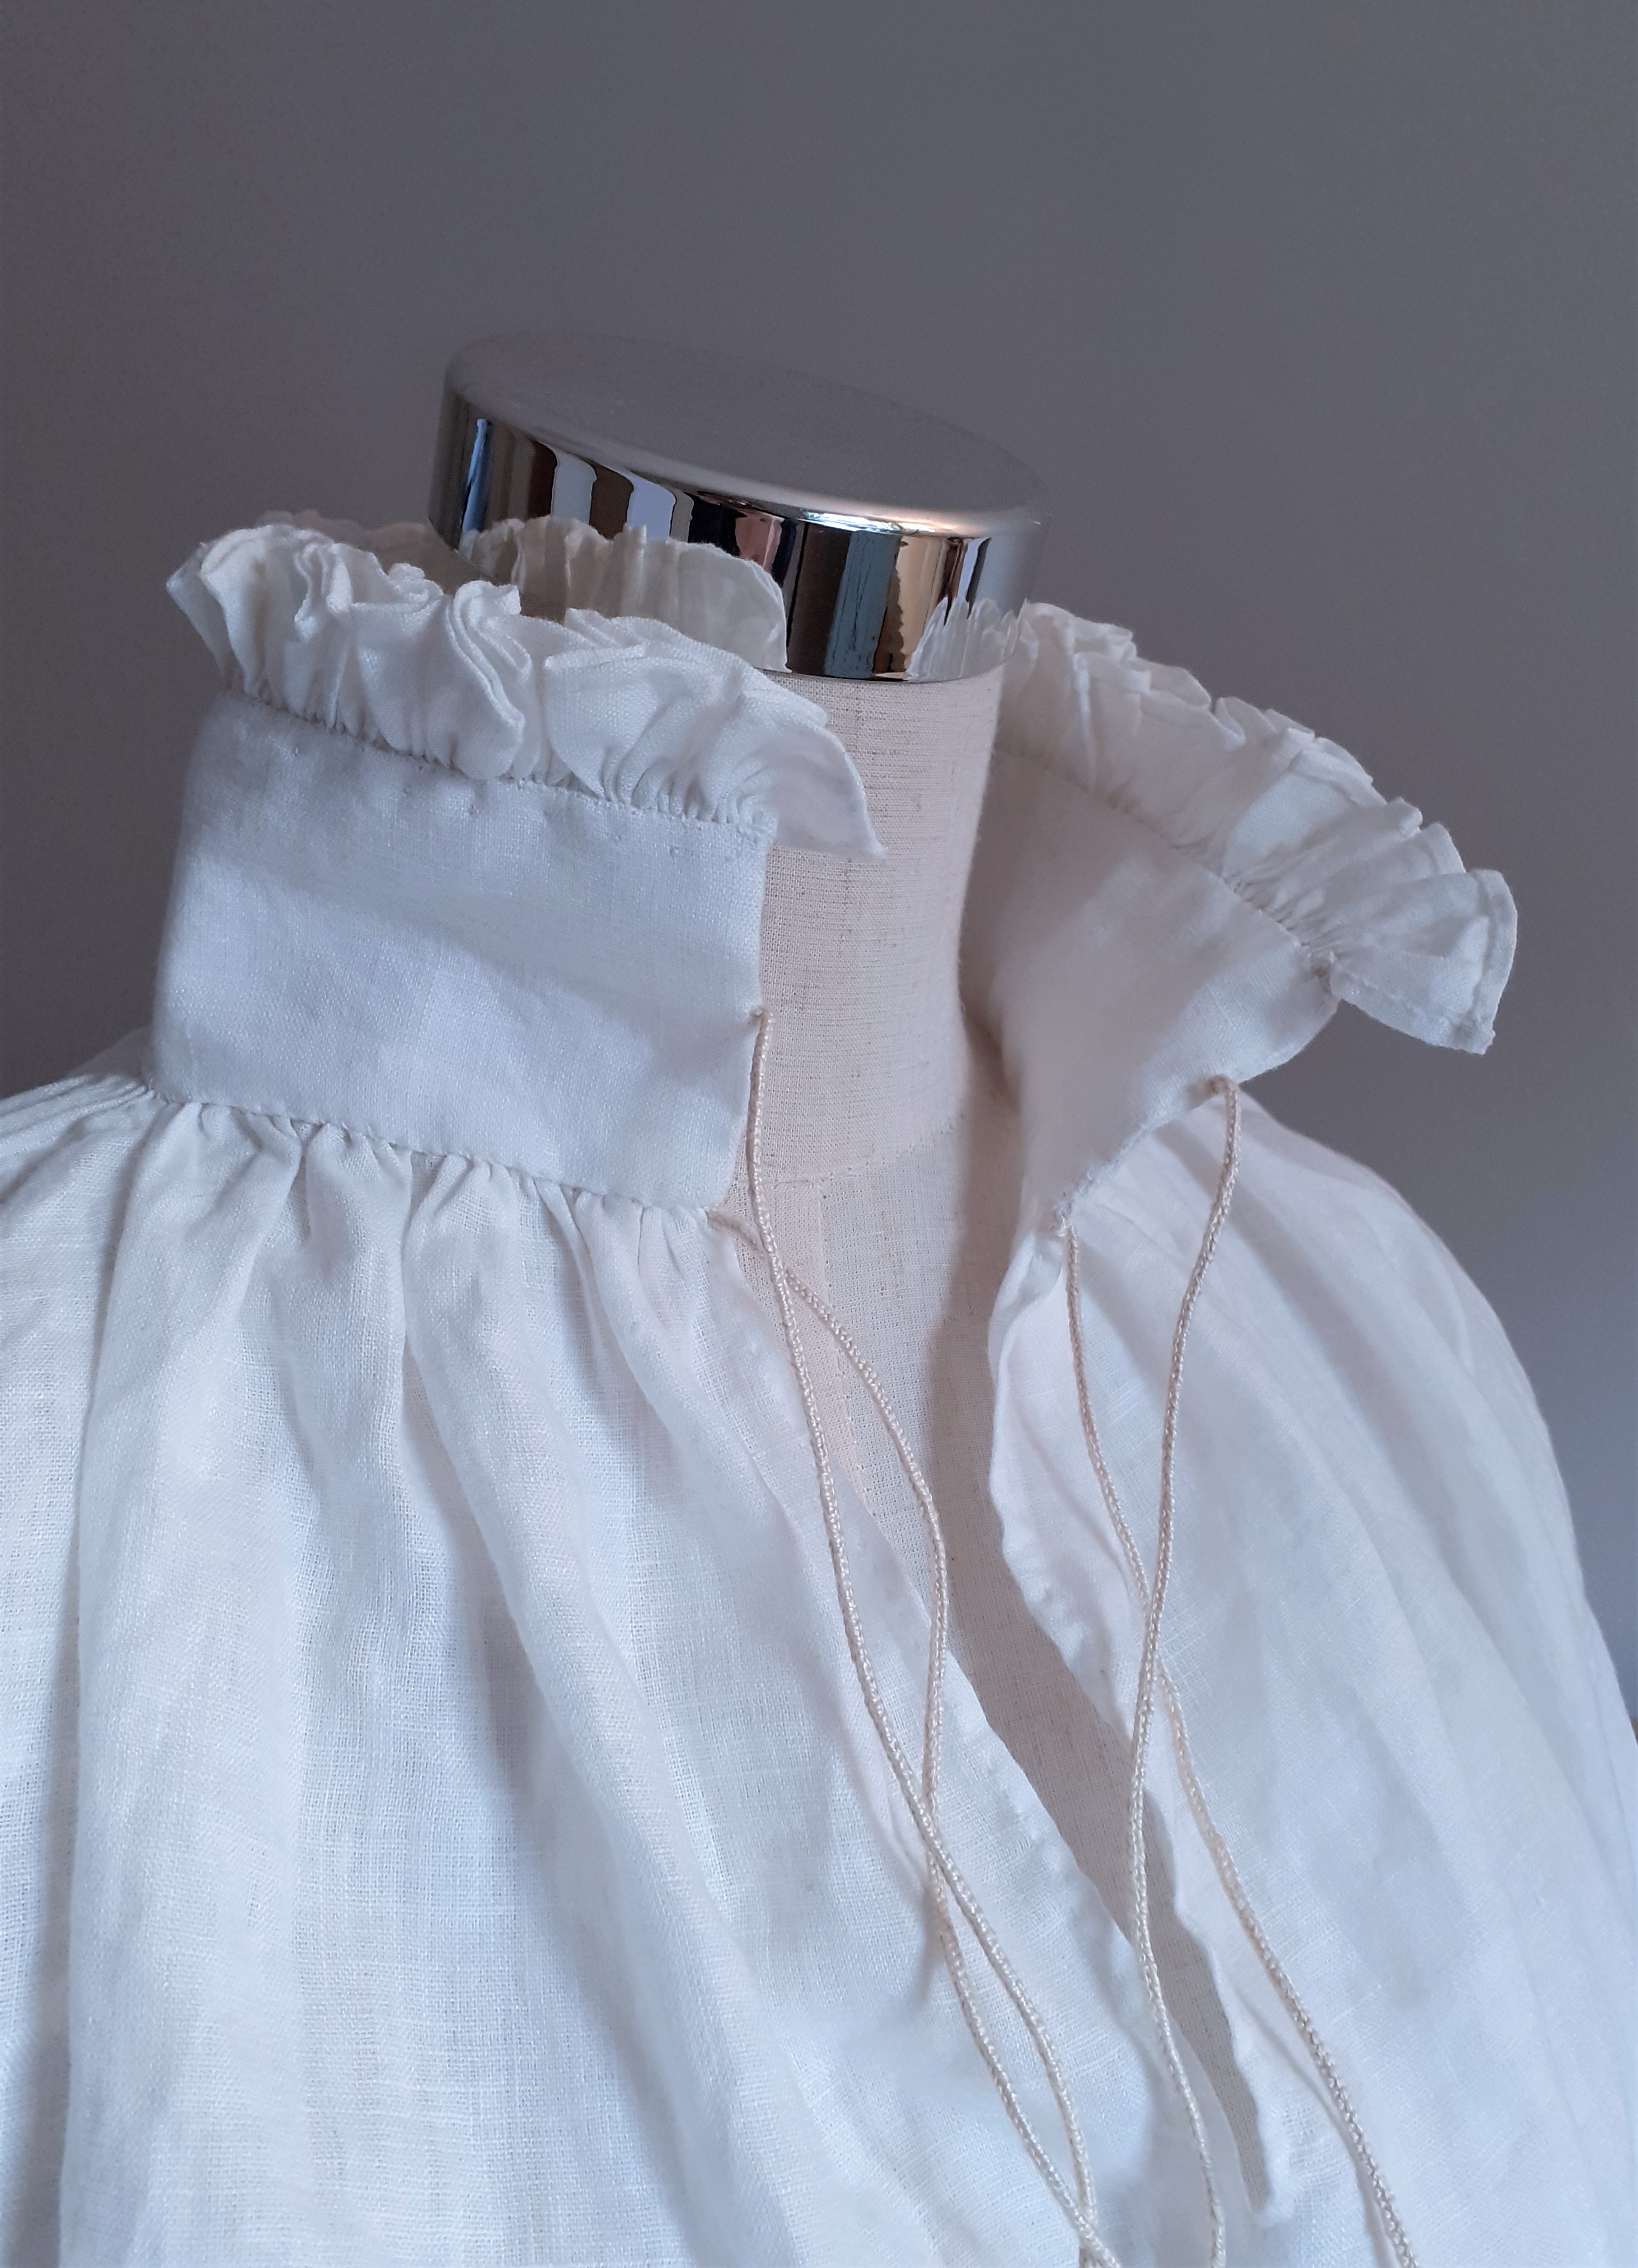


 Foto från Eterna, Sagors slut 2014. Två roller med både annan dräkt och mimik än spelarna.

 Har du redan provat väpnade roller? En grupp utan vapen måste lösa sina intriger på andra sätt. Och behöver andra egenskaper…


 Olika folkslag; olika dräkter gör det enkelt för lajvare att spela mot varandra utan att behöver lära sig vad alla spelar utantill.


