Heh, see what I did there? Pattens- step to step, as you can step with them and this is also a guide and…
Yeah. Sorry, let us step to the actual content.
15th-century style pattens
I had been trying to get myself a really good pair of wooden pattens for a couple of years, only to discover that they didn’t fit very well. So I got my hands on a new pair of wooden soles, and this time I made the straps and fitted them myself. It is a little more work than ready-made, but Wow did this make all the difference!
This project was started over 3 years ago and along the way, I lost photos from the handcrafting process. This means that this tutorial is far from the best one I have made, but I decided to finish and publish it since some friends were asking for tips for making pattens.
If you want to know more about historical pattens, check out this blog post.
Good things to make medieval pattens.
Tools for this project:
hammer
scissor
pen
knife
ruler
awl
needle
leather clips
Materials you need:
wooden soles
thick leather 2,5-4 mm
thin leather 1-2 mm
waxed linen thread
nails
tape and regular paper
two buckles around 1-1,4 cm width (optional)
Wooden soles:
You need a pair of wooden soles first, and your medieval shoes. Measure your foot with your shoes on, so you know how long the wooden sole needs to be. I didn’t make my wooden soles so I won’t walk you through (hehe, walk…) how to do it, but if you have patience and a few woodworking tools just draw your foot on a piece of wood, and carve out something that looks like the historical pattens or my sole above. The joint is not a must but I find it really comfortable.
When you have a pair of wooden soles, it is time to connect the pieces with a joint of sturdy leather and nails.
Use a paper draft to fit in the joint, mark it and copy to leather. The leather should be as thick as the cut-out for the joint, between 2,5-4 mm.
Hammer the leather joint in place with nails, and then start working on your strap. Paper and some tape is a good way to test out the pattern and fit.
My goal was to make a strap that both looked plausible and was comfortable. I started by attaching my foot to the wooden sole with tape and then tried to move around. This was not the right fit.
But it was a good starting point to achieve something like this! I cut away the tape that was uncomfortable or in the way, until I got a fit that was working. Last, I taped the buckle in place to check the fit. Try to position the tape quite high on your foot, not over your toes.
When you are happy, cut off the tape and convert them to two pattern pieces, one for each side of the foot.
Next step is to cut them out in thin leather, 2 of each.
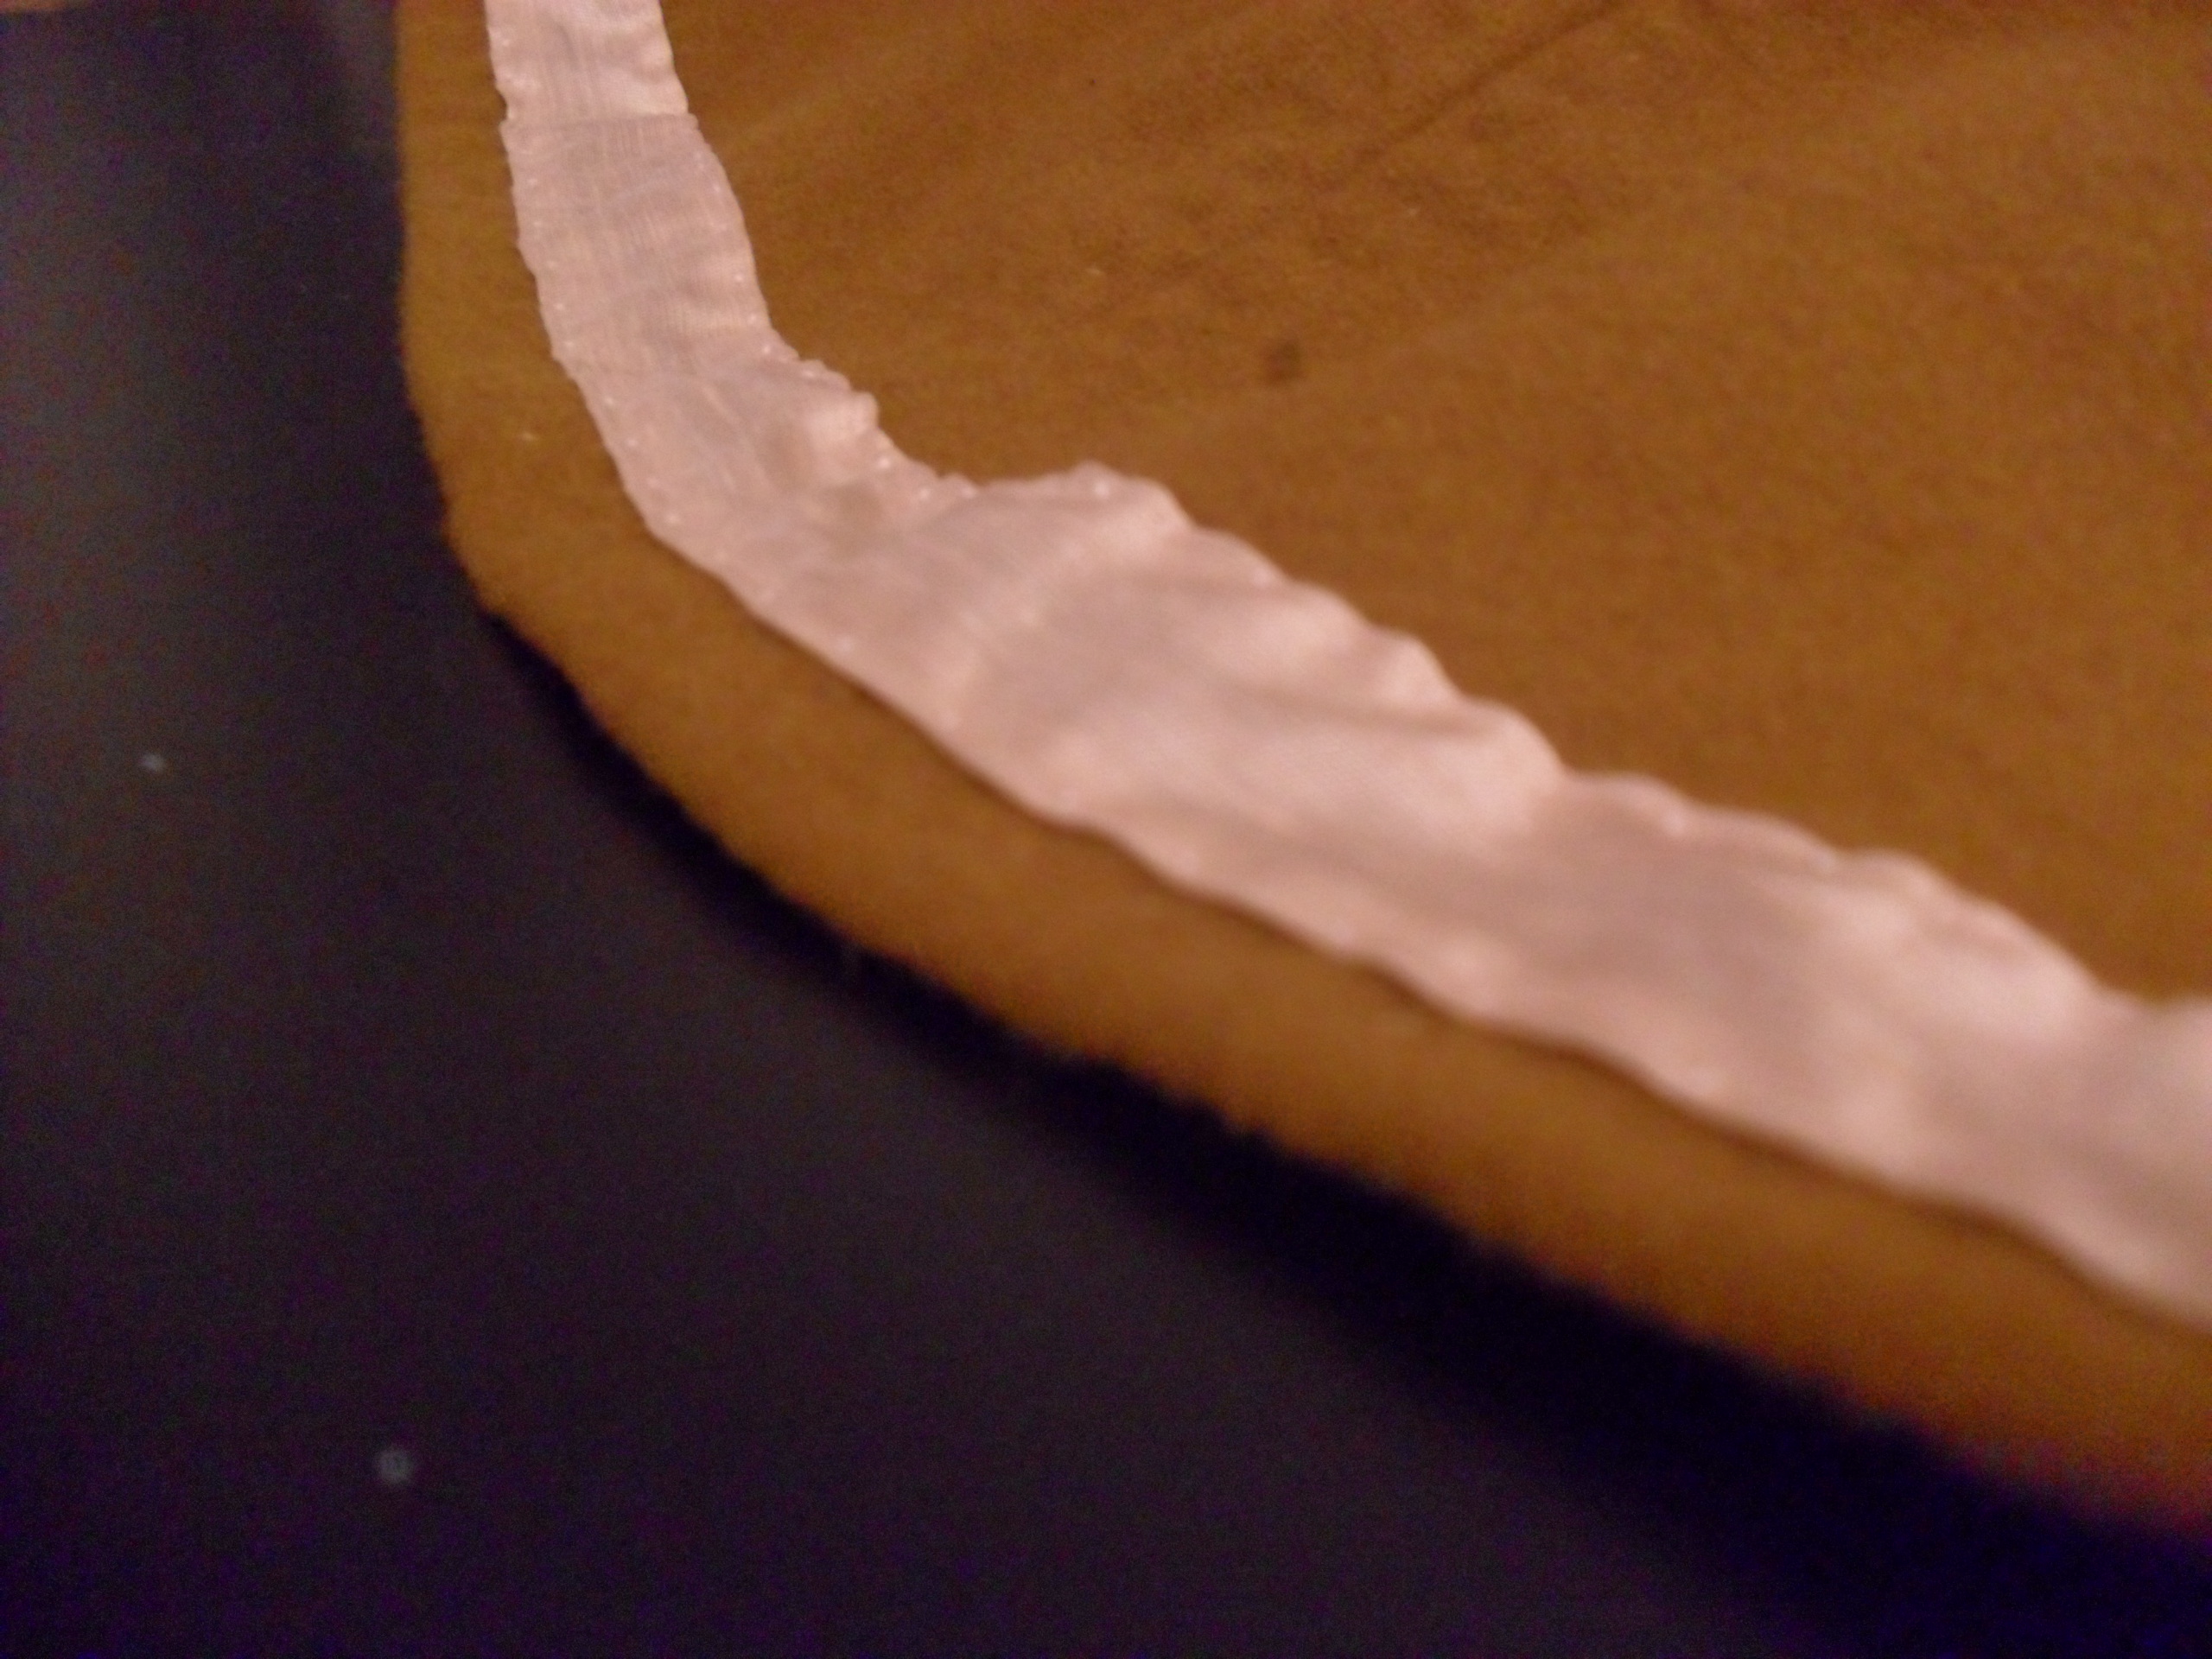
Thin leather needs some kind of reinforcement to last, so cut out strips of leather to sew on the edges.
Use an awl to make holes in the leather before stitching. Note that the strip should reach all the way up, this was just a test piece I made before doing my finished set.
Use a cobbler stitch and waxed linen thread to sew the leather strip in place.
Turn the piece to the inside, fold over the leather strip and sew it in place with a whip stitch. Don’t work through the leather piece, just enough to fasten the strip. To shape the edge and make it stay in place, you can hammer it down gently.
One piece is almost done, one to go. This was my finished pair, note how the strip goes all the way up and it is really narrow at the top to accommodate for the buckle.
After I made the reinforced pieces, I attached the buckle by sewing it in place, and made a hole in the other side for closing.
Trying out the fit of the finished pieces, by using a stapler to fasten the leather to the sole. You can also use some more tape. Love tape.
Hammering the leather in place with small nails. These are modern nails for roofing paper, but you can use any flat, shorter nails. It would be pretty to use historical nails, but I did not find any narrow enough.
That’s it! Give them some leather oil and then you are ready to go out adventuring.
Trying them outside in some water and grit.
There are lots of sources without buckles on your pattens. It is possible to just make a plain or decorated leather piece around the foot. The best part with buckles is not that they are pretty, but that you may adjust the fit to the shoes (or hose without shoes) that you are wearing.
Welcome to this blogpost about luceting! This post was made with the support from my Patreons!
A lucet cord is made out of interlocking loops and is a really practical way to make cords/strings for lacing garments, garters, shoelaces and more since it is stretchy and durable. I prefer working with wool or silk thread, a thin 2ply yarn or an embroidery yarn with a higher twist. Avoid chunky or uneven yarns since these will offer you problems and break.
This is how my luceting fork looks, but you may use practically anything with two pointy things and a handle, for example, a regular fork with the middle part removed. The historical finds looks quite different, here is one medieval example from Historiska Museet:
I find this a bit harder to use, but with a crocheting needle or pointy stick, it is easier. Lucet forks can be found from both the late iron age/viking age and medieval period. Susanna Broomé writes about viking finds in her booklet Cords and braids (I recommend her booklets.)
Finds of lucet cord are made of wool or silk (and in one case even silk and gold thread). If your thread of choice is too thin and you want a thicker cord, you can use two threads at the same time, treating them as one. But learning with a single thread is faster at the start!
Here is a written instruction:
Start with a thread, making an 8 figure around your fork. Hold the thread end with your hand, and twist the lucet fork ½ a turn, while you make a new loop with the other hand and pull the old one down into the cord. The loops should be pulled tightly into knots. Continue with this until you have a cord the lenght you desire. If you lose yourself, the loop that is easiest to tighten is the newest one, so continue with the old loop first.
And here are videos showing you how to start…
…And how to finish!
Also, a photo series showing the finishing if you prefer that:
Cut off your thread, leaving a bit for fastening.
Put this thread through the old loop, the one you would work with next. Remove from the fork.
Pull it tight.
Put the thread through the new loop, and remove this from the fork. Pull tight. Done!
Now your lucet cord is finished and ready to use. If you cut it in the future, you can either redo this finishing by unravelling a bit of cord or just make a knot at the end.
This post is a collab with Korps and contains advertisement for fabrics
Want to own a really nice cloak? Who doesn’t? (yeah, it was a leading question)
Here is my guide to the perfect cloak; we are going to look at different styles, periods, how to wear it and how to choose the best fabric.
Sources:
Let’s start with some local finds, and the oldest one first: The Gerum cloak is dated to 360-100 BCE and is an oval cloak, worn folded over the shoulders. It is a great cloak woven in a patterned twill, and wearing it folded in the middle, it will look a bit like a semicircular cloak. Wearing a big cloak folded in half, is a good way to add warmth if you don’t have a thick fabric or a lining in your cloak.
Rectangular shawl in tabby wool to a simple viking dress
Viking age cloaks can be seen on runestones, decorations, small figurines and are also mentioned in written sources. I usually call it cloak for a man’s outfit and shawl for a woman’s, but since they have the same function we will just call everything cloaks in this post.
If you fold a square piece of fabric into a triangle and wear it, it will look similar to some female figurines. Rectangular cloaks are another option, where figures are shown wearing an outer garment with corners. If you want to learn more about Viking age cloak theory; check out Viking clothing by Ewing, 2007.
Woad blue cloak or shawl, tabby woven wool fabric
The cloak from Leksand was found in a woman’s grave and is dated to the period 1100-1200. It was made from diamond twill wool, and most likely was a semicircular cloak with an opening at the front, it was also decorated with tablet woven bands at the opening (along the straight side).
The cloak worn by the Bocksten man was also semicircular with a cut hole for the neck, and a seam over one shoulder (the opening was not centered at the front) The cloak was made of several pieces of fabric, pieced together. (Kläderna och människan i medeltidens Sverige och Norge, Eva Andersson, 2006.)
How to draft a semicircular cloak on 150 cm wide fabric; it is really easy!
The cloak that supposedly belonged to St Birgitta of Sweden was also made of several pieces of fabric, but this garment is believed to have been remade from a dress.
During the 13th century, you can see lots of cloaks in contemporary sources (such as the Morgan bible), as the cloak was an important part of the outfit. During the 14th century, there are some really pretty examples of statues with buttons down the front or over one shoulder, and in 15th c paintings, they are often artfully draped in biblical scenes, but not very common in everyday portraits.
Simple semicircular travelling cloak in brown wool twill
16th century cloak patterns from Drei Schnittbucher shows examples of circular cloaks with a front opening, slits, collars and even sleeves sewn onto the cloak.
Full circular cloak pattern, look at that piecing!
Full cloak with sleeves, collar and decorative borders
Interestingthoughts:
In written sources, cloaks go under many different names depending on the time, period, appearance and who the wearer is. There is also evidence of cloaks lined with fur or fabric, cloaks with slits or trains, and of different lenght. Clearly, the garment was both used in a religious context as well as an everyday travel item.
I have not found evidence of hoods or head covering sewn onto the cloak in any finds, and when a hood is shown in contemporary art it is commonly separate from the cloak, even though it might be in the same colour as the larger garment. So if you want to make an outfit close to historical sources, make a cloak and a separate hood that correspond with the fashion of the time. (Hoods on cloaks can be seen in 18th c fashion, but let’s leave that century to another time)
Cloaks may be fastened with a seam, pin, clasp, strings, ribbons, brooch, ring brooches or buttons. Choose your method based on which period you would like it to reflect. Cloaks are fairly common in period art sources, so if you browse through a bunch of paintings you might get the idea on what to choose.
The length of the cloak seems to vary with the wearer; a travelling cloak between the knee and below the calf on men, and a bit longer on women, with ceremonial cloaks trailing behind the wearer. But paintings and prints show evidence of shorter cloaks too, with everything from decorated court cloaks to simple peasant women cloaks. Pick the length that suits your need; too much length and fabric will only weigh you down if you want a practical garment.
example of a semicircular cloak
And as always; piecing is very ok to make use of the fabric!
Different models of cloaks:
Oval cloak, square cloak, rectangular cloak, semicircular cloak (or 1/2 circle cloak), cloak with shoulder seams (or 3/4 circle cloak) and full circle cloak. The Viking age square cloak folded in half is not based on finds but more of an experiment, as is the shoulder seam cloak ( I included that in the picture though, so you may see what I am talking about). The latter I often use when I need to make a larger cloak than the semicircular one but don’t have fabric or historical evidence for a full circular cloak. The seams or piecing could as well be made on other parts of the cloak.
I have found no evidence for the cloak with vertical sections/seams to create a fit (which is popular when buying modern cloak patterns) instead, I would recommend you to choose a simple cut and then drape it on your body to your liking. Small shoulder seams or darts can be made as a more modern solution to make the cloak stay over your shoulders.
The cloak does not need to have an even hem, many examples are just draped over the body or longer back. If you want to make a full circular cloak more even by the hem, you may cut the neck hole nearer the front hem than the back hem (my full cloak is 70 cm at the front, and 80 cm long at the back). Putting the cloak on the body and adjusting the hem afterwards is another method.
Decorations:
Finds, paintings and statues indicate that embroidery, woven bands, silk or a combination of these were used to decorate the cloak, however, these examples are mainly seen on religious or high-status garments. For an everyday cloak, I would go with a sturdy, fulled fabric without decorations. If you want to decorate your cloak; try to find artwork from the period you want to recreate.
Fabric choises:
Wool, unlined or lined with wool or fur is both practical, and the most used material in cloaks during the medieval period. There are examples of velvet and silk cloaks, but only for ceremonial or high-status wearers. A sturdy, dense wool fabric that has been fulled would do well for a cloak, and beyond that, it is more a matter of when you need it (a lined winter cloak or a thinner, fashionable draped summer cloak?) There are examples of both twill and tabby woven cloaks, so again- to find the perfect cloak fabric for your period, status and adventure you would have to do some research for yourself.
Generally speaking, the right kind of fabric and the way you drape your cloak is more important than which model you choose, if you want to look dramatic. Buy enough fabric to give you the size of the cloak you need!
If you just want a good, affordable fabric right now; I include some links here to Korps.se that sells good thick woollen fabrics for cloaks. Very thick and warm fabric, or a softer and warm choice.
Colours:
The best colours for your cloak is: “yeah, it depends on..” you are starting to get this right? Period, area, status, wearer… like with all the other garments the medieval person would buy or make a garment according to what they could afford and what was available/allowed for them. Use artwork again; blues, reds and browns are seen often, and during the late medieval period dark hues and black seems to be popular. A commoner or person living in rural areas maybe had an undyed homemade cloak, while a fashionable burgher would wear something bought, dyed and cut to their taste. The cloak also differed between a garment of fashion and an everyday outer wear for bad weather; let this reflect the colour you choose.
Or, if you prefer, use this information to inspire you into making an awesome fantasy cloak for your next fantasy adventure!
If you have browsed my earlier tutorials (and videos on my Patreon) you might have discovered that I really looove pressing my seams all the time. But how did they achieve good looking seams “back then” without the use of a modern iron?
A smoothing stone: a flat stone or piece of glass (in Swedish “glättsten”) were used with a flat polished wooden board to smooth out fabrics and seam. I have seen several finds from the Viking age but there are examples dated iron-age to medieval period.
Putting the fabric/folds/seam on the board, and then pressing down with a smooth piece of glass/stone will work pretty well, and give you strong arm muscles too…
A smoothing bone or pointed bone creaser (falsben): A polished piece of bone that you can use for flattening out seams, both in textiles and leather. I wanted to show you some historical examples, but couldn’t find any photos to borrow, which makes me a bit unsure about the history of the tool. I was taught it was a really old tool, basically used since forever (in Sweden, that means at least during the 19th century…) That is not medieval, but since I have seen similar items from earlier periods, I use it. You could use the backside of a knife handle or a bone awl or stylus as well.
This works really well, and makes the seams beautifully flat, smooth and glossy. I actually use mine to finish of handsewn seams in linen, the hemming on fine veils etc. It is a bit of extra work, but quite fast and easy. The pointy tip gives an advantage over small smoothing stones in my opinion.
Heated irons are heated up by fire, and used in the same way as a modern iron with a damp pressing cloth. Historical items are both solid, and with a compartment for putting in pre-heated pieces in. This method is demonstrated in the series “A stitch in time”.
In Sweden, it seems that the iron came in use during the 16th century, placing it at the end of the medieval period. In Europe I believe it to be a bit earlier, and it is found in China during the 4th century.
Apart from having to make a fire and wait for the heating this is basically the same thing as using a modern iron, when you get used to the tool and how to estimate the heat.
My two favourite things for flattening the seams when I don’t have an iron around:
Smoothing bone: for linen, leather and thin wool items. Makes a really glossy and nice finish on linen shirts and veils. If you want one; buy one in bone, not plastic.
Gripping the seam with your hand to flatten it out while sewing down the seam allowance: good for thicker or fulled wool fabrics. You simply hold the seam allowance in place while sewing it, and the fingers on the underside of the fabric stretches it out and create the flat appearance on the outer side.
Both of these methods are nice, but I rarely use them in my everyday work, to save my fingers and joints from strain. Choosing ergonomic methods is also important, but every once in a while it is nice to make an item with no modern tools at all!
Just wanted to give you all a quick update about some of my plans this spring!
Between 8-10 of March I will be holding a workshop in medieval clothing in Norway; check out this event for a weekend of fun, new knowledge and lots of sewing!
I also have a weekend of tablet weaving in my hometown; https://hemslojden.org/activity/keramik-2-2/ were we will be doing lots of practical handcrafting, look into some historical finds, have fika and meet new friends.
Both workshops have their own way of booking by their site- just wanted to show them here for you!
I also have some free time yet before the summer for weekend workshops with your group or at a location of your choice. Just send me an email if you are interested, to linda.handcraftedhistory @gmail.com. I also have time to make a couple of outfits for customers, so are you planning to order some clothing for yourself before summer now is a perfect time to do so! (waiting time is now until early May)
Then my main market season will start, and am I looking forward to that! Medieval tents, summer winds, lots of happy people, swimming in lakes… Yes, please! Let’s hope the spring and summer will arrive soon here!
Underwear in linen – you can always use another one. Here is an easy and basic tutorial about how to make your own. I use prewashed white or natural linen fabric, about 150 cm in width. You need about 2 meters for a shift for size small to medium. If you are tall, take another 50-60 cm. If you need a bigger size or want the shift to be long and full, take 3 meters of fabric (or draw out the pattern pieces on paper first.)
Early morning in only my linen shift. This also has a gore in the middle, to make that- check out my tutorial on how to put in a gore in your dress.
Before you start:
Soak the fabric in water for a couple of hours, then prewash in 40-60 degrees C. Zigzaging the edges before washing will prevent fraying. Hang dry linen, and iron it on high heat after it is dry. Now you are ready to sew, without having to worry about the garment shrinking during washing.
Take your measures:
Length of shift/shirt + 3 cm seam allowance (SA).
Width of shift (around your chest or your widest part of your upper body) + 6 % for movement.
Width of armholes + some cm for movement. Compare with a modern shirt that fits you.
Length of the arm, from shoulder to wrist.
After measuring yourself; draw out the pieces you need on paper with the measurements you got. This is my layout with pattern pieces; front, back, two sleeves, two sleeve gussets, two side gores (one is split in two). Add seam allowance (SA) 1-1,5 cm on each side, 2 cm at hems (sleeve wrist, neck-line, bottom hem).
Adjustments:
I cut out my neckline at once, but you can start with a narrow neck-hole of around 18 cm width, sew your shift together and then try it on to adjust the neckline to your taste. Note that I also cut out my armholes on the body pieces; around 4-6 cm on the shoulders and then in a straight line down. This makes the shift lay better on my shoulders.
Draw the pieces on fabric:
When everything has been drafted on paper with measurement+ SA added, it is easier to transfer it all to the fabric. Draft the pieces out on your linen, starting with front and back pieces, sleeves, then side gores and sleeve gussets (if you want any). I draft my side gores around 40-60 cm wide but use the fabric you have and adjust to your size (xs-small=minimum 40 cm, medium=min 50 cm, large= min 60 cm etc.)
If you are going to sew everything on the machine, start with a zig-zag or serger around all fabric edges. This is important so the fabric wont fray and fall apart when wearing and washing.
If you sew your shift by hand, start with assembling the pieces, and then finish off the edges. Backstitches for assembling, and whipstitch down SA and double folded edges are durable and historically accurate.
Sewing:
After this, it is time to sew the pieces together. Start with the sleeves + sleeve gussets and then assemble the split side-gore. Next step is to sew the side-gores to the sides of the front piece. I always pin the pieces first, on a flat surface.
Sew the pieces together, and press the SA to each side with an iron, or by hand. Repeat these step after every seam, and it will be easier to sew the crossing seams nicely and make the seams look better.
Sew the shoulders together. When these are done, lay the garment out on a flat surface, with the right side up, and put the sleeves on top of the garment right side down and pin the sleeves to the armholes. (You don’t need to do a fitted sleeve on this item, just sew the sleeves in place as a regular flat seam.) The middle of the sleeve should meet the shoulder seam, continue to sew along the sleeve until you reach the gusset, sew this in place but leave 1 cm open at the edge.
Pin the side seams and sleeves together. I start sewing from the wrist, along the sleeve to the start of the gusset. Then I sew the gusset in place from the sleeve to the armhole, fasten the thread, change directions and sew the gusset to the armhole and down towards the side gussets.
When sewing the area around the sleeve gussets you might find it a bit bulky. Don’t be afraid to finish your seam, cut the threads and then change direction or the way the fabric run on the machine (or in your hand). Pinning or basting before sewing is also a great help. Remember your SA on the gusset; leave 1-1,5 cm open at the edges of the seams to make it fit. Make it as easy as possible for you at every step and you will find it much more fun!
When your garment is assembled, try it on to adjust the neckline and the length of the sleeves if necessary, and then finish the hems by hand. The easiest way to do this in a historical way, is to fold the hemline twice and whip stitch it down (this will keep the fabric from fraying, or hide your zig zag stitch). I use waxed linen thread in the same tone as the fabric, which makes for a descreet seam.
Good luck sewing!
Check out my shirt tutorial for help on how to sew a linen garment by hand.
This blog post contains a collaboration advertisement for sewing machine guides from Sewingland.
I thought I would share my best tips and tricks for making good apron dresses, since I have made a whole bunch of them by now, and probably most of the mistakes too. If this is your first try at an apron dress, check out my tutorials Easy apron Dress or Fitted apron dress first. At the end of my post, you’ll find a link to useful sewing machine guides if you would like to make your dress on a sewing machine.
Nr 1. Use enough fabric. I know it’s tempting to save on the fabric, but trust me. Too short and tight a dress will look like a modern dress. I use around 2 m *1,5 m to mine, and if you are larger/longer than me, you need a bit more.
Nr 2. Use a thin enough fabric. Save the sturdy, felted wool fabrics for a coat or a cape and chose a thin, rather loosely woven fabric. It should be comfortable and have a nice fall, try to drape it over a piece of furniture, like a table, and look how the folds drape.
Nr 3. Try it on while sewing with all your other layers of clothing, to make sure you will have enough room under the apron dress for a shift and a possible warmer dress if you think you will be needing that.
Nr 4. Don’t make the straps too long. I think it looks very strange when women are wearing their dresses in the middle of their bust, or even under their nipple area. Please don’t. When you fasten tortoise brooches, you can pin them through your strap, or make a knot at the end of a strap being a bit too long.
Nr 5. If you don’t have tortoise brooches to fasten your dress with, don’t use modern buttons or fastenings in the meantime. I have learned that apron dresses were not a thing without brooches, like the dress is an accessory to the jewellery and not the other way around. You don’t have to wear apron dresses for reenacting a viking woman, a simple long kirtle will do. So skip the apron dress if you don’t own the brooches, or sew the straps directly to the dress itself if you are momentary without them.
Nr 6. The thin fabric could be lined with a strip of linen or wool to protect the hem and support the top.
Nr 7. You may sew on a piece of tablet-woven band or a thin silk strip around the upper part of the dress, to make it durable, enhance the fitting and also, for decoration. Another way to decorate the dress is to sew a small wool braid to the top.
Nr 8. Decorating your dress doesn’t have to be expensive. Use thin strips of patterned silks, tablet woven bands, viking silver posaments, or just a braided cord. On the small figurines, it seems like there is decoration around the hem of the dress, and in grave finds there are remnants of silk and decorations around the upper part, partly inside the tortoise brooches. Save money and time and decorate only the upper part of the dress, or do the whole thing!
Nr 9. Use the same type of thread as the decoration you want to sew to your dress. Silk thread for silk fabrics, wool thread for woven bands, and a very thin and fine silk thread for posaments. This will give you a nice seam, that is as little visible as possible, and doesn’t damage the decorations.
Nr 10. To protect your dress from everyday stains; use a belt to fasten up your dress while working, this will protect the hem from mud, open fire and stains. Also, an apron is a very good choice for protecting your clothes. Or remove the apron dress and work in your shift or woollen dress. It seems the apron dress was a status symbol and finer wear, so it is probable that women didn’t wear them while labouring.