There’s a lot to say about this year, but at least I’ve been having plenty of time for sewing. Unfortunately, a bad shoulder gave me some pains, but with rest and a training program, I think we are mostly friends again!
I thought it would be fun to share some projects with you here, as an inspiration and a kind of journal to myself: I always forget what I have been sewing, and find myself longing to finish yet another personal “small project” but not understanding why I don’t make any progress…
72 garments finished during 2020; both for customers, friends and myself. I am not going to write about them all, and many have not been photographed yet. I also have a whole bunch of things not yet ready; commissions, old projects known as UFOs (unfinished objects) and some rather new ideas I have been working on.
It was time to make some new viking clothes and I managed this blue dress, the red apron dress and some matching items, like the handwoven and woad plant-dyed shawl. I am really pleased with how the outfit turned out, even if the outfit might not be sexy to the modern eye… I love experimenting with different historical cuts that could have been in use, trying out how they look and feel when I make and wear them.
Later I made this early 14th century outfit as I finally, after a long period of 15th century-romance, have laid my eyes on new conquests. The 13th and 14th centuries are very nice, and I want to get to know them a little more. The next project will be something from the Maciejowski/Morgan Bible.
I have made several complete outfits for customers based on viking age and medieval clothing, and this was the year when I only met GOOD CUSTOMERS! I kid you not! Everyone has been polite, fun to work with and sent their payments. For those of you working regularly in customer service; you know my feeling here! How did I get to be so lucky? And, will this continue during 2021?
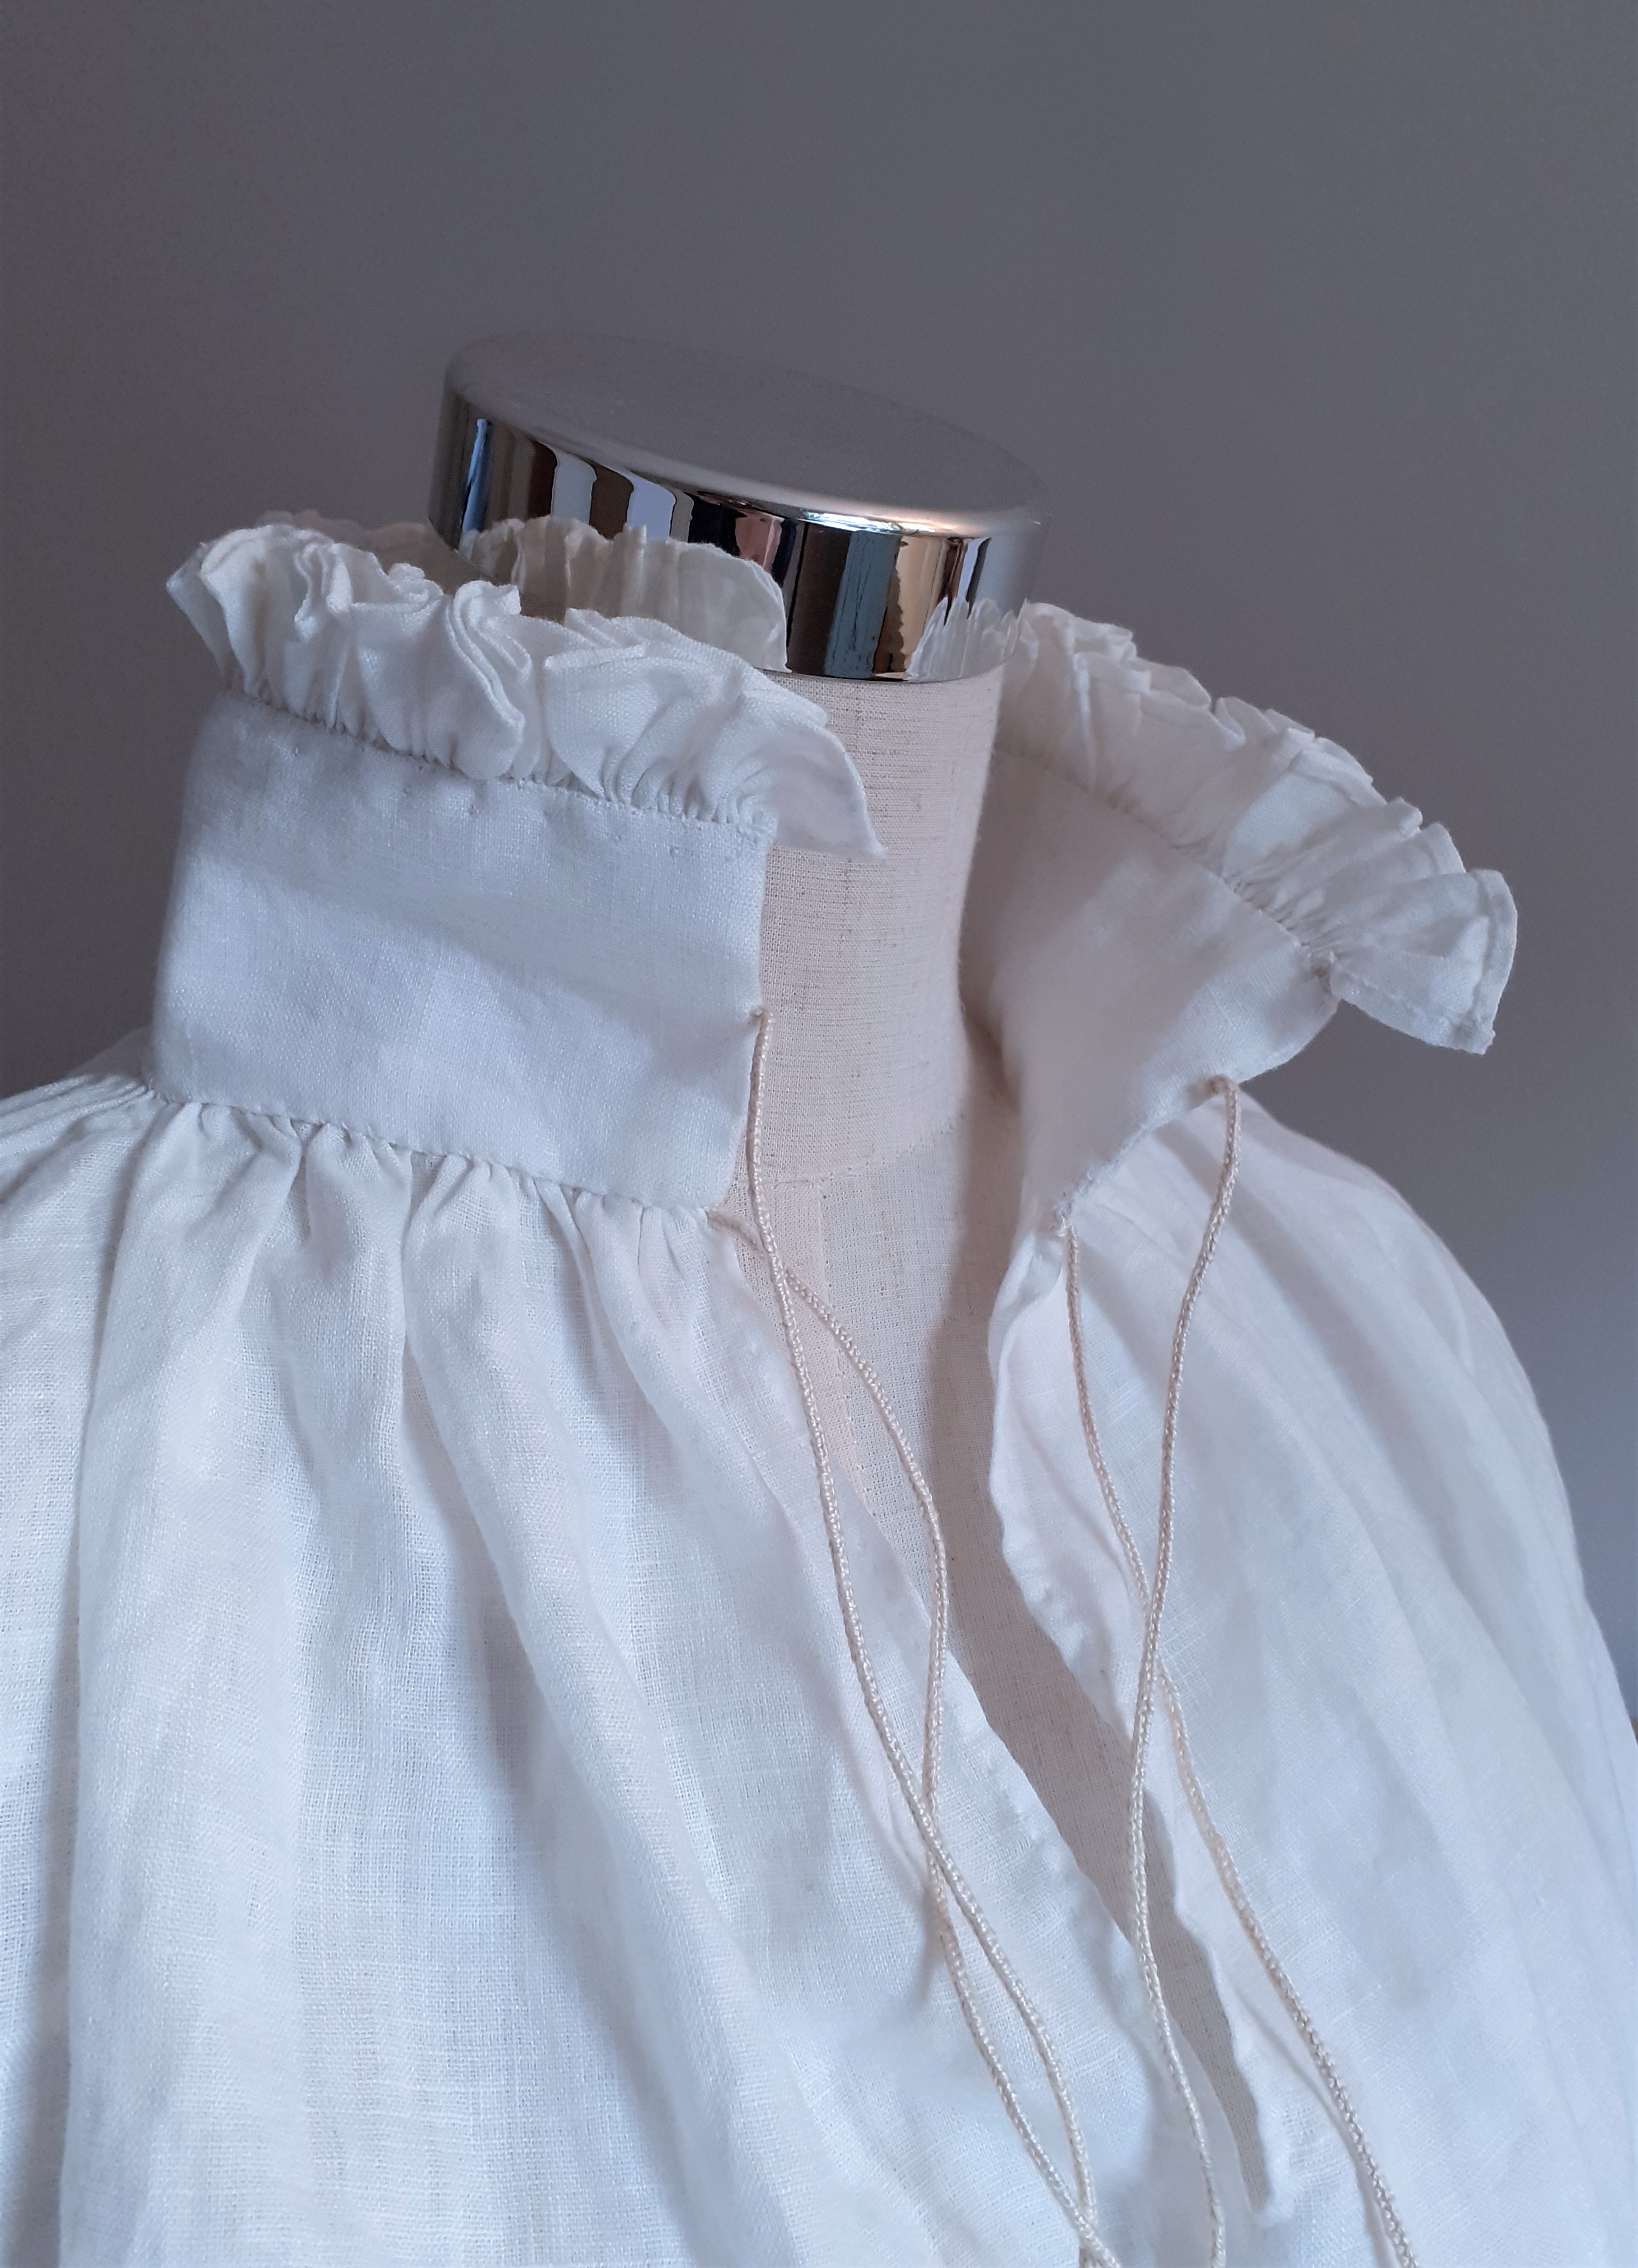
A hand-sewn 16th century shirt inspired by the Sture shirt (without decorations and embroidery). This shirt took over 40 hours to make, more than most dresses… Is it pretty? Yes. Was it worth it? Give me another year before I answer…
I have also worked on 18th century clothing, learning more about the period and the methods in use. There’s a couple of skirts, a jacket in wool and one in printed cotton, as well as a small linen cap. I am looking forward to going to new kinds of events and trying out the kit to see if it will work.
I made a new short-sleeved kirtle with a waist seam, similar to the blue Weyden-inspired dress from years ago. This dress is rather loose (I might need to take it in a bit in the side seams) and it’s made with a curved front seam. It is going to be a great working kirtle! The long-sleeved green 15th c dress also got sold, they mysteriously shrank in the wardrobe during last winter)
Apart from sewing I also dived into some video making, filmed lectures for the digital Medieval Week as well as setting up a new Youtube channel, and working with content for my Patreon page. Video editing and voice-overs still make me sweat, but my plan is to continue to improve in these new areas, creating more and better content for you readers. Patreon makes this possible since I get support to work with my content, and my hope for 2021 is that my page will continue to grow, inspire and teach handcrafting ideas to everyone interested!
It feels like it is early yet to plan for this year, but of course, I am hoping for a market season of some kind, and I have so much new content for sewing workshops and material for a new viking lecture as well. As for the blog, there is a long list with tutorials to make, as much as I have time for. All concluded, it really feels like 2021 will be a Great Year!
I wanted to tell you about my blue 15th century dress. It is made in a thin twill wool fabric and super comfortable and easy to wear!
This is one of the dresses I wear most when it is hot outside, but made in thicker wool it will give you a really cosy overdress for colder weather too. I have used lots of 15th century pictures as a start for the pattern drafting and overall look, and you can find some sources + more info at the end of the post. Also, there is lots of posts about 15th century garments and fashion here so click the tags for getting to know more. I made this one as a pattern experiment, and it turned out so nice that I am tempted to make another one…
The pattern is basically the same as the one I used for my coat. The skirts are longer and closed in the front with the opening reaching to the waist (easy to get in and out of) and the sleeves are S-sleeves (the seams are in the back) with an option to save on the fabric by inserting a gore in the back of the sleeve. This is the pattern outlay from the coat; if you want to make it to a dress just give the skirts more length, and redraft the sleeves to S-sleeves if you want.
The measures you need:
Lenght of garment (from shoulder to floor for example)
Armhole (or use a toile or pattern that fits you, the armholes are made in “the regular way” but will be a little deeper due to the width of the garment starting already from the shoulder. If you use a toile as a start, place the neck-hole around 20 cm (size s-m) from the selvedge and draft neck-hole, shoulder and armhole from the toile before continuing the sides in a straight line.)
Sleeve length and wrist circumference (for the sleeves)
Shoulder width (around 8-13 cm) from the neck hole to where the sleeve starts.
Upper body circumference. Measure your body, and split the measure in 4. Use this as a guide for drafting the start of the pattern; the neck-hole, shoulder and armhole.
As a reference, I started the neck-hole 20 cm from the selvedge/fabric edge and then drafted the pattern from there. To make sure you get the measures right and will fit in the dress; measure the width of the fabric pieces before cutting, especially if you have broad shoulders. Compare with the width needed over your shoulders.
It is easier to start from a corner, with the front piece and front sleeve gore 1.
If you are a beginner in drafting patterns, it really helps to start on a piece of paper with your measurements. Experiment until you feel more secure, and if you like, you can even cut the paper pieces out and tape them together to check the fitting. You don’t have to make the pattern a full scale, you can work on a checkered paper with a scale of 1:10 (1 cm being 10 cm in reality)
The gores for the front and back skirts are just there to give some additional width to the skirt (F1, F2, B1, B2) and they should be half the lenght of the back/front seam. So they will get longer if you draft the skirt longer.
Give the pattern a try! This is one of those outlays that may seem more complicated than it really is.
After you have cut out all the pieces, sew them together:
back seam and gores
shoulder seams
side seams
sleeves
insert the sleeves in the dress
front seam and gores (leave the dress open from the waist or the chest area up)
hemming and 1-3 small clasps at the front (if you like)
When I made the dress I tried different ways to achieve the folds; basting, gathering, and with a strip of fabric on the inside… But I like it best when it is loose and flowing so I removed all the stitching. Every time I put it on now I arrange the folds after putting on the belt. They may slip around a little but is easy to adjust again to your liking.
Most of the fabric is gathered at the front and back to drape the skirt nicely, without adding bulk on the sides. When choosing fabric, a thin but tight weave will give you a good fall and heavy drape to your dress.
There are lots of pictures of this style of dress, with draped folds, and what appear to be sewn ones. The sleeves can be made rather tight or looser, and the neckline higher or lower. Check out my pinterest for more inspiration!
This is a dress I made several years ago, to have as a simple working kirtle. I never got around to take photos and write proper documentation about it, but now I got some feeling! In these photos, the dress has been used for a couple of years and it has seen wear, washing machines and mending. So here’s my first tutorial for the autumn, and thank you for visiting and reading! (Both old friends and newcomers!)
This is a very simple working kirtle or dress, made to be practical as well as historically possible. The fabric is a plain wool weave, dyed to look like walnut dyed fabric. The skirt is partly pleated, partly flat sewn to the waist, and the upper part of the dress is fitted for bust support, side laced and has short sleeves.
I wear it with loose sleeves, pinned to the short sleeves and a gollar for warmth, under another fancier dress, or as it is if I am going to do lots of work or if the weather is warm.
The dress is hand sewn with wool thread in the same colour as the fabric, and it was one of my first garments made with wool thread instead of linen thread. I really recommend it! At first, I was a bit unsure if it was going to be durable enough, but after several years of using it, washing it in the machine (yeah, because lazy and dirty…) and treating it rather rough, it stays together really well, with only some minor mending.
I used running stitches on all long seams and folded the seam allowances to one side before whip stitching them down. The waist seam and all edges were made with whip stitches, and the sleeves and upper body seams made with back stitches to be a bit more durable than the running stitch is. The running stitch is way more durable than many believe and common in extant finds, but for heavy support, I like whip stitch and backstitching better.
The fabric is a medium tabby weave and I used around 3 meters for a dress. If you are much longer than me (1,6 m) consider buying another half metre. I did a quick pattern outlay for you, since it is old I’m not sure if I drafted the pattern along the selvedge or across the fabric but you will get an idea of what pieces you need to make one for your self.
The dress was made using two front pieces (to have a supportive seam in the front was a good choice since I didn’t have any lining in the dress.) One back piece, two sleeves and the skirt panels. I drafted S-sleeves, but the dress is made with regular sleeves with the seam under the arm. That seems to be the most common in artwork from the time on short sleeves. Your choice!
Some thoughts on skirts:
Do you see that the skirt has way more fabric in the back, while the front is straight? This will give you a nice fall as well as enough width and volume, but if you bend forward to pick up things or work by the fire, this construction will make the skirts remain away from the flames closer to your body, rather than draping forward with your movement. Hard to explain, but try it! It gives you a very practical garment.
The front panels are marked C at the centre front. The back piece is “upside-down” to use as much of the fabric as possible. You could of course piece the skirt together with more panels if you like. On my dress, the front panels lie smoothly in the waist, with only a couple of pleats to allow room for hips and stomach, while the back part is pleated around the back.
This is (I think) my only wool garment so far that has bust support, but no lining whatsoever. This is possible only because of the plain weave since it is not very flexible across and along the threads in the fabric. A twill weave would not have worked without lining.
The drawing with the front piece has two arrows marking out small details in the fronts seams. At the centre front there is a small bend going in under the bust, and at the side seams there’s another, making the seam run in a bend, and then changing direction after the bust and running straighter over the stomach. This way of sewing will make the bust stay better in place, allowing for bust support without lots of sturdy layers. But the bust will have a rounder form and not as much steadiness as a garment with lining.
I did however put in a narrow strip of linen around the neck opening on the inside, to avoid it getting stretched. There is plenty of ways to make hems sturdier, such as a narrow strip of fabric, running or stab stitching or using another layer or quality of fabric on the inside, for example. You can find this in extant finds such as Herjolfnes and finds from 14th c London, as well as in paintings. It is an easy way to finish your garment, make it last longer while being historically made.
The side lacing is made with sewn holes and a lucet braid in plant-dyed wool thread. A wool thread will be a bit stretchy, and won’t run as smoothly as silk, which makes it a bit slower to lace, but the cord will stay in place. In this photo, you can see the lacing which starts at the sleeve and reaches to the waist seam, a gap where the shift is visible (did I have too much good food this winter?) and also some mending is done on the sleeve. After the waist seam, I tie the cord (I lace it from sleeve to waist) and the skirts are opened another 15 cm to allow for easy undressing. The skirt is not laced, it stays closed anyway, and by sewing some folds in the sides, the opening will not be very visible.
A note on fitting a dress like this:
I always make a fitting for every single item I make, and that is especially important if it is supposed to be tight fitting. I do have a basic pattern, drafted on my own body (a toile) but after I have basted the pieces together I need to try them on before sewing the garment. Every fabric you work with is slightly different, some more stretchy, some supportive and stiff, and by trying the pieces on you can adjust the garment to your taste.
The method for adjusting and fitting a dress like this is the same as I use while making a supportive upper body toile, and you achieve the support by taking in the upper body in the sides and front, sometimes also by stretching the shoulder seams upwards a bit.
A front laced kirtle is a bit easier to adjust to a bigger bust, but you can make it work with a side lacing as well, just remember to make the same adjustments to the laced side as the sewn together side, and maybe lacing it double one turn just below the bust for greater support.
For a complete outfit; linen shift, wool hose and leather shoes under the kirtle. A simple belt to hang the money purse from (change is very important for today’s trader) and a veil on the head. Here I have a simple cap under the Great Veil, to have a base to pin it on. The veil can then be worn in many different ways, depending on how you like to wrap or fold it. 2-3 brass pins secure the veil to the cap under it.
Whoho! Finally documented this dress a bit, so now I don’t have to feel “bad” about forgetting it all the time. As you have noticed, this is not a complete step-to-step tutorial but rather a post with guidance if you want to make a similar dress.
Many readers ask me to share more sources and such material on the blog, but according to copyright laws I am not free to post all the stuff that inspires me on the internet, and therefore you will often find links, reading tips and Pinterest notions where you can find artwork and resources of your own. Hope you understand my take on this!
I am putting up some items for sale, mostly things I have been making as projects, for tutorials and such. Good historically clothing, everything is worn and priced after their condition. Most items you might have seen already here on the blog, and now they are looking for new homes to give room for new projects and tutorials!
A 15th c coat in brown woolen twill. Handsewn with linen thread. Made after historical models, edged with white rabbit fur from an environmentally and animal friendly farm. Clasp in neck in bronze after 15th c finds. European size 36/38, or small. Bust measure recommended between 80-100 cm. Loose and flowing, lots of fabric. Price: 240 Euro/ 2500 kr. Want to order a new one in a colour of your choice? 335 Euro/ 3500 kr.
A green woolen dress/kirtle in a thin twill, linen lining inside. Handstitched with linen thread, closing with hooks and eyes. After historical models, 1450-1470. Size: Europeian 36/38, waist around 78 cm, bust 90 cm (a couple of cm in difference is ok, can also be sewn in by the side seams) for a 160-165 cm long wearer. 380 Euro/ 4000 kr ,machine washable.
A blue woolen dress/kirtle with short sleeves, after paintings by Rogier van der Weyden, 1450-1460. Handsewn, lined with linen on the upper body. Short sleeves, lacing at front. Size: eu (34) 36, Waist 76 cm, bust measure up to 90 cm/65 EE, supportive upper body. Can be taken in by the side seams. Lenght of wearer: 160-165 cm. Machine washable, good condition. 380 Euro/ 4000 kr.
This post is about my work with 15th c dresses for the Golden Egg challenge I do in the SCA, and it will be something like an overview on dresses. If you want pattern outlays and sewing tutorials, check out my tutorial page!
What is really the difference between a kirtle, middle dress, dress, underdress and so on? Not much, except the words. All these can be used for the same garment, depending on the country of origin and the period. A kirtle refers to the main (upper body) garment for both men and women, which should be long (and loose at the hem). A tight-fitting, short garment with the same function is called a jacket or doublet. A kirtle can be both a tunic and a dress. So it is more of a language term than a specific garment.
Dresses are basically what you think it is; long garments (for women in this post) worn in different fashions, styles and materials. The medieval women generally wore several layers of garments, so to better talk about these, they are given different names.
The shift, chemise or underdress is your underwear, usually in bleached or unbleached linen, washed frequently as you would do with modern underwear.
The supportive shift is a sleeveless, tight underwear to support and shape your bust. You can see it in both pictures and as a find (Lengberg). You can wear it on its own under the middle dress, or together with a shift with sleeves.
The kirtle or middle dress is the next layer, often in wool, but also in silk, cotton, velvet or mixes of materials. You can wear this in public, and during the 15th c, it is often tight fitted. The cotehardie? That is french, meaning basically a kirtle but is referred to as a tight fitted 14th c garment for both men and women, often with buttons or lacing.
The dress or overdress is a warm layer worn on top of the first two, during the 15th century it is often loose, with lots of draping fabric. And as expensive as you can afford it. The houppelande? A certain style of overdress, with an opening at the centre front, often elaborate sleeves and lots of fabric in the skirts.
The coat or cloak is a layer of its own, to protect the wearer from the weather (or for symbolic/religious use) or as a fashionable garment. Women and men both wear them and own them in sources, but they don’t seem to be high fashion during the 15th c, more like a practical choice.
OLYMPUS DIGITAL CAMERA
During the 15th century, fashion seems to change quite fast, and you can also see many different styles of dresses in the same picture or geographical area during the same time. If you want to research different kinds of styles yourself, I recommend diving into some artwork for the period. I have two pinterestboards to check out, one about my Golden Egg project here, and another on interesting 15th c clothing here.
I also wrote a post about research and artwork here. I could really go on and on about different models of dresses forever, but to keep it simple I am just going to show you some different examples I have tried to recreate from the 15th c:
For my wardrobe, I opted for the green kirtle, a simple dress with long sleeves, a waist seam and front closure with hooks and eyes. The sleeves can be loose enough to roll up to the elbow, or a tighter version like mine. The front opening continues after the waist for a bit, to make the dress easy to take on and of. Decorative clasps by the front or lacing seem to be options for this style. It also seems like the kind of dress you can wear as both middle or overlayer on your outfit, depending on how you fit it and the choice of material.
But I also got curious and tried out the loose dress model with my dove blue dress, based mainly on a picture from Bohemia. These model can often be seen with a decorative closure at the neck and is held together by a thin belt by the natural waist. The breast can be seen as two individual shapes; you need a supportive shift with separated cups or a modern balconette bra to achieve this look! (or go natural)
Before, I tried to recreate this kirtle with short sleeves and a waist seam with a plaited back, based on some artwork of Weyden. The sleeves have a seam under the arm instead of the more common S-sleeve, the middle back has a seam, and there is a strip of fabric around the neckline, as a way of giving support to the shape. The front of the skirts lay smooth to the upper body, but at the back, there are plaits to add volume and a nice drape to the dress.
The houppelande is such an interesting garment, and I have tutorials about the different pattern and outlay. These are some of the different versions I have made. I really am a fan of this green colour as you may have noticed, and my friends use to joke with me if I don’t wear green at events…


")

")


")
")


")
")
")


")
")