At the end of each historical adventure-season I try to clean, mend and grease all our shoes. Outdoors in the autumn sun is of course the most enjoyable, but as long as you get it done it is fine. (Ideally, one would do this after each event to keep the shoes in top condition. But I am lazy…)
Shoe care: soft brush, leather grease with rag and paper.
After each adventure:
Treat your shoes with some grease after each event/market/adventure and also during longer trips. If the shoes get wet, dry them in room temperature or outdoors (never put them by the fire). You may fill them with paper to get them to dry quicker.
How to deep-clean your shoes before putting them away for the winter:
Brush away loose bits and dust, and clean the space between leather and sole by separating these and brushing away small scraps in the crack. Use a soft brush.
Wipe the shoes clean with luke warm water, and a bit of leather soap/regular soap if dirty. Scrub the soles clean with water and soap.
Dry well, filled with paper to hold the shape better.
Treat the leather parts with leather grease. I also grease the soles on turnshoes.
Dry for a day or two, and then store the shoes in a dry space. I usually keep the historical shoes in the wardrobe.
Clean between the sole and leather
Now these pair are cleaned, dried and greased!
Before the next adventure, take out your shoes and grease them again before use!
Mend your shoes as soon as you discover they are broken! A ripped seam or a loose strap needs to be sewn (you can use vaxed linen thread) and a loose rubber sole needs to be glued in place. If you are unsure how to mend the shoe, the shoemaker you bought them from should be able to help you or give you advise. A modern shoemaker/cobbler could also be of help.
Shoes might not be as visible as other garments, but they add to the historical look and experience!
Store your shoes:
Shoes should be kept in a dry space, and can be filled with paper to better hold their shape. Wardrobes, airy shelves or paper boxes are good. Shoes might get moldy if kept damp or squashed together.
How to use your shoes:
Leather turn shoes (with a leather sole) wears out quickly if you walk with them on gravel and asphalt. If you are walking a lot on those grounds, consider to bring a pair of pattens (wooden soles with straps) to protect your shoes. Or change to modern shoes if walking longer distances. I do that during Medieval week in Visby to spare both shoes and knees.
Mud is equally bad for your shoes; try to avoid it, wear pattens, or brush your shoes clean as fast as you can after a muddy experience.
When walking, remember to not drag you feet against the ground, but properly lift your feet to spare the sole. Avoiding glass and sharp stones is also good. If the shoes get a bit large, use an inner sole, a pair of extra socks or leather straps to keep the shoe firmly on your foot. A shoe that moves on your foot will get uncomfortable and wear out faster.
Buying or making historical shoes can be expensive, but with the right use and treatment they will last a long time. I use mine approximately 30 days a year, and they are several years old now!
(Want to make your own shoes? I have a weekend workshop in shoemaking planned for 13-14 November 2021 in Sundsvall, Sweden. Send me an email if you want to know more and join us!)
This blog post is made with the support of my Patreons
According to my notes, I made an update on this sewing project when moving it to the current blog address, in 2014. 2014? That is some time ago… With that said, I hope you have patience with this old version, and hopefully, it will help you make one of your own.
Materials and tools needed:
Fabric 150 cm width, 200-240 cm length
Measuring tape
Scissors
Chalk
Threads + needle
Long ruler or a stick
Measure:
The measuring and construction for the Euradress are quite a bit different than other viking and medieval garments, but it is a fun project. The first measures to take here are the base and lenght of the sleeve-piece, everything else will be based on these measures
Hold the measuring tape in the middle of your throat and measure along your arm to the thumbnail. This measure will give you a little bit of extra range of movement to avoid making too short a sleeve.
My measure is 74 cm (my regular sleeve pattern is 66 cm long.)
Measure the base (width) of your sleeve by holding your measuring tape one hand width below your collarbone, drape it over your shoulder towards your back, and take the measure from the back when you are parallel with the start by the front of your body (a friend might be useful here).
My measure is 40 cm, this might be a good measure for size small-medium, while larger sizes will probably have a longer measure (if doing this pattern with measures that differs greatly from mine, be sure to draw your own pattern pieces in a way that works for you. This might be quite different from my draft, but the principle would be the same).
Note: the base of the sleeve is also the upper measure of the front and back pieces. “15 cm” is where my wrist would be, it is not the whole circumference since I will have a long gore adding width for my arm to fit. As a reflection, I would probably have made this measure at least the circumference around my wrist (can’t remember why I did not) but I advise you to do that.
This is my draft of the pieces, on a folded fabric. The width is folded in halv (75 cm) and the dress pieces are drafted along the length of the fabric. Here you can see how much fabric you need after taking your measures: the length of the sleeve + the length of the dress from 1 hand below your collarbone to the bottom hem. Remember to add SA, I have not done that on this old draft.
How to make a draft of your own:
Fold your fabric in half
Make a line to mark out the middle on the fabric’s surface (red dots).
Draft the width of the sleeve around your wrist by the start of the line (highest up) 1/2 width on either side of the line.
Mark the length of the sleeve from the wrist to the base (green line)
Draft the base of the sleeve where the green line ends, 1/2 width on either side of the line. (purple line) make sure the line is at a 90degree angle to the green line.
Draw out the rest of the sleeve (blue area) by drawing lines from the edges of the purple line to where the wrist is (thin lines surrounding the blue area).
Draft the front and back body pieces (pink area), starting from the sleeve base edge, down to the corners of the fabric surface, basically continuing on the lines making the sleeves (pink lines). The measuring tape or a long ruler is a great help here.
That’s it! The blue is your sleeves, the pink your front and back piece and the yellow area being “leftover” is your side gores, you will have 1 whole and 2 halves. Cut the pieces out through the folded fabric, if it wants to move around you may pin the fabric layers together with pins along the lines.
Sewing order:
One side gore is cut out in halves; sew this one into a whole gore. You may also make a false seam along the middle of the whole one, creating two identical side gores. “False seams” are seen in finds, made by sewing a very narrow seam in a whole piece, to create the look of a symmetrical garment.
Sew the base of the sleeves against each other, but only a short seam of 1-2 cm on each edge. This will make it easier to sew the rest of the dress. The opening left on either side of the sleeve bases is your neckline. Finish that later.
Sew the sleeves to the front piece, I find it easiest to start in the centre front and sew the sleeves out to the edge of the front piece on either side. Repeat with the back piece.
Add the side gores. I started by the hemline of the dress, sewing in the gores from the bottom and up to the wrists. I did this to be sure to get use of the whole width of the base of the gore since the gore might be a bit longer than the pieces it fastens against (I guess this was also the reason I made my wrist cf so small, I got additional width from the side gore before I cut off the abundance. Looking back on this method, starting by the wrist and sewing down you would get a better opportunity of shaping the bottom hem evenly, by trimming away the corners of the side gores). I would recommend pinning/basting the side gores in place first before sewing.
Try the dress on, and adjust the bottom hem and sleeves before folding down the hem and whipstitch it in place.
Adjust the neckline on your body by deciding how low you want the opening to be front and back. I closed mine in the back around 4 cm from the base and then hemmed the rest of the opening with whipstitching.
Adjustments and fitting:
The side gores might be a bit too long; check before sewing and cut off the abundance after the wrist.
This garment might be a bit loose-fitting; adjust the seams between the gores and the front/back parts if needed.
Check out the bottom hem by putting the garment on and measure + adjust to make it look good.
About the find:
The Eura finds are from Finland and dated to the Iron Age. It is a great find with lots of information about the Finnish clothes and how they were worn, and have been documented and recreated mainly in the Finnish historical clothing culture.
The Eura dress is a different outfit than the Swedish and Norwegian viking outfit, but the peplos/overdress is similar to other early finds on peplos and to the Gotlandic early viking outfit. The Euradress in the tutorial above, with its special construction method, do have similarities with other finds from Scandinavia, such as the medieval Uvdal find from Norway.
Sources/learn more?
“Ancient Finnish costume” by Pirkko-Liisa Lehtosalo-Hilander
If you have browsed my earlier tutorials (and videos on my Patreon) you might have discovered that I really looove pressing my seams all the time. But how did they achieve good looking seams “back then” without the use of a modern iron?
A smoothing stone: a flat stone or piece of glass (in Swedish “glättsten”) were used with a flat polished wooden board to smooth out fabrics and seam. I have seen several finds from the Viking age but there are examples dated iron-age to medieval period.
Putting the fabric/folds/seam on the board, and then pressing down with a smooth piece of glass/stone will work pretty well, and give you strong arm muscles too…
A smoothing bone or pointed bone creaser (falsben): A polished piece of bone that you can use for flattening out seams, both in textiles and leather. I wanted to show you some historical examples, but couldn’t find any photos to borrow, which makes me a bit unsure about the history of the tool. I was taught it was a really old tool, basically used since forever (in Sweden, that means at least during the 19th century…) That is not medieval, but since I have seen similar items from earlier periods, I use it. You could use the backside of a knife handle or a bone awl or stylus as well.
This works really well, and makes the seams beautifully flat, smooth and glossy. I actually use mine to finish of handsewn seams in linen, the hemming on fine veils etc. It is a bit of extra work, but quite fast and easy. The pointy tip gives an advantage over small smoothing stones in my opinion.
Heated irons are heated up by fire, and used in the same way as a modern iron with a damp pressing cloth. Historical items are both solid, and with a compartment for putting in pre-heated pieces in. This method is demonstrated in the series “A stitch in time”.
In Sweden, it seems that the iron came in use during the 16th century, placing it at the end of the medieval period. In Europe I believe it to be a bit earlier, and it is found in China during the 4th century.
Apart from having to make a fire and wait for the heating this is basically the same thing as using a modern iron, when you get used to the tool and how to estimate the heat.
My two favourite things for flattening the seams when I don’t have an iron around:
Smoothing bone: for linen, leather and thin wool items. Makes a really glossy and nice finish on linen shirts and veils. If you want one; buy one in bone, not plastic.
Gripping the seam with your hand to flatten it out while sewing down the seam allowance: good for thicker or fulled wool fabrics. You simply hold the seam allowance in place while sewing it, and the fingers on the underside of the fabric stretches it out and create the flat appearance on the outer side.
Both of these methods are nice, but I rarely use them in my everyday work, to save my fingers and joints from strain. Choosing ergonomic methods is also important, but every once in a while it is nice to make an item with no modern tools at all!
At the beginning of August, I took my camp equipment and moved to Björkön for a long Viking-weekend. I had such a wonderful time and wanted to show you some great photos and inspire you to maybe travel there yourself when the world allows.
As many of you fellow viking-nerds know, Björkö was the place where the viking city Birka was situated, and it is very beautifully situated outside Stockholm, in Mälaren (so it is in the inner archipelago, not towards the sea) which makes for a great climate. Wild apples and cherry trees grow over the island, and sheep grass the ancient hills, grave mounds and ancient monuments still visible from the viking era.
There are still lots of grave mounds left as they were, but also a museum, a newly built experimental viking village with boats tied to its pier, and good paths to stroll to different sites on the island. As you can imagine, I got quite excited when asked to join some friends there!
When the sun set, we took a stroll around the pasture lands, enjoying the view over the water and the surrounding islands, with a small picnic basket with us. The path took us over viking age grave mounds, past the Black Earth (where the city Birka was situated) and toward the Homelands. When darkness came, we returned to the village to lit a fire, and enjoy the company of each other.
The village is built as an experimental viking settlement which allows a group to actually live in the houses, tend the gardens and the buildings, as well as sleep, cook and go around their daily life there- as well as greeting modern visitors during the day time. Not everything is 100% accurate with what we know today about the daily viking life, but things get mended, rebuilt and used in a historical way, with old tools and knowledge (and modern safety measures…)
It was so cosy going around the settlement, with the sound of cooking and woodworking, the smell of fire and tar, and vikings going around their day tending to their business. I brought my market stall and tent, setting it up with a nice view over the water, where I spent some time drinking coffee and chatting about all things viking age. I also held a lecture about clothing and dress in the Viking society, inside the interesting museum on site.
My friends Joel and Josefin took me on a guided tour since they had been here before, and we went to see the excavations going on near the shore a short walk away. This was so interesting and I learned a lot about archaeology (which seems to be such a hard job, working on your knees for hours, patiently digging through the ground.) It was also very clear how much the field has developed since the early reports, that we base much of our understanding on when recreating viking age. I look forward to the reports from this excavation!
Outfit of the day; linen shift, apron dress in woollen diamond twill inspired by the Köstrup find, woollen shawl and tortoise brooches to fasten the outfit with.
In the photo below, I just have the blue dress and loose hair, feeling a bit undressed, but also happy to finally be cool enough…
I spent the days in the market stall selling some viking things, or strolling around with new friends in the museum, out in the landscape or by the fire. This was just what I needed after a summer of staying-at-home, and even though we weren’t many it felt really good to be outside again, doing things I love.
If you want to know more about how to visit Birka, here’s a link with useful info, there are some lovely boat trips during the summer which will let you stay to see the interesting bits and take a swim before going back.
Gunnes gårds yearly autumn market is a really cozy place to be, and me and love traveled there to have a viking weekend together. There was a downpour when we arrived on Friday afternoon, but the rest of the weekend offered lovely weather and fun meetings. I hade a really busy time, and didn’t get as many photos as I would have liked, but maybe that is just a sign of having fun?
I brought my work with me, as usual, and we were hanging in our new market tent, meeting new friends and just having a good time. The tent is a market tent for all those viking markets (and for me when I travel alone) since the larger pavilion is medieval style, and also quite heavy to bring by myself. I am happy with the tent, though the large double bed we have is a bit big for it, but hey- it is hard to have it all!
During Saturday and Sunday I held two lectures about viking age clothing from a visitor’s perspective, hoping to lure more people into the interesting world of viking age… Love sat by the tent during that time, to try to help customers with questions. He is not by far as handcrafty or interested in clothing as I am (being more of a brewer/archer/gamer), but he sure looks the part in his outfit =)
Tried out a new hairstyle inspired from a find from pre viking age. It is a french braid from the top of the head going down, and then another regular braid with all the hair, twisted into a bun and pinned into place with the hair pin made of wood. Quite simple, doable without a mirror, but holds in place during the day. I like it, I will definitely try it out again!
I also got to try out my new apron dress. It is made in a very thin blue wool fabric, with a matching veil/thin shawl in the same fabric. Perfect for those warm market days during summer. Under I have a bleached linen shift. The jewels and beads I think you have seen before; it is all old and the glass beads are those I made myself. Here is also the hairstyle from the side, a bit worn since it was afternoon by the time we took the pictures
We also got the most awesome neighbours to hang out with! Two really talented spinners, one of them here with Susanna who runs Viking age clothing. I really recommend her patterns if you want to sew viking clothing for yourself, she is very knowing and talented in viking era clothing!
S, our neighbour, also had a very cool minimalistic camp, with just a small sleeping area, a cooking fire and some personal equipment.
Now I am back home, and since this was the last market for the season, I am doing some after-season work; washing and mending clothing, taking care of camping equipment, packing everything down, writing lists and such. I am also doing a look over of the wardrobe and camp, and plan to sell of some things that has not been used during the season. Most things will be up shortly on facebook or my Etsy, so be sure to check in there every once in a while!
This blog post contains a collaboration advertisement for sewing machine guides from Sewingland.
I thought I would share my best tips and tricks for making good apron dresses, since I have made a whole bunch of them by now, and probably most of the mistakes too. If this is your first try at an apron dress, check out my tutorials Easy apron Dress or Fitted apron dress first. At the end of my post, you’ll find a link to useful sewing machine guides if you would like to make your dress on a sewing machine.
Nr 1. Use enough fabric. I know it’s tempting to save on the fabric, but trust me. Too short and tight a dress will look like a modern dress. I use around 2 m *1,5 m to mine, and if you are larger/longer than me, you need a bit more.
Nr 2. Use a thin enough fabric. Save the sturdy, felted wool fabrics for a coat or a cape and chose a thin, rather loosely woven fabric. It should be comfortable and have a nice fall, try to drape it over a piece of furniture, like a table, and look how the folds drape.
Nr 3. Try it on while sewing with all your other layers of clothing, to make sure you will have enough room under the apron dress for a shift and a possible warmer dress if you think you will be needing that.
Nr 4. Don’t make the straps too long. I think it looks very strange when women are wearing their dresses in the middle of their bust, or even under their nipple area. Please don’t. When you fasten tortoise brooches, you can pin them through your strap, or make a knot at the end of a strap being a bit too long.
Nr 5. If you don’t have tortoise brooches to fasten your dress with, don’t use modern buttons or fastenings in the meantime. I have learned that apron dresses were not a thing without brooches, like the dress is an accessory to the jewellery and not the other way around. You don’t have to wear apron dresses for reenacting a viking woman, a simple long kirtle will do. So skip the apron dress if you don’t own the brooches, or sew the straps directly to the dress itself if you are momentary without them.
Nr 6. The thin fabric could be lined with a strip of linen or wool to protect the hem and support the top.
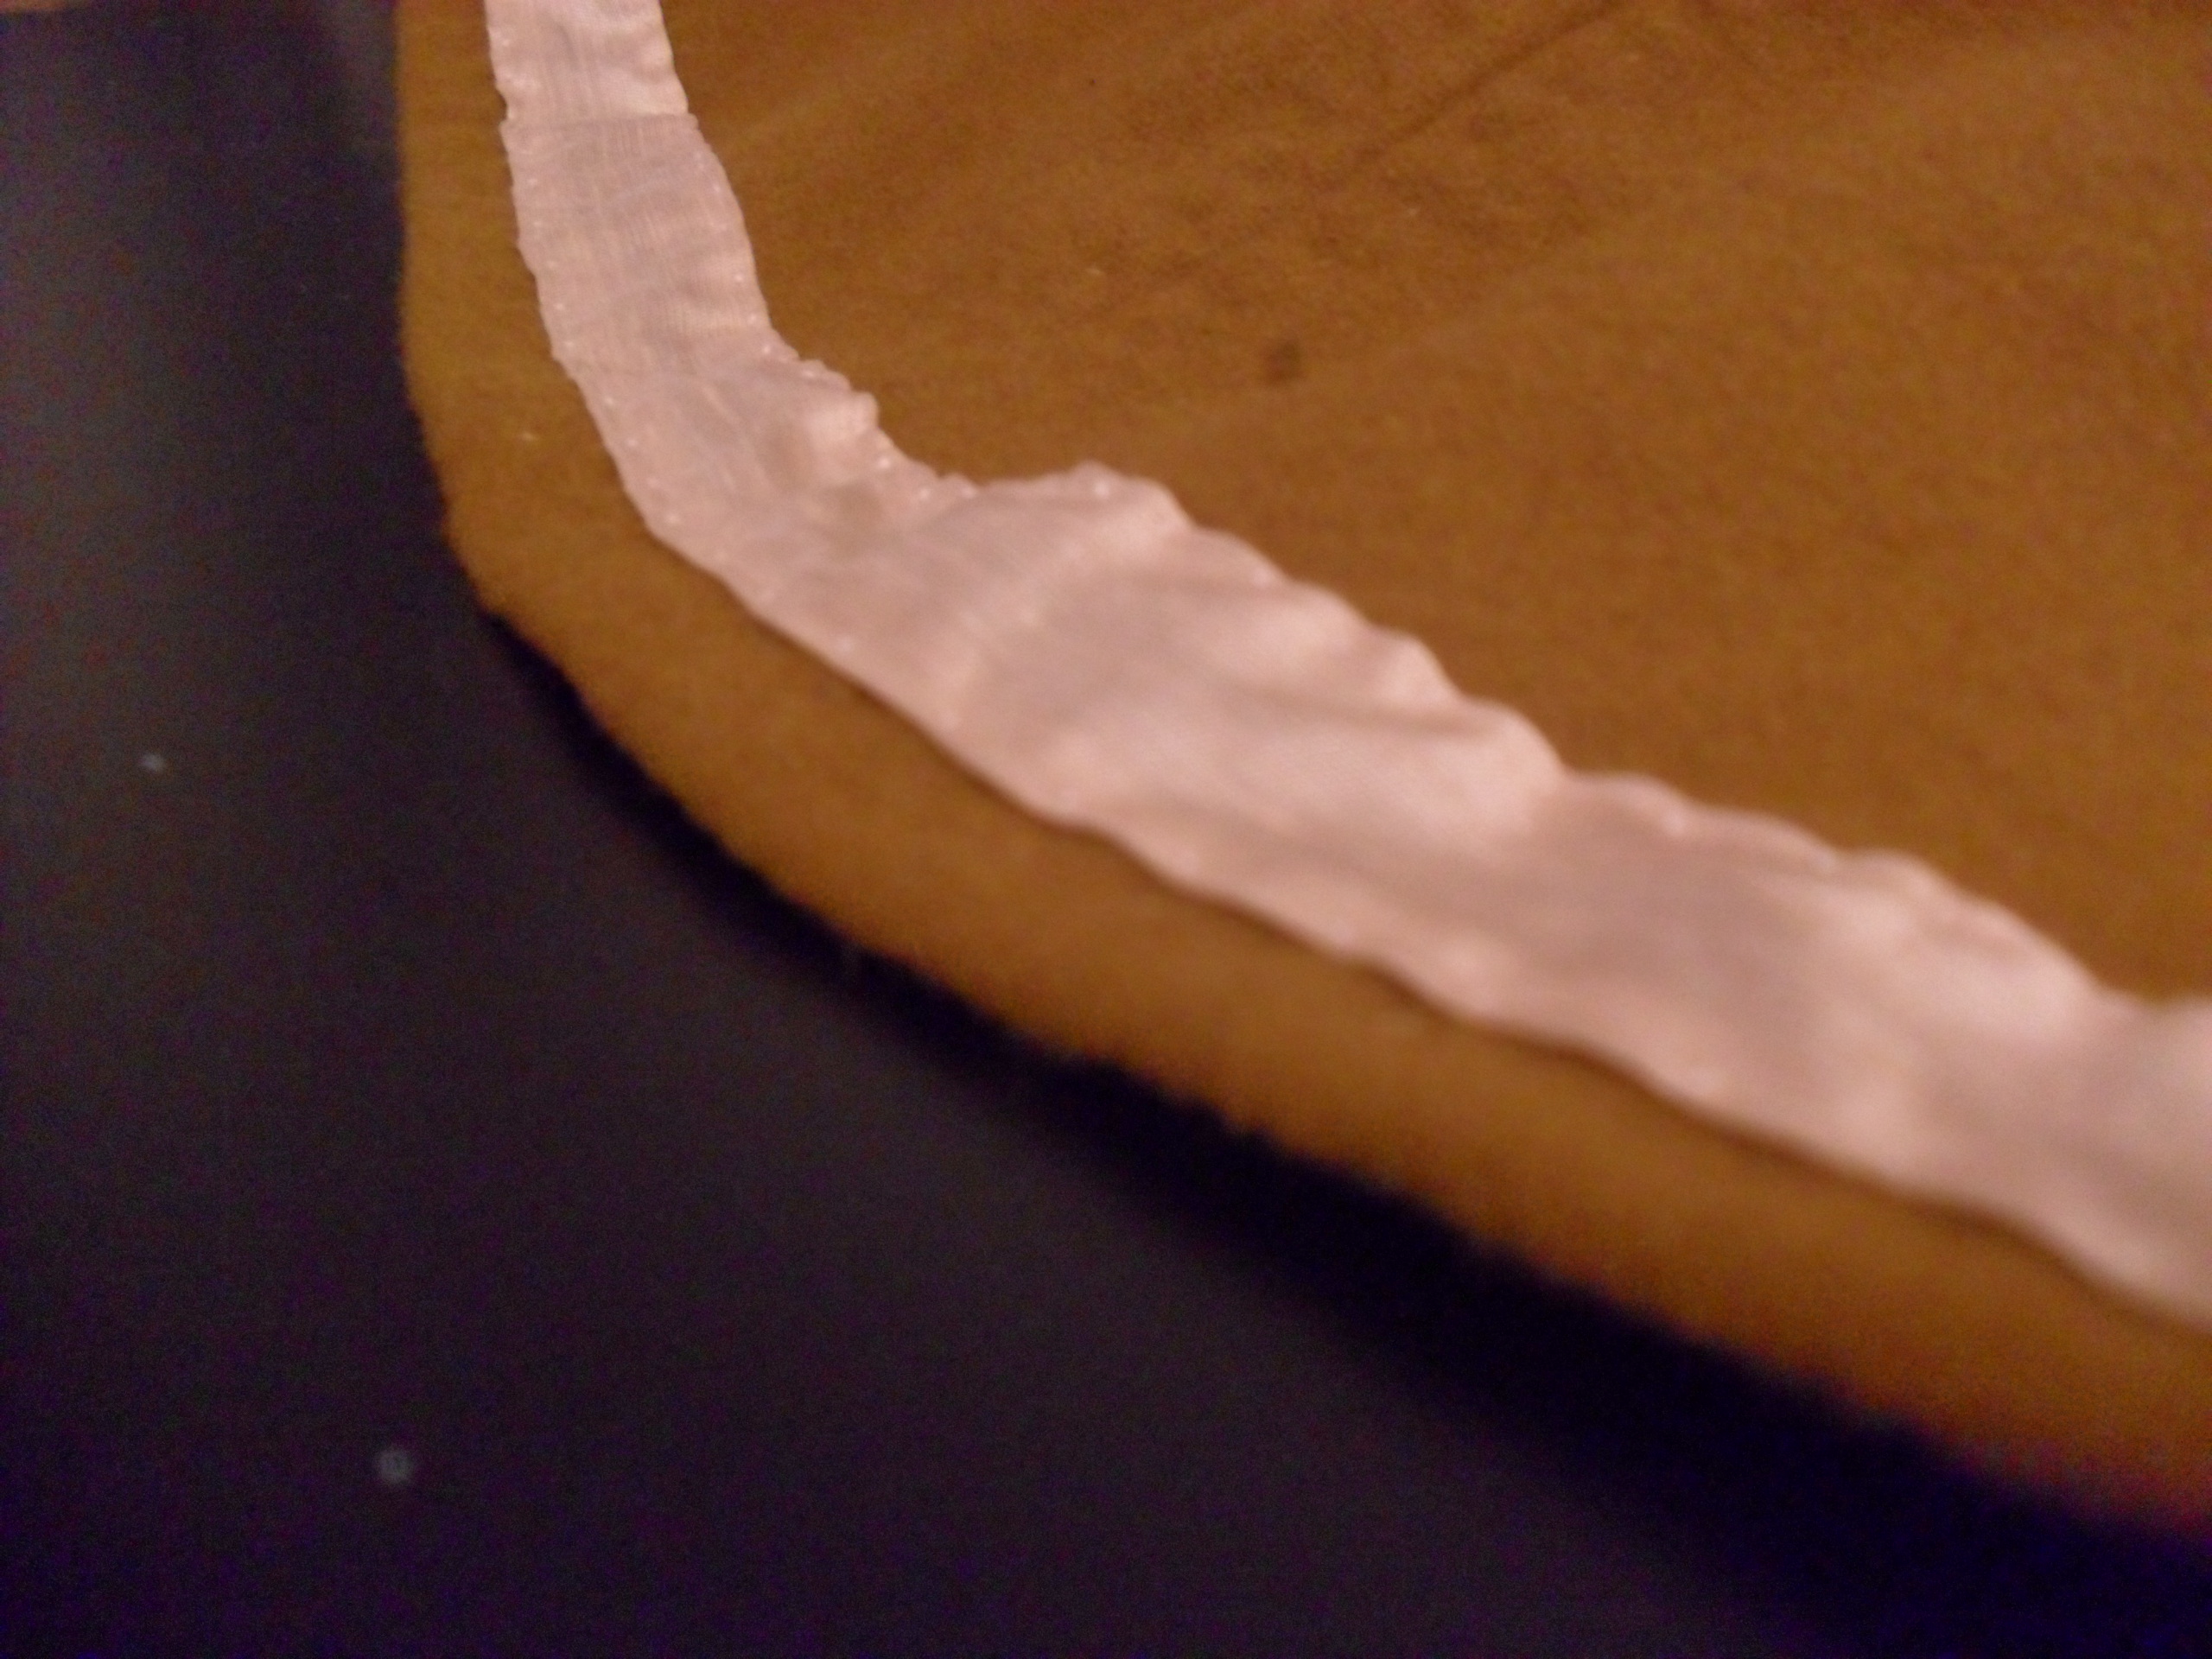
Nr 7. You may sew on a piece of tablet-woven band or a thin silk strip around the upper part of the dress, to make it durable, enhance the fitting and also, for decoration. Another way to decorate the dress is to sew a small wool braid to the top.
Nr 8. Decorating your dress doesn’t have to be expensive. Use thin strips of patterned silks, tablet woven bands, viking silver posaments, or just a braided cord. On the small figurines, it seems like there is decoration around the hem of the dress, and in grave finds there are remnants of silk and decorations around the upper part, partly inside the tortoise brooches. Save money and time and decorate only the upper part of the dress, or do the whole thing!
Nr 9. Use the same type of thread as the decoration you want to sew to your dress. Silk thread for silk fabrics, wool thread for woven bands, and a very thin and fine silk thread for posaments. This will give you a nice seam, that is as little visible as possible, and doesn’t damage the decorations.
Nr 10. To protect your dress from everyday stains; use a belt to fasten up your dress while working, this will protect the hem from mud, open fire and stains. Also, an apron is a very good choice for protecting your clothes. Or remove the apron dress and work in your shift or woollen dress. It seems the apron dress was a status symbol and finer wear, so it is probable that women didn’t wear them while labouring.
One of the dresses that I still like after using for many events, is my Viking age apron dress (it’s actually one of my oldest piece of clothing). It´s made of a medium-heavy tabby woven wool and the construction of the dress is inspired by the find from Hedeby. The pattern is made of 4 pieces and is quite simple, you´ll achieve the fitted look by making small adjustments according to your body.As you probably already noticed, there are amazingly many different variations of reconstructions and suggestions on how the apron dress may have looked, and I also think there were different variants during the viking age. However, I decided to imitate the find from Hedeby, as this has a piece of a probable seam preserved, and gives a suggestion of how the skirts/panels may have been assembled. After reading some discussions on the website Historiska världar and looking at gold figurines, I also chose to sew the dress too long, to create a train. That’s my interpretation on the figurines and picture stones and I was curious about how the fabric would fall with such a model. After a while, however, I cut off the excess fabric that made the overly long skirt, since I got irritated about the fabric dragging mud everywhere and getting in my way. It was a nice view though, the long skirt trailing behind.
Here is a list of what you need, and some easy steps to follow to make one of your own!
What you need:
2-3 m *1.5 m fabric (2 m= small, 3 m=large)
scissor
measuring tape
markers for fabric
pins
needle and thread or a sewing machine
a friend to assist with the final adjustments on the dress
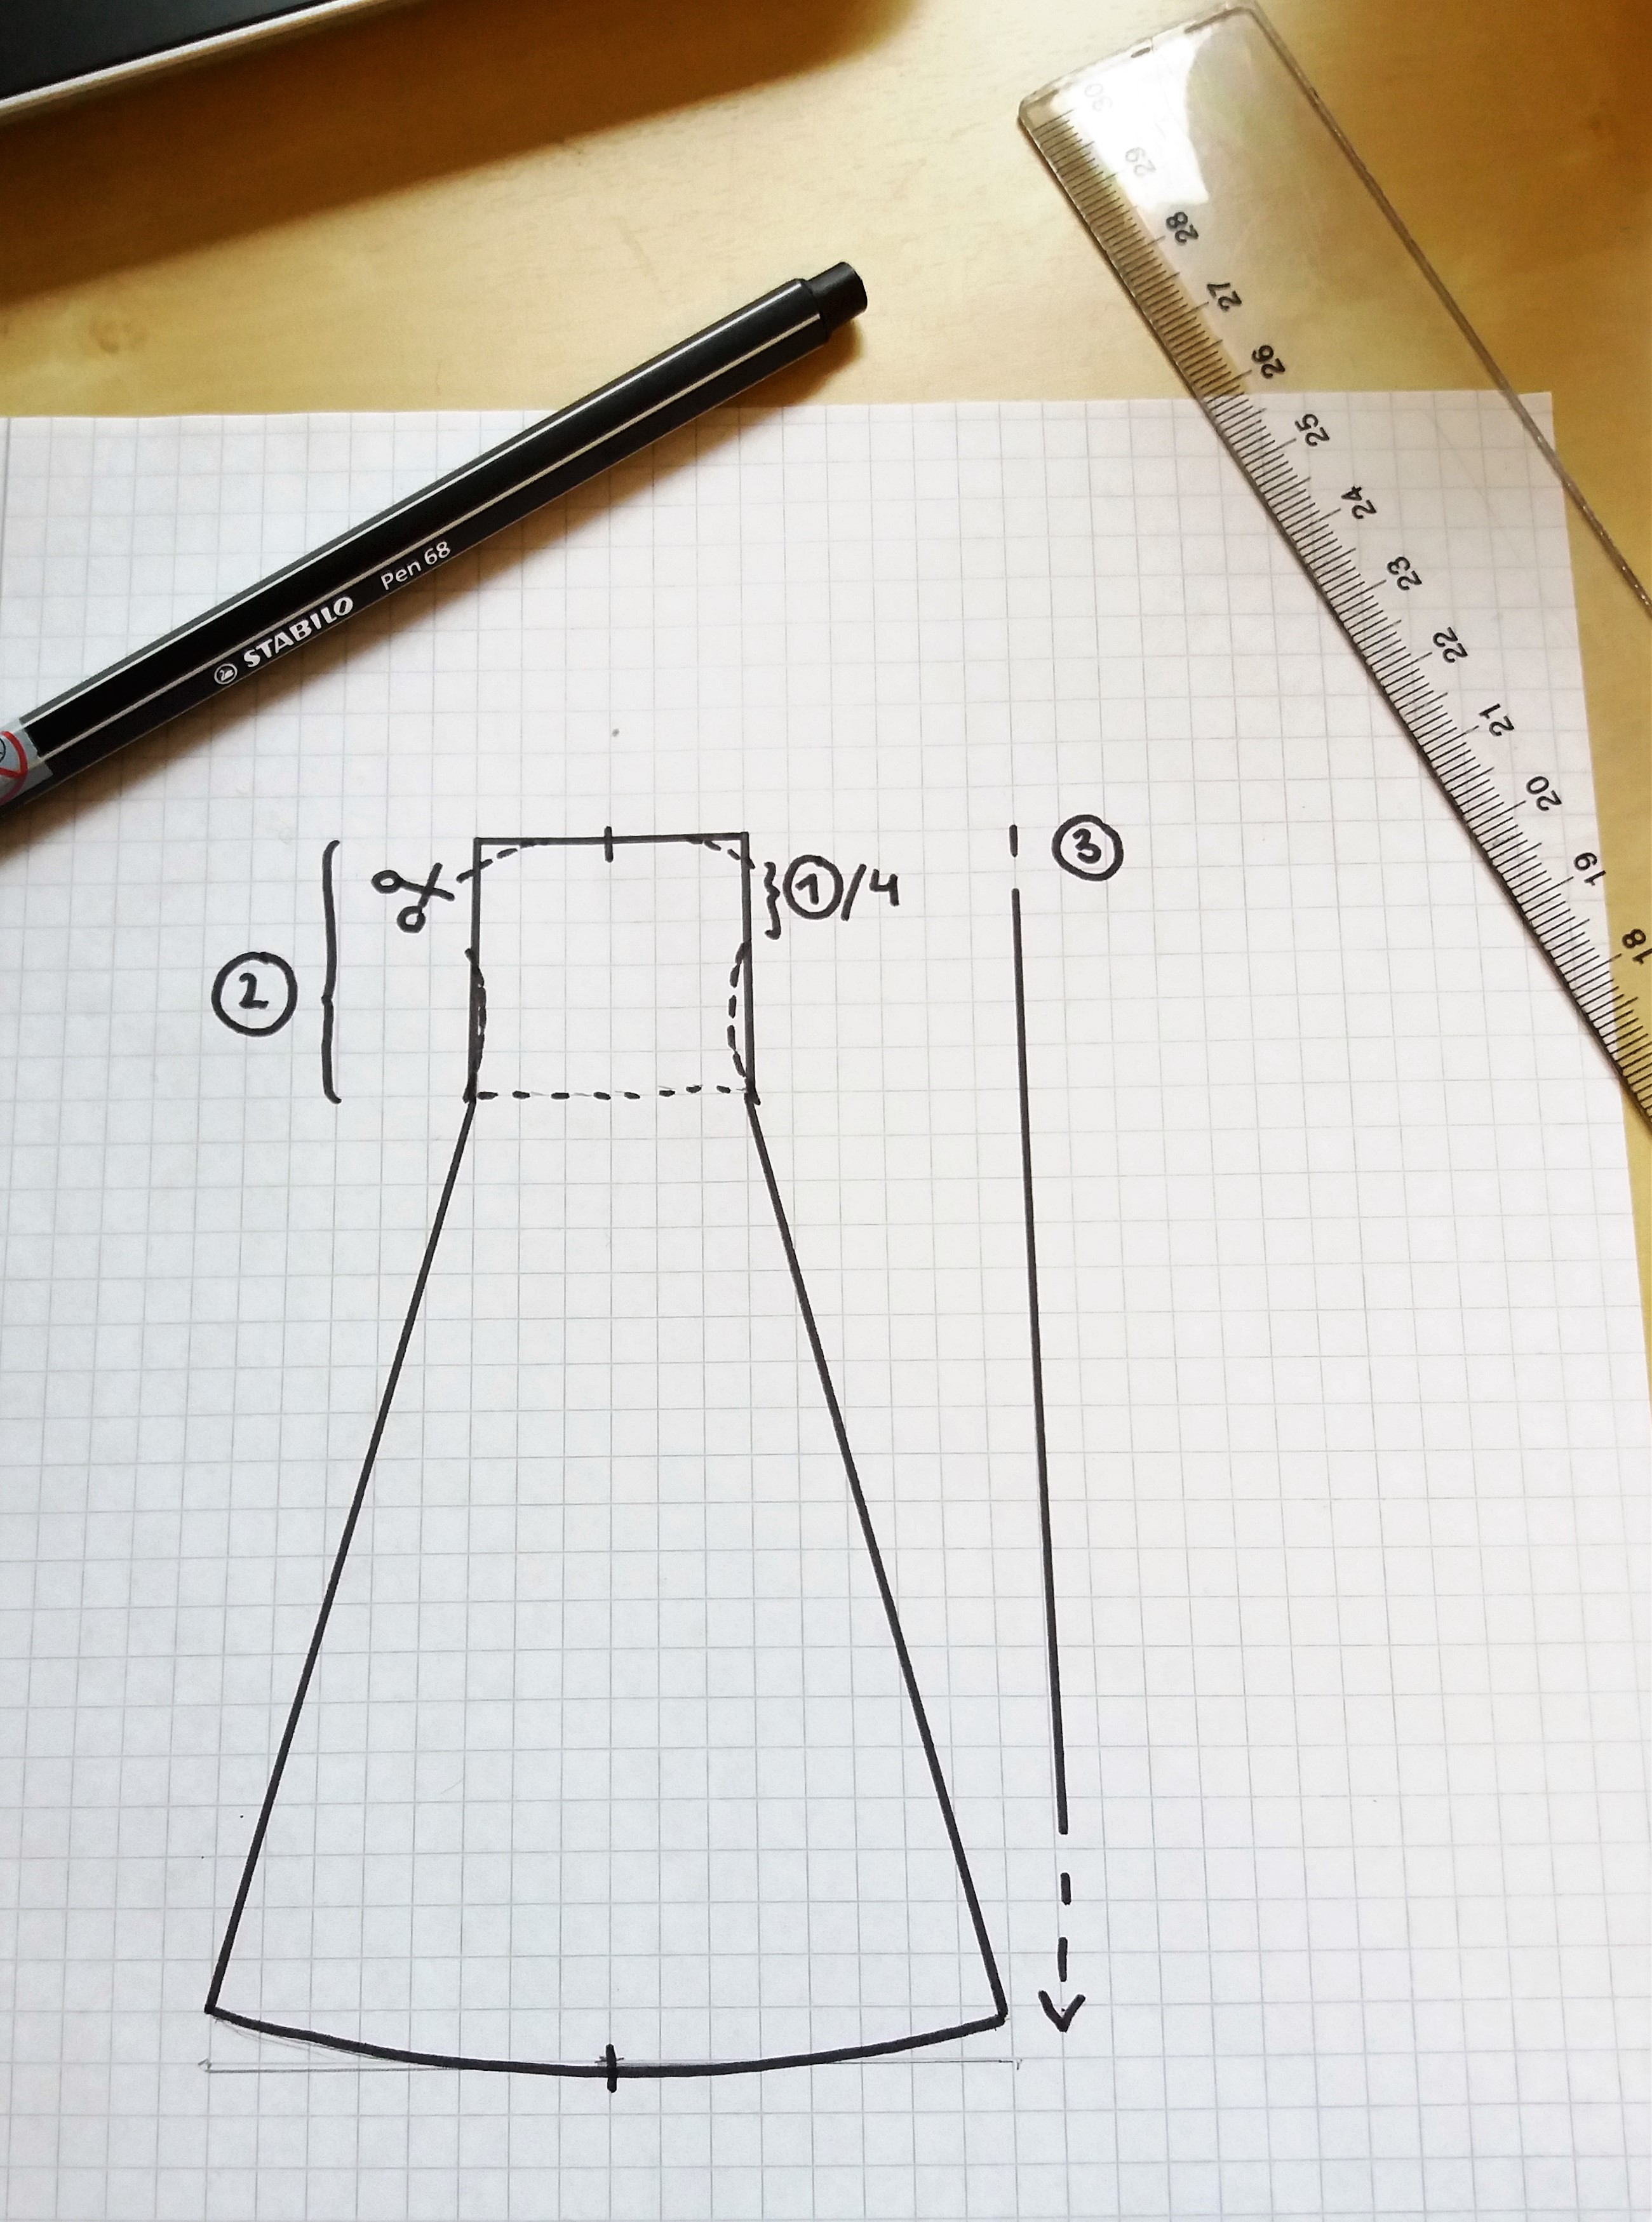
The measurements you need:
Armpit-hemd (3) (as long as you want the dress to be) + 3 cm sewing allowance at the bottom, and 5 cm at the top if you would like to make the dress with a higher look (like my green one) when measuring from the armpit; start as high up as you can get under the arm. you will cut out space for your arm movement later.
Width around your body (1) (the widest part of your body, often around your bust. Divide this measurement in 4 and then add 4cm to each piece (seam allowance and leisure of movement)
Armpit-waist (2) (in this case, your waist is your slimmest part of your body, after which the dress is going to get wider)
I chose to make my dress rather fitted, but a more loose style will make it possible to wear a pair of underdresses under it, which can be nice during colder weather. The 4 pieces are of the same size and shape. They start out straight and then gets wider at the waist.
The amount of fabric you need depends on your measurements, but I drafted up three different ways of putting your pattern pieces out on your fabric, depending on how much fabric you want to use.
For the draft to work you need to have a fabric that is 150 cm in width, and the dress can not be longer than that. 1F + 2F is the two side pieces, 3B + 4B is the front and back ones. The bottom-left draft shows how you can use the fabric in an effective way by doing a gore in one panel.
The upper pattern takes 250 cm of fabric and gives you a dress with a hem circumference of 80cm *4= 320 cm. You can absolutely do with less; the one at the bottom- right gives you a hem of about 270 cm, using under 200 cm of fabric. This is for a small-medium sized person. If you have a larger size, remember to add width not just to your upper area but to the skirt as well, to make the dress drape nicely and give you space to move.
After cutting the pieces from the fabric, baste them together in order to try the size and fitting. The dotted lines on the picture above indicate where you can fit the dress (waist+under the bust, under the armpit and at the small of your back). When you try out the dress, remember to have your shift underneath so it won’t get too small. If you’re using a modern bra during your viking adventures, then also wear it during fitting sessions.
When the dress is done, I usually make the straps in linen or wool fabric (linen straps are more common in finds). Make them as narrow bands (folded double) and sew them on to the back of your dress at the same position as your bra straps would be, this will make them fit comfortably on your shoulders. In the front, you may sew them down to the dress if you haven’t got tortoise brooches yet, otherwise use these to fasten the straps to the dress. I prefer to do a loop at the end of the strap, and then another one at the front of the dress; these you can clearly see in finds from the viking age, and it also makes it easier to use the brooches without damaging your fabric.
If you feel that you would like to add something; decorations are a nice way to spice up your apron dress. A tablet woven band, a small piece of silk fabric or a silver thread posament are all find-based decorations from the viking age. Good luck with your sewing!
Are you interested in the viking age, but wonders how to learn more? Browsing pinterest on all lovely photos, but thinking that everything might not be historical? Here’s some really good links and reading for you! (And no, of course you don’t have to exercise your hobby the most historical way possible- but it’s always interesting to know-how)
Susanna Broome is a great tip if you want patterns and reading about pattern construction. Her page includes lots of good-to-know, as well as patterns for sale, both in english and swedish. She is both historical well-read, as well as daring to say “I did this, we don’t know if that is the correct way, but it´s working and gives you a nice outfit”.
Viking clothing (Thor Ewing) is a good read. Everything might not be historical accurate since he is making conclusions- but it makes the book interesting for reenactors and not just a list of different finds.
Pinterest is both very good, and quite dangerous. Lots of pretty clothes, lots of fantasy, lots of guesses. But also lots of finds and photos from museum and databases, good quality handcraft and historical interpretations. Look for Viking Finds rather than just “vikings”, archeological material, posts about what have been found and were, and pair it with written sources.
For viking finds of metal, ceramics and the like, different museums offers online databases. For example, I found one of the original tortoise brooches (that I use in my outfit) on the Västernorrlands Länsmuseum which is only a short trip from my home.
Good luck with your reading, and please write a comment if you have any more interesting reading tip to share!