Om ett par dagar bär det av till Visby, och jag kommer som vanligt hålla kurser på Kapitelhusgården! Kom gärna förbi och kursa med mig, eller säg hej om du ser mig på stan- jag tycker att det är så himla roligt att få träffa bloggläsare!
Här är mina kurser (köp biljetter direkt i programmet eller droppa in en halvtimme innan i mån av plats)
Tisdag: 12.30 “Toile”
Grunder i mönsterkonstruktion för medeltida kläder där du gör en toile för överkroppen. Kom iklädd tajtare t-shirt/linne. Material och verktyg ingår.
Onsdag 08.30 “Toile”
Grunder i mönsterkonstruktion för medeltida kläder där du gör en toile för överkroppen. Kom iklädd tajtare t-shirt/linne. Material och verktyg ingår.
Torsdag 08.30 “Ärmar”
För dig som gått toilekurser/har en toile för överkroppen sedan tidigare och vill göra ärmar. Gör en ärmtoile till dig själv, få en massa sömnadstips och teori. Genomgång av svängd ärm, ärmkulle, Särm, Moybog mm. Material och verktyg ingår.
Torsdag 12.30 ”Brickbandsvävning med mönster”
Grundkurs för dig som vill väva men inte vet hur. Tydlig genomgång och handledning för att påbörja vävning och förstå vävda mönster. Material, verktyg/brickor och häfte ingår.
Fredag 08.30 ”Brickbandsvävning under medeltiden”
Grundkurs för dig som vill väva medeltida vardagsföremål. Snabb och effektiv vävning av strumpeband, bälten mm som blir enfärgade eller enkelt mönstrade. Historisk genomgång av fynd och tekniker. Material, verktyg/brickor och häfte ingår.
Jag vill också passa på att göra reklam för den hemliga shoppen; den håller öppet nere på marknaden (sammma tält som förra året, men med en ny placering. Håll utkik efter skylten!) under onsdag kväll.
Yeay! In a couple of days me, love and our friend Lali (the Swedish guest blogger with all the great 16th c outfits) will be traveling to Visby Medieval Week, and we will be there all week!
I am working at Kapitelhusgården with workshops, and the rest of the time we are planning to hang out with friends, eat ice-cream, go to the medieval market, visit shows and hearing music concerts.
Here is some links if you are going to; for the schedule and the inofficial schedule for the week. And as always, if you see me during the week I would love to meet you and say Hi!
Wow, time sure runs fast during summer. Now it is only 2,5 weeks before the medieval week in Visby, on the island Gotland here in Sweden and I have lots of work to do before we travel there. Me and love will be traveling with our friend L, and as usual, I will be at Kapitelhusgården holding workshops during the week. If you want to attend one of them you can prebook here.
There will also be a Secret Shop opening on a Secret Location in the market place during the week. If you know what I’m talking about- watch out for the sign!
Anyway, I haven’t had the time to write new posts for you, even if I have heaps of good photos and adventures to tell you about. They will have to wait until autumn, and instead I wanted to give you some reading tips (in Swedish and English) if you are preparing for Visby (or any other medieval/viking event) and want some inspiration.
Hope you will enjoy these links, and if you are going to visit Visby- I would be so happy if you came by and said hi to me =) Some of my most dear memories includes meeting readers and making new friends during the medieval week!
Making that matching outfit doesn’t have to difficult or impossible expensive, but it does take a fair bit of planning: before. Yes, I know it is the most boring part, but thinking before shopping is what makes the thing. So I put together a list of my best tips for making an outfit that makes everyone go “Wow” when they see it.
1. Decide on a colour scheme that you like, and follow it. You should have 2 base colours, with additional tones to match. In my case, orange and warm yellow is my main colours, as you can see on the amber necklace, the woven belt, the shawl and the apron dress. The hair band have a darker orange colour, but it is warm and intense to match the other tones. The red coat and the middle woolen dress brings in the additional colours to make the outfit interesting but have likewise a warm toned base.
2. Add some contrast or mismatch to intensify your matching outfit (yes, it works like that) it could be the opposite colour (red-green or yellow-blue) or a really dark detail to an otherwise light outfit. In my case, the green glass beads does match the yellow tones, but breaks nicely with the red ones. Still, they are in the same warm tone as the rest of the outfit. The uncoloured beige dress is another example; it doesn’t follow the main theme but have a warmer undertone so it works fine with the other warmer shades.
3. Patterns or texture adds interest and depth to any colour. My apron dress is woven in a herringbone twill, and the coat is a bit uneven in its colour due to different dyes in the fabric, which is barely visible but adds texture and interest to the finished garment.
4. Darker and lighter shades; when choosing your colours make sure you have different shades and not only different colours. For example; yellow-orange-red make for a change in both colour and shade, but a light blue paired with a similar light green makes the outfit a bit flat. Add a darker green or blue-green tone and you will make the outfit more interesting!
5. Layers; plan for all the layers at once, and make sure they have different tones, shades or textures if they follow the same colour theme. In this case, you won’t end up having two orange dresses on top of each other, and can make sure that details will be visible.
6. Details; don’t we all love a well put together outfit? Making details lifts an outfit, and it can be both jewelry, accessories as well as useful tools, a knife, a jug or something like. Match it in colour, tone, shade or shape to your outfit. In my case, I chose to make a tablet weave to reinforce the apron dress, make the straps, and a matching headband. Having the same colour/pattern appear in different places adds interest and makes the outfit look well planned and matching.
7. Consider your own colours; colour schemes and matching is a whole science on its own, and there is plenty to read or check out on YouTube. Matching colours, creating interesting outfits and the like works the same way on historical clothing as on modern outfits or make up. Consider your own colours, if you have a warm or cold undertone in your skin, and consider what you like to wear. Using those kinds of colours will both make you more comfortable and happy during historical events. But also consider the historical finds; if you love to wear black and dark blue maybe that is not the best choise for your farmer viking outfit. But as these are considered as neutral colours in our modern eyes, maybe a dark grey with soft, plant dyed blues will do great for your viking outfit?
Got inspired? Did you find this guide useful? Please let me know by liking my FB page or leaving a comment on the blog!
This is the final layer I made for my wedding outfit, it is a silk velvet dress inspired by the late 15th century over dresses. The gown is open at the front to allow for easy undressing, and to show more of the white dress underneath. This can be seen in paintings, though a closed gown would have been more common.
This was one of the most difficult garments I have ever made. The fabric is a silk velvet, sensitive, very thin and extremely flimsy; I so understand why silk velvet has been replaced by synthetic alternatives on the market (and it is not just a matter of price). The gown is fully lined with silk dupioni for support and look, and has linings in black silk taffeta and on the bottom, the same black high quality wool as in my love’s joined hose. I opted for the golden coloured silk because it did so well under the velvet, and made the velvet shine even more. if using a transparent velvet; try out different shades of lining fabric to find the one that gives you the look you want.
The gown closes with a small hook and eye at the waist, and then this belt is added. The bronze buckle and strap end is made after a painting from the period, and can be seen on houppelandes and similar overdresses from the period.
Working with the fabric. Here you can see the silk lining being laid out at the velvet to act as a pattern piece. The velvet was very sensitive, so pinning was only an option in seam allowances.
The fabric being so thin and flimsy, pinning it to the sturdier silk lining was a good help for cutting, basting and sewing. I treated the two layers as if they were one when sewing, making the seam allowances visible on the inside of the dress. Since the velvet is transparent where the pattern is, it was not an option to have the seams between the both fabric layers.
Front and back pieces of the body being laid out. With a patterned fabric, you might want to consider where to put your pieces, and in what direction. I let the two front pieces have the pattern laid out in the same direction, and then turned the back piece upside down, since the skirt would have the pattern visible in the same direction at the back of the gown. The two fronts doesn’t have to be similar in pattern, all contemporary art depicts uneven patterns on the front of dresses.
You may also note that the front lining pieces have the selvage running along the openings, since the velvet was stretchy, and silk stretch when cut on bias, I laid the pieces out diagonally on the silk fabric to have a non stretchy front, and instead add some flexibility across the body. This way, there is some small movement allowed over the rib cage, while the front lays flat against the body.
I sewed the gown together on the overlock machine, this was one of my best choices ever since the seam both helped with protecting the seam allowance and allowed for some stretchiness in the skirt. After the gown was put together, I hang it on my doll to let the skirts fall out. Fabric cut circular like in this case always seems to hang out unevenly…
And yes it did! I ended up cutting away between 10-15 cm in some places, but only 2 in the areas running along the fabric length. I was quite nervous- cutting a little each time and allowing for the fabric to adjust. There was some massive pinning and measuring and swearing going on at this part and frankly, I just forgot to take pictures because I was so frustrated. Here you can see the velvet skirts hanging out, the silk lining behaving all nicely and staying in shape.
After this, I worked with the hems and inside seams by hand. All the seam allowances were folded down, basted to the lining and then covered by a strip of silk fabric, whip stitched down. No ironing though; velvet does not go along with pressing so the seams were just smoothed out by hand. The front opening and the sleeves were lined with black silk taffeta, the same as love’s doublet were edged with.
The bottom needed a little more heavy lining, and I wanted something that could take some more wear than silk so I chose a thin wool tabby weave. Here it is, laying on the floor.
One of the seams, seen from the outside when finished of. The whip stitches securing the strip inside is not visible on the outside velvet, neither is the machine seam that holds it together.
I am very pleased with the dress, I really plan on using it in the future on events. It was not easy to make, but hopefully some of my experience shared with you will make you want to try one for yourself if you wish!
Because the books are in Swedish; so will this blogpost be. Update; the books are being translated and some of them are available in English!
Kommer ni ihåg att jag skrev om mansdräktsboken förut? Nu har även kvinnoboken kommit ut, och jag ville förstås bläddra i den också!
Boken påminner mycket om mansdräkten med samma lättöverskådliga layout, enkel och tydlig text, och stycken som efter en snabb genomgång ger dig koll på dräkten. Det är den typen av bok jag skulle börja med att skaffa om jag ville göra 1400tal, eller ge till en nybörjare som vet *ingenting* men gärna vill vara med. Det sena 1400talet är en komplex period med många samexisterande stilar och plagg, men jag tycker ändå att det känns som att den ger en överblick över det tyska modet, även om det inte finns plats för så många sömnadstekniska detaljer som jag skulle vilja- det är ju trots allt mitt intresse =)
Boken innehåller, förutom referenslistor, också massor av bilder från perioden. Bredvid varje avsnitt om plagg/material osv hittar du alltså både historiska referenser, bilder, skisser och materialförslag från ett modernt perspektiv. Dessutom finns ett uppslag om hur du får till 1400talslooken med en “turbanslöja”, jag förutspår att det här kommer vara nya innestilen till sommaren…
Uppdatering: 1300tals kvinnodräkt har också kommit ut! Jag fick tag på min via http://www.Handelsgillet.se och den innehåller gott om exempel på olika typer av klänningar att sy + tips på accessoarer och slöjor.
Today I am sharing my best tips for making garments in velvet!
Velvet has a beautiful shine to it, with highlights rather than shadows. This can be seen in paintings, where the clothing is pictured with highlighted areas rather than darker folds. Like this; (though this may also be woollen cloth, it goes for illustrating highlights in fabric)
The choice of material is important. On the market today, you can find different kinds of velvets, of both high and low quality. The original velvet fabric was made of silk, insanely expensive, and probably also sensitive for wear and washing. To buy a good silk velvet for your project is of course historically accurate, but also very expensive, and you will have a garment that is sensitive. But the look and shine of the fabric will be outstanding.
Cheating? For a silk velvet look, you could instead choose velvet made of viscose, rayon or a mix of synthetic fibres. This fabric is a lot cheaper, more durable, and is (depending on the quality and materials) close to how silk velvet looks. Avoid fabrics made of pure polyester, since these will be warm and uncomfortable to wear; a mix based on viscose is often the best. You could also go for cotton or cotton mixed velvet, the look is a bit more matte than silk velvet but black is quite close in appearance. The good thing with cotton velvet is that it is made of natural fibres so it is easy to wash, feels good to wear and is durable and fire-safe (it will not melt on your other clothes if you are unlucky) as well as cheap. As an example; my wedding gown made of silk blended velvet costs 4 times more than medium cotton velvet.
Ironing velvet fabric is often unnecessary, instead, just hang it out. If you need to press seams or iron out stubborn folds, you need to iron the fabric on its wrong side, with a cotton cloth over and a bath towel underneath. This will protect the fabric, and the towelling (in Swedish; frotté) fabric with its pile will act as a soft bottom so the velvet pile doesn’t get flat and pressed down. Iron gently, and always try it out on a spare bit first.
Hang it before hemming; to make the skirt hem as even as possible; hang the dress on a doll for a couple of days to let the fabric hang out, then pin/mark the hemline and cut it. The skirt on my velvet overdress is cut in a half-circular piece (almost) making the fabric drape nicely, but also hanging out uneven in the hem. Look at this picture- this is the dress skirt before cutting the hem, it differs over 10 cm!
The pile is what makes the velvet special, and it is important to take care not to crush or flatten it out. When ironing; do so gently. When machine sewing, choose a foot/presser that is narrower and loosen the pressure on the machine a bit if possible. Or sew the fabric together on an overlock machine or by hand. When cutting out your pieces, don’t step on or lean on the fabric, as this may crush the pile unevenly.
Baste- don’t pin! Silk velvet is quite sensitive, the pins might rip threads from the fabric so basting with loose stitches is a safer way to go. If sewing in other materials, it is still better to baste because the pile of the velvet, when put together with another fabric, tend to “walk” over the surface no matter how much you pin it.
A picture from our wedding day, the velvet dress looking all nice and innocent, not at all like me and the dress really hated each other while making it…
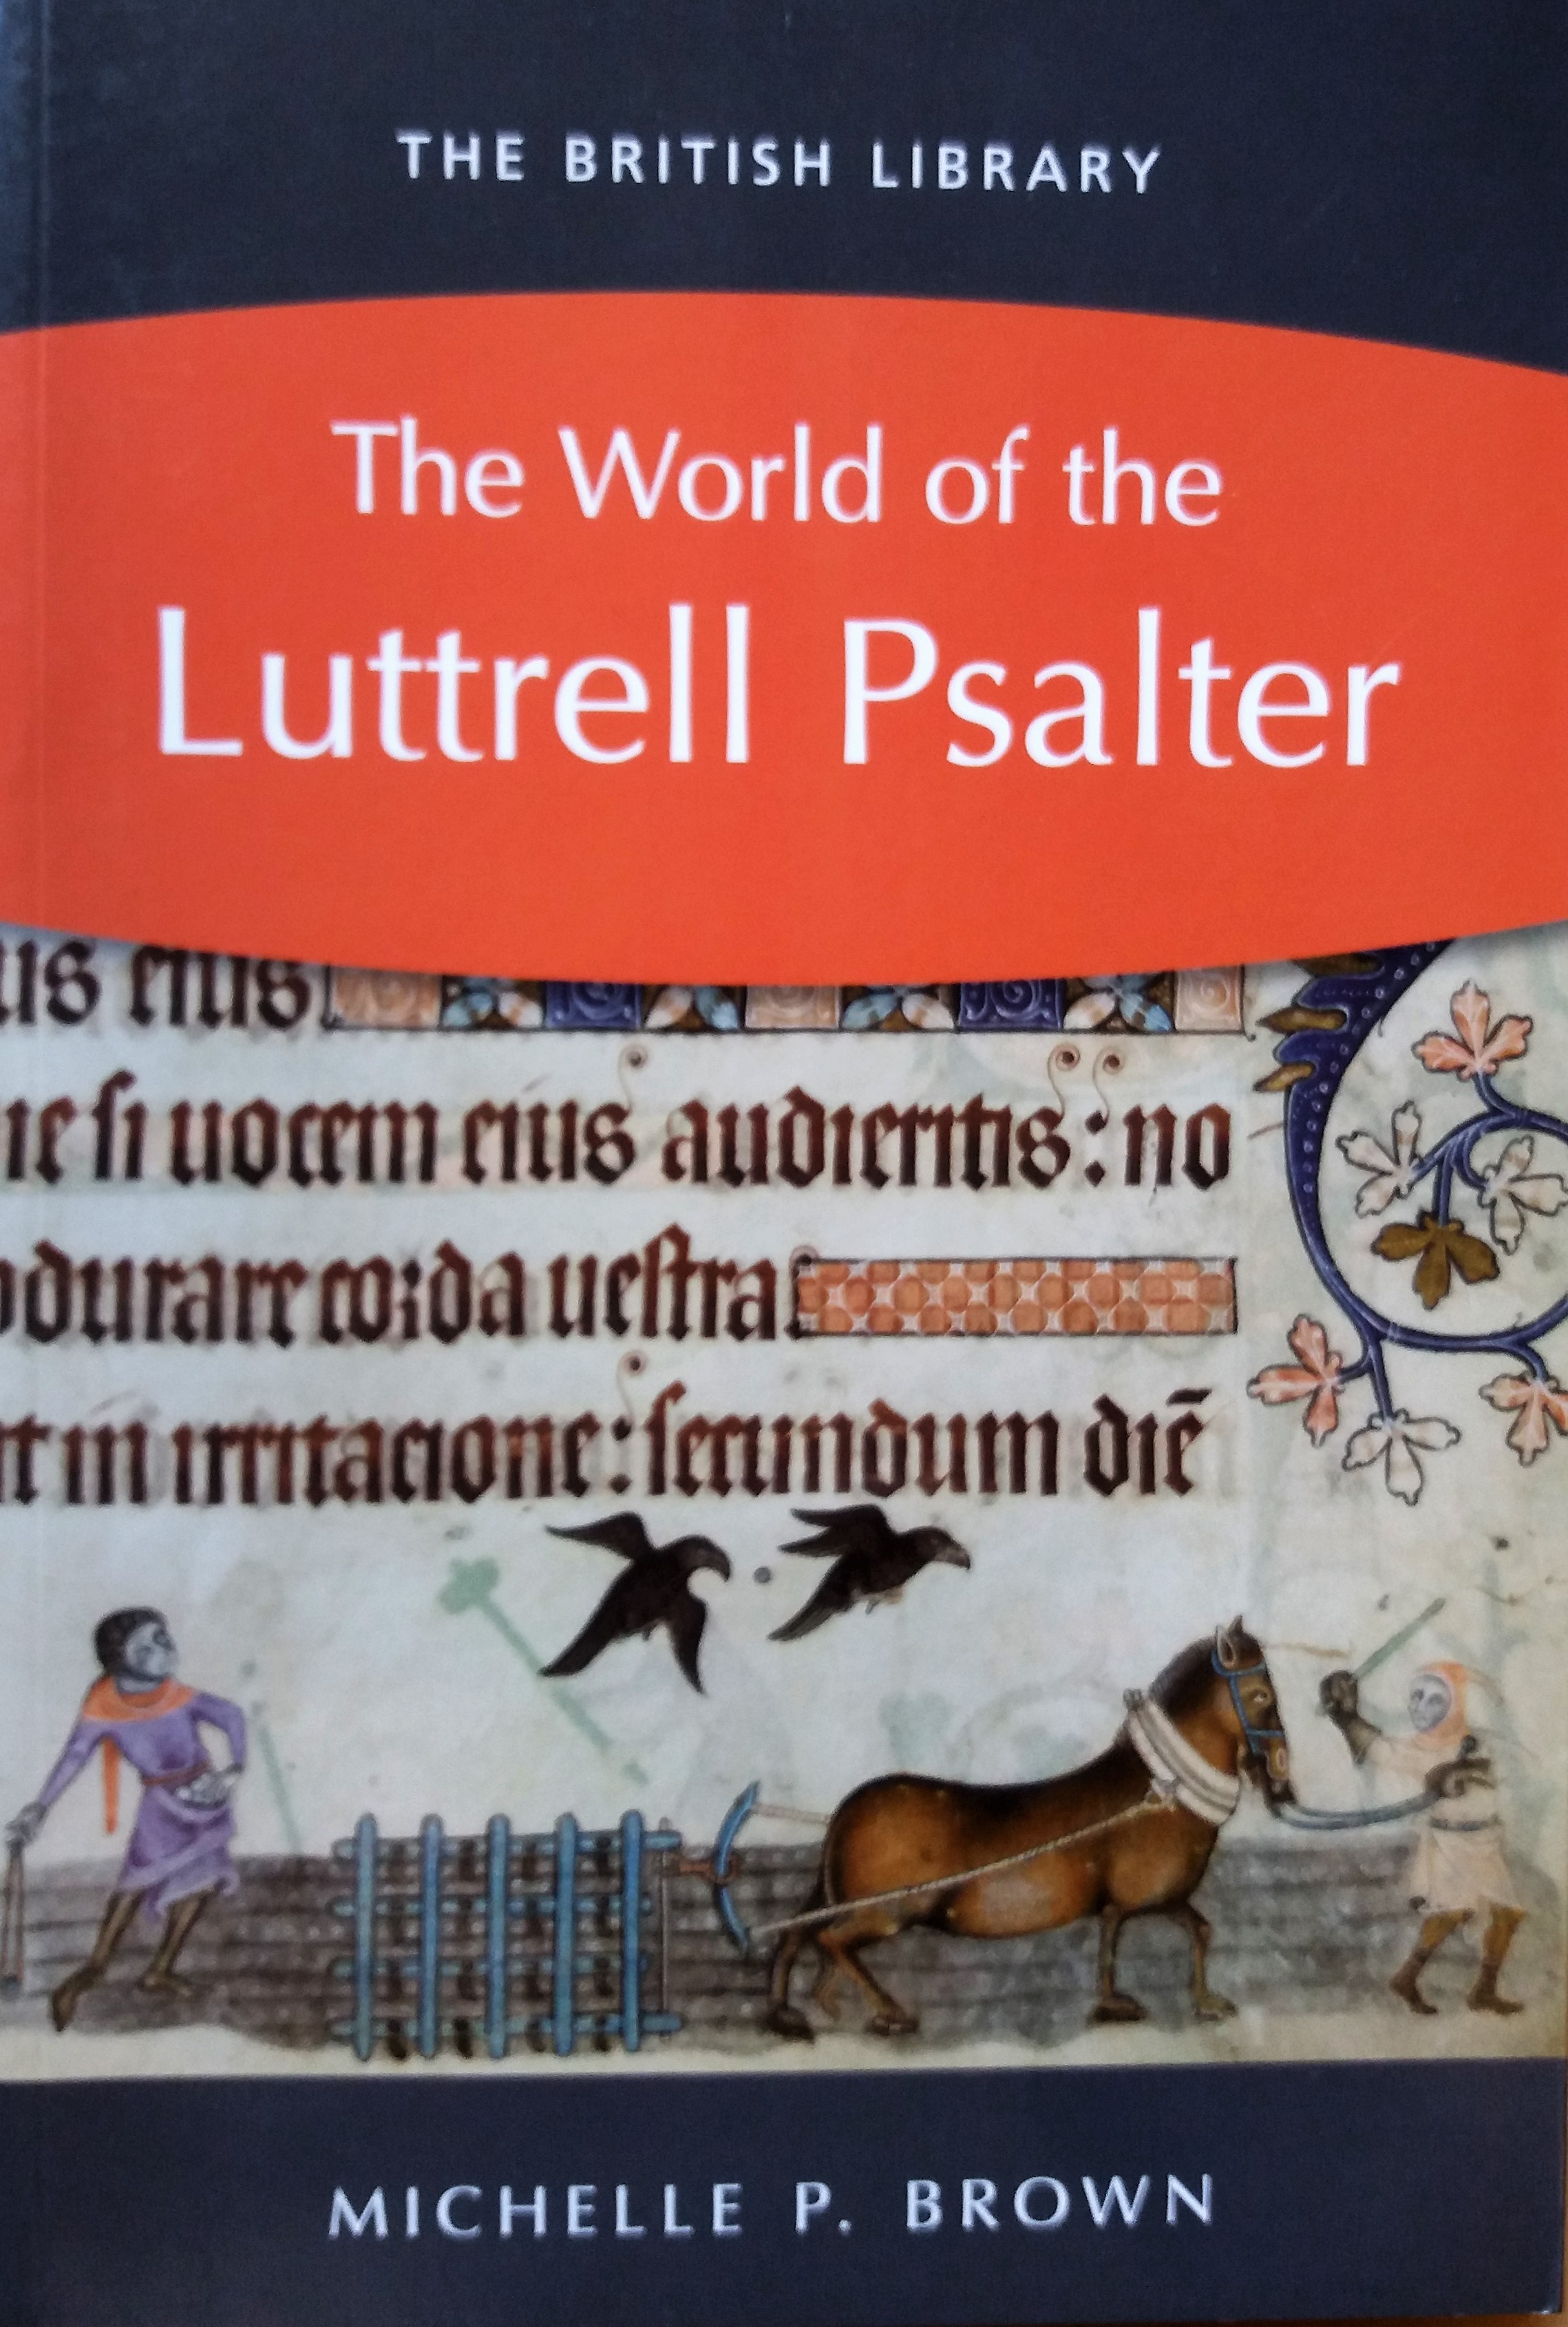
I purchased this book on a whim, and was happily surprised! It is a really good presentation of the Luttrell Psalter (from 1330) and richly illustrated with both religious and every day paintings inspired by 1330 England. If you have an interest in this period, likes illuminating manuscripts or just want another good book for your medieval library this is a must-read!
I really liked all the pictures of everyday chores and people in the book, me being somewhat of a nerd on period clothing (have you noticed…?) lots of detailed clothing, hair styles and accessories.
The last tutorial was about how I made my first Houppelande (medieval overdress) that was an early houppelande, with a pattern layout that saved in on the fabric.
Now we move on to the opposite; a full circular houppelande dress that was the high fashion during the 15th century, and were worn by both men and women (with different lengths and fashion details of course) The construction method for this one is open for discussion; there might have been gores and more pieces according to different fabric widths during the medieval period. This layout is practical and simple if your fabric is 150 cm wide and you want the houppelande to be of as much fabric as possible, the small pieces allowing you to save in on the fabric a little.
The construction idea is from an article I found ages ago (that is now lost on the internet?) And later tailor’s books which shows very full dresses for women and coats for men. The shape, style and drape of this method also look similar to paintings of houppelandes.
First, you need a lot of fabric! How much depends on your length, in this example, I make a pattern that gives you a dress around 150 cm long; good for the shorter woman or for a man (since houppes for men usually leaves at least the shoes visible) That means you will need 5,2 meters of fabric for the dress itself, and then another 1,5 to 3 meters for the sleeves. Oh, and maybe a full lining too?
The pattern is basically 4 quarters of a circle; forming a full circle when put together. The small pieces save you some fabric, but you may cut out the full quarter circles if you prefer. If you go with the pieces, then sew them together with the quarters the first thing when you have cut them out, so you have 4 whole quarters.
Then, sew the shoulder seams together, that is the short straight seams above the arrows. Leave the armholes (on the pattern they are cut out as half-moons) and sew the sides together. To know how wide your armholes should be; measure yourself loosely around your armpit, or use a previous pattern. Add extra cm for movement; at least 5-6 cm.
The seam length of the shoulder should follow your shoulder; between 10-14 cm depending on how long shoulders you have. The armholes should be laying on the body, not falling down from the shoulder to your upper arm. Cut away what you don’t need, a little at a time if you are unsure.
When you are satisfied with the shoulder, armholes and side seams, sew the back and front together with each other, front to front, back to back. In the front, you leave an opening big enough so you can dress and undress easily. On paintings, some dresses are open almost to the hip. In the back you need to leave an opening big enough for your neck, try it on and you will understand! The open seam will give you the neckline on the back, and can then be cut for a rounder style if you like, or you could add a collar.
So, that was it- quick and easy yes? Now the dress should look something like the sketch above, and you can attach the sleeves to the dress. Sleeves? Well, that is for the next part of the Houppelande tutorial series. Stay tuned!
During the 16th century it became high fashion to slash or cut fabrics in a decorative manner, and this was taken up by mercenary landsknechts and women working and living in the armies as well. Being a fashion for richer or high-born persons, it was quite the dare for mercenaries to wear, but such a good way to show that you were a high earner with lots of status and gold on your pocket…
So, I wanted to share with you all my best tips for getting that slashed and cut look that you may want for your outfit!
But first, some good things to know:
The most important thing is the material to work with; wool is by far the easiest. In finds and manuscripts, you will also find garments made by silk or silk/linen and silk/wool blends, but those garments will have very small cuts (also called pinking) made with a specific tool and is a whole different story. So; chose a wool fabric. A felted, dense and tightly weaved wool is the best, this will give you a sturdy garment that won’t fray easily.
The slashing is not hemmed. I know many people do this because they chose a sensitive fabric, they are afraid it will fray and tear, or they have just been told that all raw edges should be hemmed or sewn. The standard is to not hem or sew the slashes, they should be raw, made with a very sharp tool, and yes- they might wear out faster than a garment that is not slashed. There are garments made with other techniques, for examples doublets with sleeves that are being made out of strips of lined/hemmed fabrics. These might look similar to cut garments, but the making is different.
Slashed and cut garments may not last as long as more sensible ones, or look very pretty after using for a while, that is the point with this fashion! You’ll have to be rich enough to order fine materials, pay a tailor to sew it for you, pay even more for the slashing and cutting, and then don’t mind that you will have to exchange the garment once it looks worn. If you are a more economically laid modern person, pick a wool fabric for your outfit, since this lasts longer than silk or linen.
Almost all slashed garments that I have seen have been lined with a second layer of unslashed fabric. This could be a regular lining or a whole garment that holds together the one laying over, providing stability and fit. I often use a linen fabric lining for wool and silk fabrics, but in the case with slashed guards (strips of fabrics) I place the guards on top of the main fabric, to make it visible through the slashing.
Feeling ready for some slashing now?
The pictures are mostly from my trossfrau dress project, this from a woodcut that I have copied and coloured to get a feeling for the dress to be.
I usually wash my wool fabrics, iron them and then cut out the pieces I want for the garment. Before I sew them together I draw out my slashes on the wrong side with a fabric marker and then cut them before I put the garment together. If you are not sure about the fitting, it is good to baste the garment together and try it on before this, since it is difficult to adjust fitting after the slashing is made.
I usually also draw out helplines during this stage; everything that helps you make good sharp lines placed exactly where you want them is good. A ruler, some mathematics and a marker go a long way. I also like to make a template to use while drawing out the slashes.
Do not slash all the way to the edges, remember the seam allowance and leave 2-3 cm along the edges to make it easier to sew the pieces together.
This is a larping outfit (only inspired by historical fashion) as an example of a durable slashed garment. The arms have slashes, but not the armpits or body, and the slashes ends some cm before the seams. Sewn in a medium-heavy twill, slightly felted.
If you want the garment to be sturdy and hold together, slash less along the armpits, side seams and crotch; all areas where the fabric gets more wear. If you look at historical woodcuts and painting, you may notice that tight fitted pants have no slashes at the backside of the legs near the seams, neither over the butt (there might be exceptions, as always)
The finished dress, a hot day in Visby a couple of years ago
Fur can be tricky, so here’s some help on the way if you are going to fur line your garment (like this late 15- early 16th century gollar). This method may be used with a good fake fur too!
I am guessing that you historically either treated the fur like a garment of your own (sew the fur together to a garment, then attach it to the outer fabric) or as a fabric lining (cut out the pieces of fur and stitch it to the seam allowances of the outer fabric once this is sewed together). A mix of these two might also be the case, due to the different challenges you face when fur lining a garment without it getting bulky.
If you only want a strip of fur on your garment, I find it easiest to cut out the fur pieces, and treat them like fabric lining; cut them straight and clean, join small bits if necessary before sewing them to the outer fabric. In contemporary art the fully fur lined garments seem to be the most common one, but some artwork you could interpret as only having trims in fur. Fur was both fashionable and warm and used in many garments, and I have a fully lined gollar. This one becomes too warm during summer, and also take a lot of space in the bag when packing, so I thought this new one would be a good alternative; fashionable, with the fur to warm me against the wind, but lighter in both warmth and packing space.
I started with my wool gollar; I cut out the main piece and the collar and sewed them together with running stitches. A common thread for the period is uncoloured linen thread, so I used that and waxed it to make it more durable while sewing backstitches. After the pieces were joined together, I pressed down the seam and cut down the seam allowance on one side, and felled the seam allowance with whipstitching. This makes the seam more smooth and adds durability to the garment.
I tried to lay the gollar out flat, for you to get a good look. Note that it is not a full circle, you want it to lay flat against your back and shoulders in a tight fit. The fit on the gollar you’ll have to try out on yourself; so make one out of scrap fabric if this is your first one!
I measured the collar and the front where I wanted the fur to be, and cut out strips of fur to match them. I then sewed them into place with linen thread and a small, regular needle. A thinner needle makes it easier to sew in fur, and pinning the fur into place makes sure it doesn’t stretch or slides. If you find it hard to use pins, try with fabric clamps/sewing clamps instead.
At the corners, I just sew the fur to the fabric and leave the leftover fur for later. Note that I treat the fur like fabric; sewing the furry side to the right side of the fabric.
When the fur is sewn onto the fabric, I cut away the leftover and trim the edges down.
At the corners I trim away enough fur so when I fold the fur inside the garment it will not get bulky but fit together edge to edge.
At the bottom edge, I want the fur to follow the curved front of the gollar, so I mark this with a pen and then cut it away.
After trimming down the fur, I fold it to the inside of the gollar, and pin it in place. Make sure it lays flat when wearing the garment; fur can be tricky and does not adjust the way fabric does. When you are happy with the fit, sew the fur in place with whip stitches, or attach it to a lining. In the corners the two pieces of fur should barely meet, the hair will hide the seam, so just sew them together loosely.
I chose to have a lining inside my gollar in a thin woollen fabric, to add warmth and make it easier to sew the fur down with no visible stitching.(a fully lined gollar can be seen in art.) For the lining, I cut out another gollar, without a collar (because the fur strip will cover the inside of my collar) and without the parts that would be covered with fur. When fastening the lining in the gollar, pin it or baste in place and then sew it at the same time as you attach the fur on the inside. Start with the collar, and then the front opening going down.
Sewing in fur is time-consuming and quite tiring for the fingers. Nice company or a movie is good to have!
When the fur (and lining) is attached around the gollar I stitched the lower hem with whip stitches. To make the seam smooth, I cut away some excess lining fabric, as can be seen in the photo. So; adjust the lining, cut off excess seam allowance, pin and whip stitch.
To fasten the gollar you can use dress pins, small fabric strips, ribbons or lucet braided strings, hooks and eyes or do as I did; add a fancy clasp at the throat. At the end of the sewing, I didn’t really like that the fur was so visible at the bottom, so I trimmed it down quite hard. Another option would have been to let the fur finish on the inside of the gollar, so it was not so obvious that the gollar was not fur-lined all the way around. Cheating is hard sometimes…
The clasp is a late 15th century find from Sweden, with A standing for “amore”. It added nicely, but for a commoner, a hidden fastening would do better.
A note about fur; I recommend you put some thought and money into the purchase of fur. There are still many fur-fabrics and farms that treat animals like shit, where the animals suffer greatly to become your hobby-based garment. If you buy rabbit skin for 7-9 Euro/skin you probably support these farms, even if not buying directly from them. A better option would be to buy fur from local farms where you can visit the animals, and get to leave the skin at the tanner yourself. You can also find good choices on the internet, buy second-hand or choose fake-fur from the fabric store (not the most historically accurate, but I rather go modern than using unethical furs) I had the fortune of finding a lady breeding rabbits in her garden as a part-time income, and got to buy furs from her, tanned locally by a handcrafter. These were about 30E a piece, so really reasonable in price!
Volare Digital Capture
Some examples of gollars being worn by 16th century common people during dances. Some of them seem to have a fur line around the hem (as being fur-lined) while others could be unlined or lined with fabric.


")


")


