HANDCRAFTED HISTORY


Leave a comment

15th century clothing part 1- Research overview from art

The last 1- 1 1/2 year the 15 century has been one of my main interests. It is a really interesting period in history, with lots of changes in both politics, society and how trade, money and people moved. My main interest has been the clothing in middle Europe, around what is today Germany, Belgium and the Netherlands (more or less, influences and fashions spread and you can see similar styles in areas boarding to these ones).

From these areas came several great artists, there are lots of paintings and artistic work left, and Scandinavia were greatly inspired by the clothing and fashion movements from the German area.

To both challenge and inspire myself I decided to make a Golden Egg challenge on the topic of 15th century clothing. The Golden Egg is a household in the SCA; you can read more about it here. My goal is now to research and make a whole outfit from the late 15th century for myself, and the timeline is one year between start and presentation.

I wanted to share some of my research, as well as some good sources for you to read for yourself. My main interest is the clothing for women, but you will find lots of good inspiration for men’s fashion as well.

olika modeller

Some important points to remember when studying 15 c fashion (or any historical fashion really) is:

  • The diversity of the period. Fashion shifted over a certain time, and during the 15th c it shifted quite fast. It also differed over areas (such as towns, countries) as well as social classes. It is not possible to sum up the period by stating “a women wore this and this, in such a way” but some things are similar, like wearing a linen shift, middle kirtle and over dress of some kind. How these looked, what materials they were made in and how you wore them differed greatly, as did the accessories.


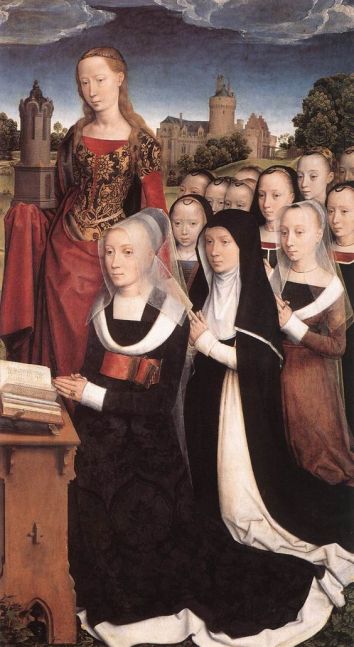
  • The art and paintings of the period is a really good source, since there’s a lot of them, and the fashion of art suggested a natural, realistic reproduction of the people living during that period, with lots of details regarding seams, models, fashion and materials. This was also the period when portraits became popular for others than the nobility, with the ever-increasing burgher class economy as a base for portraits. This give us a source of good depictions of people of the time, and also gives a good clue on what kind of clothing and headwear was in fashion. It is important to note that there also were sumptuary laws regarding what you could wear, and how you were to be portrayed according to your status in society, making the understanding of art and symbolic meanings very important.


  • Religious art was also very important, and great artworks were often the result of a whole workshop with different painters, studies and sketches from different areas and periods, as well as saints depicted with biblical clothing and symbolic tokens. This means that you can find different styles in one and the same painting, both considering fashion and the style of the artist, even though the master overlooked the work on each artwork. It also means that flowing robes and cloaks that appear might not be the fashionable items like the gowns and doublets right beside them, but more some kind of biblical clothing.


  • Colours, technics and styles regarding painting developed greatly during this century, with the use of different mineral sources etc as a way of getting vibrant, expensive and fashionable colours. But this does not mean that the colour tone on a painting was the same as the depicted garment from sketches and models; the colour was foremost the result of the client’s budget, where vibrant reds, dark blues and golden inlays were important for the fashionable and rich client. Does this mean that paintings can’t be the source for fashion studies? No, of course you can look at art for getting an idea of the clothing of the time. Just keep in mind that the colour that you see on your computer screen is the result of both a computer screen setting, the photography of the painting (with editing) how well the painting has withstood time (mineral paint tend to change over time) as well as the idea of what a really expensive colour looked like in art versus fashion.


  • Artists of the time was more handcrafters and less artists in our modern use of the word. They trained for masters, belonged to workshops and worked with paintings as a team, not as one expressive personality. The money came from churches, rich nobility and the burgher class who commissioned art pieces  (or bought ready-made pieces) such as piety paintings, portraits and, later on, everyday scenes from their home. This means that art was the result of society, fashion, study and individuals, greatly inspired by the ongoing social development as well as other painters. Of course there were room for personal style; compare Rogier van der Weyden to Durer and you will find style differences, even if you are not a trained art historian.


  • The artist had knowledge about the fact that fashion shifts; and that what was worn everyday when the paintings was made, was not the clothes of the time depicted in them. So in a painting of Christ’s birth; you can se both people dressed in the high of 1470’s fashion, as well as mythical and religious figures dressed in cloaks and robes that were meant to be seen as “some kind of long time ago clothing”. This might be pretty obvious, but to make it a bit trickier there is also paintings with 14th century fashions depicted (in a rather loose style) in 15th century paintings.


  • Dress for your age; as for society today, people tend to dress after their age, with the young girls and women of that time preferring high fashion dresses, loose hairstyles or flowing hair for the unmarried (or soon to be crowned queens) while older women seems to be more covered, with additional layers and more elaborate veils. Older women can also be seen in “unfashionable” garments; what was the thing 10-20 years ago at their prime seems to hang along.

Having this in mind, you can clearly se that if you aim to make an outfit as historical accurate as possible (…possible for your means, skill etc) an important start is to choose a certain time and period. The social standing is also important, so a good starting point could be a woman from south Germany (or a city of your choice) from the wealthy burgher class, who lived during 1450-1470.

1484,hans memling

I have chosen to focus on the area of Germany, the Netherlands and the Flemish region. This because there were some great artists living there that I want to study further, but I also enjoy the fashion of that area and how the geographic areas and countries influenced each other. If you compare this areas to (for example) Italy or France, you will find that both style in art and fashion differs greatly.

Another thing to consider, is to search for sources besides art; like finds, surviving clothing items, sketches, written documentation etc. This will give a depth for your understanding of the period, where the beauty ideals and painting technique might touch up certain details to the point of it being difficult to interpret (like, how did all the women have those small round breasts sitting high up on the body?)

1470dress

These are some important painters and artists from the German/Netherland/Flemish (Belgium)/Burgundy region during the century that I have chosen to study in more detail:

(About the dating: Sometimes it is difficult to find the year of birth/death for individuals, so the dating in uncertain, but it will provide with a overview of when they lived and were active)

  • Limbourg brothers (1385-1416) Germany
  • Hubert van Eyck (1366-1426) Flemish
  • Jan van Eyck (1395-1441) Netherlands
  • Rogier van der Weyden (1399-1464) Netherlands
  • Petrus Christus (1410-1476) Netherlands
  • Hugo van der Goes (1440-1483) Netherlands
  • Hans Memling (1430-1494) Netherlands
  • Hieronymus Bosch (1450-1504) Netherlands
  • Gerard David (1460-1523) Netherlands
  • Hans Holbein the Elder (1460-1524) Germany
  • Albrecht Durer (1471-1528) Germany

If you are interested in this period and want to learn more about the art, there’s some good books about different artists, and this really good (and free) article at Wikipedia about the subject.

I have also studied books on different artists, the Prestels “Masters of Art” series have been very interesting. There you can find both Van Eyck, Durer and many more.

Want to see more artwork from the time? Check out my Pinterest folder!


1 Comment

Fur lined gollar- step by step

Fur can be tricky, so here’s some help on the way if you are going to fur line your garment (like this late 15- early 16th century gollar). This method may be used with a good fake fur too!

I am guessing that you historically either treated the fur like a garment of your own (sew the fur together to a garment, then attach it to the outer fabric) or as a fabric lining (cut out the pieces of fur and stitch it to the seam allowances of the outer fabric once this is sewed together). A mix of these two might also be the case, due to the different challenges you face when fur lining a garment without it getting bulky.

If you only want a strip of fur on your garment, I find it easiest to cut out the fur pieces, and treat them like fabric lining; cut them straight and clean, join small bits if necessary before sewing them to the outer fabric. In contemporary art the fully fur lined garments seem to be the most common one, but some artwork you could interpret as only having trims in fur. Fur was both fashionable and warm and used in many garments, and I have a fully lined gollar. This one becomes too warm during summer, and also take a lot of space in the bag when packing, so I thought this new one would be a good alternative; fashionable, with the fur to warm me against the wind, but lighter in both warmth and packing space.

I started with my wool gollar; I cut out the main piece and the collar and sewed them together with running stitches. A common thread for the period is uncoloured linen thread, so I used that and waxed it to make it more durable while sewing backstitches. After the pieces were joined together, I pressed down the seam and cut down the seam allowance on one side, and felled the seam allowance with whipstitching. This makes the seam more smooth and adds durability to the garment.

I tried to lay the gollar out flat, for you to get a good look. Note that it is not a full circle, you want it to lay flat against your back and shoulders in a tight fit. The fit on the gollar you’ll have to try out on yourself; so make one out of scrap fabric if this is your first one!

I measured the collar and the front where I wanted the fur to be, and cut out strips of fur to match them. I then sewed them into place with linen thread and a small, regular needle. A thinner needle makes it easier to sew in fur, and pinning the fur into place makes sure it doesn’t stretch or slides. If you find it hard to use pins, try with fabric clamps/sewing clamps instead.

At the corners, I just sew the fur to the fabric and leave the leftover fur for later. Note that I treat the fur like fabric; sewing the furry side to the right side of the fabric.

When the fur is sewn onto the fabric, I cut away the leftover and trim the edges down.

At the corners I trim away enough fur so when I fold the fur inside the garment it will not get bulky but fit together edge to edge.

At the bottom edge, I want the fur to follow the curved front of the gollar, so I mark this with a pen and then cut it away.

After trimming down the fur, I fold it to the inside of the gollar, and pin it in place. Make sure it lays flat when wearing the garment; fur can be tricky and does not adjust the way fabric does. When you are happy with the fit, sew the fur in place with whip stitches, or attach it to a lining. In the corners the two pieces of fur should barely meet, the hair will hide the seam, so just sew them together loosely.

I chose to have a lining inside my gollar in a thin woollen fabric, to add warmth and make it easier to sew the fur down with no visible stitching.(a fully lined gollar can be seen in art.) For the lining, I cut out another gollar, without a collar (because the fur strip will cover the inside of my collar) and without the parts that would be covered with fur. When fastening the lining in the gollar, pin it or baste in place and then sew it at the same time as you attach the fur on the inside. Start with the collar, and then the front opening going down.

Sewing in fur is time-consuming and quite tiring for the fingers. Nice company or a movie is good to have!

When the fur (and lining) is attached around the gollar I stitched the lower hem with whip stitches. To make the seam smooth, I cut away some excess lining fabric, as can be seen in the photo. So; adjust the lining, cut off excess seam allowance, pin and whip stitch.

To fasten the gollar you can use dress pins, small fabric strips, ribbons or lucet braided strings, hooks and eyes or do as I did; add a fancy clasp at the throat. At the end of the sewing, I didn’t really like that the fur was so visible at the bottom, so I trimmed it down quite hard. Another option would have been to let the fur finish on the inside of the gollar, so it was not so obvious that the gollar was not fur-lined all the way around. Cheating is hard sometimes…

The clasp is a late 15th century find from Sweden, with A standing for “amore”. It added nicely, but for a commoner, a hidden fastening would do better.

A note about fur; I recommend you put some thought and money into the purchase of fur. There are still many fur-fabrics and farms that treat animals like shit, where the animals suffer greatly to become your hobby-based garment. If you buy rabbit skin for 7-9 Euro/skin you probably support these farms, even if not buying directly from them. A better option would be to buy fur from local farms where you can visit the animals, and get to leave the skin at the tanner yourself. You can also find good choices on the internet, buy second-hand or choose fake-fur from the fabric store (not the most historically accurate, but I rather go modern than using unethical furs) I had the fortune of finding a lady breeding rabbits in her garden as a part-time income, and got to buy furs from her, tanned locally by a handcrafter. These were about 30E a piece, so really reasonable in price!

Some examples of gollars being worn by 16th century common people during dances. Some of them seem to have a fur line around the hem (as being fur-lined) while others could be unlined or lined with fabric.


1 Comment

Loose sleeves with ribbons- a tutorial

More sleeves! If you have checked my “Pin on sleeves” tutorial, you will find some likeness with this garment, but I wanted to some nice tips when doing these ones. First some inspiration:

I started by drafting the sleeves from the pin-on pattern; the same as I used for my golden sleeves below (laying under them, you can see my original sleeve pattern for comparison)

First, I have tried out two kinds of sleeves that are tied at the arms; my wedding dress and lately, my 15th century Italian silk dress. The difference between these two sleeves is that my wedding dress is just opened at the seam in the arm and then closes with strings, while my green/black sleeves are cut out to make the chemise even more visible. Also, the green sleeves are tied at the shoulders and therefore loose; I can change them for others at any time. The wedding dress is sewn together, the sleeves sewn after the sleeve tutorial I have on my blog.

Here you can see the wedding dress, the sleeves are quite straight, and the chemise is puffing out between the laces. When making these sleeves, you just sew a regular S-sleeve but leave it open above the elbow. Hem the edges, and make lacing holes and sew on laces on the edges. These ends with a pearl decorated cuff, but a regular sleeve will do fine.

The green sleeves look like this when cut out:

I started with my basic loose sleeve pattern in scrap fabric, pinned it on my arm and tried out where the gaps with chemise sleeves visible should be, then I cut away the excess fabric, and here you can see the result. The sleeves are in pure silk fabric, and I wanted to make them reversible to be able to choose between green or black ones for my dress. So I cut out two identical pieces of fabric for each arm, here you can see the black sides. Remember to make them mirrored, one for each arm.

I then pinned the fabrics together and marked out where the ties were going to be. Here you can see both layers of fabric.

I decided to sew them on the sewing machine since they are going to be turned inside out afterwards, so the seams would not be visible. But if you like; just follow the steps but sew them with runningstitches or backstitches instead.

To make it easier; sew the ribbons at the same time as you sew the sleeves together. I cut out the silk ribbons (40-50 cm each) and then pinned them by the seam allowance around the sleeves, on the inside between the two fabrics.

And sew around the sleeves. Leave an opening for turning them; I left the wrist open. Here you can see the silk ribbons in the seam allowance, just make sure they don’t slip away or get under a seam when sewing.

All done! Trim the edges by cutting away tips and seam allowances at the corners, turn the sleeves inside out and iron them flat. Since I want them to be reversible, I will make sure the two layers of silk fabric lays smooth and even edge to edge around the garment so the black won’t be visible when turning the green out, and vice versa.

Now it is time for some hand sewing; start by making lacing holes for the ribbons. I make them with a sharp awl, and whipstitch them with buttonhole silk thread.

After that, fold the fabric edges at the wrist to the inside of the sleeves, and sew that side closed with small whipstitches by the edges. If you use fake silk ribbons, you may burn the edges carefully to make them melt and not thread. If using pure silk, you will have to sew the edges or finish them in some kind of way. I folded mine twice and sewed them down with whip stitches and a thin silk thread (for sewing machines). This part took the most time on the sleeves, with the making of the sleeves on around two hours and the ribbon hemming around 2,5 hours. I failed to photograph this part, apparently, there was some movie time on the sofa instead. But this is what it looks like when done:

The silk ribbon has two lengths and these are pulled through the hole and then knotted. Either a simple knotted loop like this or a regular bow can be seen on art. At the shoulders, the sleeves are attached to the dress by similar holes and ribbons, three on each shoulder.

And finally, some good advice when making silk sleeves:

  • Silk often needs to be lined to get that really good look, chose a thin fabric in silk, cotton or linen or a mix of these to get a historical lining which also works great.
  • Silk is not a stretchy material, so make your silk sleeves a bit larger than your woollen ones.
  • Try them on while working to be sure you get the look you want.
  • Straight sleeves lay more flatly on your arm (white dress), while cut out sleeves gives more volume, pick the model that fits your project.


Leave a comment

Pälskantning till ditt medeltida plagg

This is a post about purchase and care for fur for medieval outfits. It was written some time ago and is therefore in Swedish.

Jag tänkte dela med mig av mina tips kring pälsar- både var du hittar dem och hur du ska hantera dem. Det här inlägget skrevs för länge sedan och är därför på svenska, men jag kom mig aldrig för att publicera det.

Päls?

Om du föredrar att använda fuskpäls, så finns det bra sådana på välsorterade tygaffärer eller på nätet att beställa. Ohlssons tyger har billiga fuskpälsar på metervara, men oftast är de av väldigt enkel kvalité, luddar och ser inte alls ut som naturlig päls. Leta hellre efter fuskpäls till kläder på nätet.

Jag letar ofta på loppisar efter begagnade pälsar som jag monterar isär och skär upp i remsor. Det är mer arbete, men också mer miljövänligt och billigare. Jag köper aldrig farmad päls och jag rekommenderar aldrig det- det finns många djurvänligare alternativ!

Vilka pälsar är medeltida?

Det som verkar vara vanligast i medeltida fynd och på målningar är ekorre, kanin/hare och mårddjur (hermelin, mink, mårdhund mm) men även rovdjur och bäver förekommer. Noppad bäver är en rolig variant där bara den fluffiga underullen sparats och täckhåren avlägsnats. I vikingatida fynd finns också katt, björn, säl mm. På medeltida målningar avbildas päls ofta som små fyrkanter med mörkare hörn i foder, eller fluffiga kanter runt plagg. Titta gärna på den period just du är intresserad av och fundera på vad som är i mode just då!

Det finns inga fynd på fluffiga benvärmare i päls, coola handledsremsor (tänk Conan) fårskinnsfällar som mantlar (Game of Thrones) eller hela djur som hängs upp på ena axeln (också tvserier…) även om det finns målningar på hela djur som accessoarer. Så om du vill satsa på medeltid; tänk kantning eller fodring med pälsbitar, så jämnt, heltäckande, och rakt skuret som du kan få till det.

Hur hittar jag päls?

Loppisar och secondhandaffärer har ofta gamla pälsar till salu för några hundralappar.

Päls och skinnhandlare säljer ofta pälsar, både hela och delar från olika djur. Fråga efter pälsar som inte är farmade, och gärna svensk päls. I Sverige är jakt reglerad av hårda regler och lagar, och du slipper rävpäls med tre tassar (där den sista sitter fast i någon sax…) I Sverige jagas räv och bäver för att hålla nere bestånden, och hare för köttet. Både bäver och hare passar bra till medeltida dräkter, och är betydligt enklare att hitta än ekorre, hermelin och andra medeltida pälsdjur som idag inte jagas för päls.

En ny, fluffig och vacker päls i ett marknadsstånd är mest troligt farmad; fråga och våga välja och välja bort!

Kaninskinn är ofta lätta att få tag på och relativt billiga, men kan komma från tveksamma förhållanden. Det finns däremot flera hobbyuppfödare i Sverige och Norden som håller kaniner hemma för kött och päls, ofta med ekologisk profil och en fin djurhållning. Många har hemsidor med bilder på hur de håller djuren (utomhus på gräs eller i fina inhägnader i flock) och säljer skinnen som ett sätt att få in extrapengar snarare än som sin huvudinkomst.

Fårskinn är fluffiga, fina och relativt billiga och har använts som varma folkdräktsplagg i Sverige. De förekommer i medeltida källor, och verkar tillhöra lägre klasser.

Vilka pälsar ska jag undvika?

Varg är fridlyst och vargpäls får bara säljas med tillstånd som ska följa med pälsen. All annan vargpäls är 1. tjuvjagad eller 2. farmad i små trånga burar.

Andra fridlysta djur i Sverige är lo och björn (läs mer här)

Nya, fina och fluffiga pälsar utan ursprung är ofta farmade. Eller värre, tjuvjagade. En seriös pälshandlare vet var alla pälsar denne köper in kommer ifrån. Läs gärna mer om pälsindustrin här.

Päls från länder som Kina, Indien och andra länder som är kända för dåliga arbetsförhållanden. Om medmänskligheten brister kan du vara säker på att respekten för djuren är värre. Att flå djuren levande, hålla dem i dålig miljö samt använda kemikalier och gifter i garvningen som sedan fäller ut från pälsen under användning är inget som låter jättetrevligt.

Hur hanterar jag pälsen hemma?

Om jag köper en begagnad päls (fårsinn, hel päls eller liknande) så fryser jag alltid in pälsen under några dygn för att bli av med eventuella skadedjur. Sedan vädras pälsen under några dygn.

Slutligen så monterar jag isär den gamla pälskappan, eller skär rent skinnen och gör om dem till remsor (för kantning) eller större stycken (till foder). Använd en brytbladskniv och skär från köttsidan av skinnet genom huden, men undvik att trycka hårt för att inte skära av själva hårstråna. Jag brukar ha en skärbräda under, men sedan lyfta pälsen några millimeter upp när jag börjat skära för att inte råka skära för hårt och ta av alla hårstrån. Det ger en finare och mjukare kant.

Päls luddar och hårar rätt mycket när du arbetar i den, så ha en dammsugare nära till hands, eller håll till utomhus, så slipper du få hår i hela hemmet. Slutligen kan du dammsuga av alla remsor var för sig på päls och köttsida för att få bort damm, lösa hår och fluffa upp pälsen lite.

Päls mår inte bra av att vattentvättas och blir ofta torr och skör, men är den smutsig eller ofräsch så använder jag lite såpa och ljummet vatten som jag sköljer igenom skinnet med. Det här brukar gå rätt bra med begagnade fårfällar. Plantorka fällar och skinn, och vänd på dem så luften kommer åt från bägge sidor. Jag brukar avsluta med att borsta fårfällen med en gles borste för att få ett finare fall på pälslockarna.


11 Comments

Tutorial viking/medieval shift or underdress

Underwear in linen – you can always use another one. Here is an easy and basic tutorial about how to make your own. I use prewashed white or natural linen fabric, about 150 cm in width. You need about 2 meters for a shift for size small to medium. If you are tall, take another 50-60 cm. If you need a bigger size or want the shift to be long and full, take 3 meters of fabric (or draw out the pattern pieces on paper first.)

Early morning in only my linen shift. This also has a gore in the middle, to make that- check out my tutorial on how to put in a gore in your dress.

Before you start:

Soak the fabric in water for a couple of hours, then prewash in 40-60 degrees C. Zigzaging the edges before washing will prevent fraying. Hang dry linen, and iron it on high heat after it is dry. Now you are ready to sew, without having to worry about the garment shrinking during washing.

Take your measures:

  1. Length of shift/shirt + 3 cm seam allowance (SA).
  2. Width of shift (around your chest or your widest part of your upper body) + 6 % for movement.
  3. Width of armholes + some cm for movement. Compare with a modern shirt that fits you.
  4. Length of the arm, from shoulder to wrist.

After measuring yourself; draw out the pieces you need on paper with the measurements you got. This is my layout with pattern pieces; front, back, two sleeves, two sleeve gussets, two side gores (one is split in two). Add seam allowance (SA) 1-1,5 cm on each side, 2 cm at hems (sleeve wrist, neck-line, bottom hem).

Adjustments:

I cut out my neckline at once, but you can start with a narrow neck-hole of around 18 cm width, sew your shift together and then try it on to adjust the neckline to your taste. Note that I also cut out my armholes on the body pieces; around 4-6 cm on the shoulders and then in a straight line down. This makes the shift lay better on my shoulders.

Draw the pieces on fabric:

When everything has been drafted on paper with measurement+ SA added, it is easier to transfer it all to the fabric. Draft the pieces out on your linen, starting with front and back pieces, sleeves, then side gores and sleeve gussets (if you want any). I draft my side gores around 40-60 cm wide but use the fabric you have and adjust to your size (xs-small=minimum 40 cm, medium=min 50 cm, large= min 60 cm etc.)

001

If you are going to sew everything on the machine, start with a zig-zag or serger around all fabric edges. This is important so the fabric wont fray and fall apart when wearing and washing.

If you sew your shift by hand, start with assembling the pieces, and then finish off the edges. Backstitches for assembling, and whipstitch down SA and double folded edges are durable and historically accurate.

Sewing:

After this, it is time to sew the pieces together. Start with the sleeves + sleeve gussets and then assemble the split side-gore. Next step is to sew the side-gores to the sides of the front piece. I always pin the pieces first, on a flat surface.

003

Sew the pieces together, and press the SA to each side with an iron, or by hand. Repeat these step after every seam, and it will be easier to sew the crossing seams nicely and make the seams look better.

004

Sew the shoulders together. When these are done, lay the garment out on a flat surface, with the right side up, and put the sleeves on top of the garment right side down and pin the sleeves to the armholes. (You don’t need to do a fitted sleeve on this item, just sew the sleeves in place as a regular flat seam.) The middle of the sleeve should meet the shoulder seam, continue to sew along the sleeve until you reach the gusset, sew this in place but leave 1 cm open at the edge.

Pin the side seams and sleeves together. I start sewing from the wrist, along the sleeve to the start of the gusset. Then I sew the gusset in place from the sleeve to the armhole, fasten the thread, change directions and sew the gusset to the armhole and down towards the side gussets.

When sewing the area around the sleeve gussets you might find it a bit bulky. Don’t be afraid to finish your seam, cut the threads and then change direction or the way the fabric run on the machine (or in your hand). Pinning or basting before sewing is also a great help. Remember your SA on the gusset; leave 1-1,5 cm open at the edges of the seams to make it fit. Make it as easy as possible for you at every step and you will find it much more fun!

005

When your garment is assembled, try it on to adjust the neckline and the length of the sleeves if necessary, and then finish the hems by hand. The easiest way to do this in a historical way, is to fold the hemline twice and whip stitch it down (this will keep the fabric from fraying, or hide your zig zag stitch). I use waxed linen thread in the same tone as the fabric, which makes for a descreet seam.

Good luck sewing!

Check out my shirt tutorial for help on how to sew a linen garment by hand.

Spara

Spara

Spara


5 Comments

Houppelande tutorial -part 1

Since I made my first houppelande (late medieval overdress) some years ago, I have been thinking about putting together a tutorial for you, to make it easier to understand the construction techniques behind the dress.

As it turned out, the houppelande dress is a bigger project than I thought at the beginning, so I’m doing the tutorials in different parts so it will be easier for you to find the model you are most interested in, and to get a nice overview of the whole dress style.

I start with my first woollen houppelande:

028.jpg

This was somewhat of an experiment trying out both pattern and what it would look like finished. I could not find my original sketch for the pattern layout, but it did look something like this:

20170912_111048

Some notes; this type of pattern layout work well in a tabby weave since it doesn’t matter if you turn your front and back pieces, but you can also use an even sided twill like I did. If doing this type of pattern on a patterned fabric, you can have the pattern one way on the front pieces and the opposite on the back pieces, which work really well I think, if you want to save on the fabric.

The amount of fabric needed for this layout, in size small, is 150 cm * 280 cm (I used 3 meters of fabric, so I had a slightly larger hem.

F=front, B=back and FM= front middle gore. S1 and S2 are the sleeves. I always recommend drawing out your pattern before you do it on your fabric, it gives you the opportunity to see if all the pieces have room and if you can add some extra circumference to the skirt. I also use to draw out how the garment will look finished, to give you an extra idea of the result. The small cut out pattern piece I use to draw the pieces faster by drawing around it on the paper.

medeltid 004

This is what it looked like once I had cut out all the pieces. After cutting, baste your pieces together to try them on, or sew them at once. I used running stitches and back stitches for parts where there was more stress on the seams (like around the body, the armholes, and the top of the front gore). I also pressed the seam allowances down and whip stitched them. You can of course sew your dress on a sewing machine if you would like, just be sure to pin or baste the skirt lengths first so they don’t stretch uneven.

DSCN0462

Always pin or baste your pieces together when they lay flat on a surface. After this is done, you can have the garment in your knee, sitting comfy on the sofa and sewing without having the seams getting all uneven. I started with the front gore, then sew the front and back pieces together. The sleeves were made after the “fitted sleeve” tutorial.

The hem is folded twice and whip stitched down, and the sleeves and front opening is lined with soft, cut sheepskin in a matching colour.

The dress is sold since some time back, and I moved on to make another kind of pattern construction (as I usually do). I liked this one because of its simplicity, it was very comfortable and not bulky around the upper body. Another pro was that it didn’t take a lot of fabric to make it. I really liked the fluffy lining since it gave a lot of extra warmth.

054a67573f8869e90732b57deb3ee42d

The style is somewhat unusual in art but can be seen at the start of the houppelande period in some regions, though with a tighter upper body, the sleeves were full length and often somewhat tighter. For paintings and art inspiration, check out my Pinterest board about Houppelande dresses

What I didn’t like was that I dragged the hem of the dress after me everywhere, without getting the comfort of a warm and thick enough fabric to protect me from rain and chilly winds. So the next one became a bit sturdier in fabric, and with more fabric…


1 Comment

Some of the clothes I’ve made this year

Sometimes I get the feeling that I never get anything done, or that I haven’t made a piece for sale in like, forever. So I made a list of some of the things I have done this year, both for customers and for myself and love, and then I felt that yes- maybe I have been quite productive after all!

In the beginning of the year, I think I accidentally started this Herjolfnes recreation, all hand stitched.

I made our wedding outfits for our Midsummer wedding:


Supporting linen dress, white silk dress, velvet over dress, purse, belts and for love; silk shirt, silk brocade doublet and under west, woolen hose, bag and belt. Also, I remember sewing some tunics and dresses for our families for the wedding.

Did I sew this houppelande also, or did I finish it the year before? It is also all hand stitched, on wool, silk and rabbit fur.

During autumn, I apparently needed to redo my apron dress, make a whole new viking coat by hand and put it all together to a new outfit, along with some tablet woven bands.

   Also, some commissions took place, like this coat…

… as well as a number of hoods, shirts and tunics (here’s some of them along with the silk cotehardie)

I also remember some viking hedeby trousers (baggy pants)- four of them i think.

InstagramCapture_38ac78d7-caef-4b53-b49a-c493692d90f5

As well as some hand sewn viking clothing…

20171120_104600

I updated my shop and market stall during the spring with cloths, small flags and my own logo hand painted on a linen fabric.

  Made a whole bunch of veils in linen and thin wool for different outfits;

I studied 16th century tailoring manuscripts and sewed two jackets for women, in wool fabric (one for my friend Linnea and one for myself)

Oh, and rosaries were totally a thing- I have read a lot about them, made a whole bunch of drawings, some pieces for sale and a folder about how to do them yourself, as well as holding some workshop on the subject.

This is far from everything I have made, and some pieces have not even made it to being properly photographed though I have been wearing them on several occasions.  Also, quite a few items and commissions also are just on fb or my Instagram accounts, otherwise this post would be far to long.

All in all, I think I have; 1. made quite some things and 2. need to be even better at documenting them and writing about them here on the blog.


Leave a comment

Visby Medieval Week 2017

This Medieval week in Visby was rather different from my previous ones; I traveled without love (who was working) and lived indoors in a rented apartment with two friends. I also had workshops scheduled for every day I was there, and just had a free afternoon the day we arrived. So, with that said, I don’t have much photos since I was working a lot, but I wanted to share some moments with you- both by camera and words.

Me and my two friends really had the best living and it was easy to share with them, but we did have different hours so often I was on my own to and from work. It actually was really nice, I had some of my best moments because I was out on my own, strolling or talking with people and new friends I otherwise wouldn’t have time to see. I really recommend having some time on your own during the Medieval Week- it’s the perfect way of meeting new friends!

And adventuring on my own also means climbing things; even if wearing a full silk dress and veils…

One afternoon I met up with Minna to take some photos in the botanical garden, one of them is now the header for my social media! Here in the late afternoon light, trying to tie up my headwear without a mirror and enough pins (it ended up hanging from one side as you may have seen…)

Minna in her awesome hood; made from a manuscript from South Europe.

Work, I say? Yes, since I run Handcrafted History as my full-time commitment, most of my medieval and viking adventures and event is about work for me. I either have my market stall, selling clothes and handcrafting materials, or holding workshops and lectures. During Medieval Week, I mostly work at Kapitelhusgården, which is a lovely place and medieval restaurant in the middle of Visby. During the day, they offer workshops and lectures, and in the evening the garden transforms to a restaurant and pub, with a picnic-feeling. I love the place!

I am holding my workshops there during the week, and this year one of my attending handcrafters took some pictures with my camera- so I actually have some during-work-photos. (This usually never happen because I get so busy with the workshop and explaining things…) So this is what it could look like when I’m holding workshops! I usually wear medieval or viking clothing when I work, but on modern locations such as universities I wear my everyday clothing (if nothing else is requested).

Linnea whom I traveled and lived with

And J, from my local group, meeting in the park for a chat and some photos


Leave a comment

Lästips; handbok i 1400talsdräkt för män

Because the book is in Swedish; so will this blogpost be. It is about a new book about the late 15th century clothing for men.

Jag fick hem en helt ny bok, skriven på svenska, som handlar om den sena 1400talsdräkten för män. Det är så fantastiskt roligt att en sådan här bok görs, på svenska, av skickliga medeltidsmänniskor, med syfte att underlätta för andra att förstå och skapa 1400tal. Förutom att det är en lätt väg till kunskap så är det också ett tecken i tiden på att medeltida återskapande av olika slag blir större och större i Sverige!

Boken har en lättöverskådlig layout, enkel och tydlig text, och stycken som efter en snabb genomgång ger dig koll på dräkten. Det är den typen av bok jag skulle börja med att skaffa om jag ville göra 1400tal, eller ge till en nybörjare som vet *ingenting* men gärna vill vara med. Jag gillar att den tar upp en historisk överblick och talar om formspråk, för att därefter ge förslag på plagg som tillhör perioden. Det finns inga mönster eller steg för steg instruktioner för plaggen, sådana finns istället att köpa via reconstructing history eller görs själv med hjälp av en mönsterkonstruktionskurs eller Tailors assistant. Är du en sådan som vill forska vidare själv, så gräver du i referenslistorna som innehåller både bilder och litteratur. Det är helt enkelt en handbok riktad till återskapare som vill börja med perioden- så himla smart och häftigt!

Anna, som är en av två författare, har jag träffat flera gånger på event och hon är en skicklig hantverkare och återskapare, som också bloggar om mycket 1400tal (Willhelm känner jag inte än, men ring mig så tar vi en fika och nördar 1400tal!) Boken innehåller, förutom referenslistor, också massor av bilder från perioden. Bredvid varje avsnitt om plagg/material osv hittar du alltså både historiska referenser, bilder, skisser och materialförslag från ett modernt perspektiv. Mycket bekvämt med andra ord, eftersom mycket arbete som du behöver för att kunna återskapa dräkt redan är gjort i boken.

Rikard och Helena från Handelsgillet är också delägare i Chronocopia som ger ut boken, och arbetar (förutom att sälja material och produkter) med att sprida kunskap om återskapande. I boken finns det en del produkter från deras shop, vilket kanske kan ses som reklam- eller ett praktiskt sätt att få tag på bra material att fota för att belysa tygfärger, material och vad man kan hitta för att praktiskt återskapa perioden. Jag tycker att det är ett bra initiativ, jag vet att de gör mycket efterforskningar kring färger och val av material de köper in för att allt ska vara historiskt, och här är deras shop Handelsgillet för dig som vill hitta material från boken (den tunna kyperten som syns har jag använt till flera av mina dräkter).

Nästa bok behandlar kvinnodräkten- gissa vem som ska klicka hem den också…


Leave a comment

November update

A post about shopping, giving discounts and what I am up to now.

Today it is black Friday, and you are apparently supposed to buy lots and lots of things and all companies are having lots of sales, special offers and the like. Not me. Why?

As a small business runner, I have discovered lots of thing about selling and producing things, and about the market in general, so to speak. One of the things I have learned, is that to have sales and discounts on things, you will have to either 1. earn less (not an option for big companies) or 2. earn the money in other ways. So if your favourite store or brand have large discounts and sales all the time, it means that it isn’t really a discount but the regular price – the price they want for the product to sell it with profit. All the other times when they sell on full price is just an extra income; more profit for each product. It really is very logical; why should a professional company sell things that they do not profit on?

This means, for me to have regular sales, I would have to rise my prices with about 20%, and then sit back and enjoy every time a customer bought a piece on full price. But that doesn’t feel very honest. So every time I do offer something on sale the cut goes on my income; it basically means I have been working hours for free. Sometimes I take that cut; to sell items that has been in stock for some times, or to give a close friend or a regular some discount. But I will most certainly not do it because it’s a shopping day, on which people are supposed to buy things just because…

working at home is fun, but also tiring when the work spreads through the whole house

With second-hand things it is a bit different. I often sell items after just a couple of uses, and that is mainly because they are experiments on new materials, technics or garments that I really wanted to make, but maybe not needed. Also, some items is getting sold because they don’t fit, or don’t get used enough. These items I do not sell as a part of my business main income- but to give myself space and income for a new project to take place. For me it is really important to not just make pieces on order, but allow myself to get inspired and creative in order to grow as a tailor and seamstress. For this reasons, you can often find barely used garments for a much better price at my facebook page.

This time of year is a bit slow for reenactment business, and I finished my last orders a couple of days ago. So now I am writing on new blogposts, working on new tutorials, reading books and sewing some new things for myself and the shop. Like this hood; just a small piece that turned out quite lovely, and is going up on the fb page for sale.

Do you want a special item made for yourself, as a Christmas gift or for next years season? Now is an excellent time to order; by late spring I usually have quite a delivery time if not fully booked. Hope you are having a nice weekend- with more snow than drizzling rain.