This is a dress I made several years ago, to have as a simple working kirtle. I never got around to take photos and write proper documentation about it, but now I got some feeling! In these photos, the dress has been used for a couple of years and it has seen wear, washing machines and mending. So here’s my first tutorial for the autumn, and thank you for visiting and reading! (Both old friends and newcomers!)
This is a very simple working kirtle or dress, made to be practical as well as historically possible. The fabric is a plain wool weave, dyed to look like walnut dyed fabric. The skirt is partly pleated, partly flat sewn to the waist, and the upper part of the dress is fitted for bust support, side laced and has short sleeves.
I wear it with loose sleeves, pinned to the short sleeves and a gollar for warmth, under another fancier dress, or as it is if I am going to do lots of work or if the weather is warm.
The dress is hand sewn with wool thread in the same colour as the fabric, and it was one of my first garments made with wool thread instead of linen thread. I really recommend it! At first, I was a bit unsure if it was going to be durable enough, but after several years of using it, washing it in the machine (yeah, because lazy and dirty…) and treating it rather rough, it stays together really well, with only some minor mending.
I used running stitches on all long seams and folded the seam allowances to one side before whip stitching them down. The waist seam and all edges were made with whip stitches, and the sleeves and upper body seams made with back stitches to be a bit more durable than the running stitch is. The running stitch is way more durable than many believe and common in extant finds, but for heavy support, I like whip stitch and backstitching better.
The fabric is a medium tabby weave and I used around 3 meters for a dress. If you are much longer than me (1,6 m) consider buying another half metre. I did a quick pattern outlay for you, since it is old I’m not sure if I drafted the pattern along the selvedge or across the fabric but you will get an idea of what pieces you need to make one for your self.
The dress was made using two front pieces (to have a supportive seam in the front was a good choice since I didn’t have any lining in the dress.) One back piece, two sleeves and the skirt panels. I drafted S-sleeves, but the dress is made with regular sleeves with the seam under the arm. That seems to be the most common in artwork from the time on short sleeves. Your choice!
Some thoughts on skirts:
Do you see that the skirt has way more fabric in the back, while the front is straight? This will give you a nice fall as well as enough width and volume, but if you bend forward to pick up things or work by the fire, this construction will make the skirts remain away from the flames closer to your body, rather than draping forward with your movement. Hard to explain, but try it! It gives you a very practical garment.
The front panels are marked C at the centre front. The back piece is “upside-down” to use as much of the fabric as possible. You could of course piece the skirt together with more panels if you like. On my dress, the front panels lie smoothly in the waist, with only a couple of pleats to allow room for hips and stomach, while the back part is pleated around the back.
This is (I think) my only wool garment so far that has bust support, but no lining whatsoever. This is possible only because of the plain weave since it is not very flexible across and along the threads in the fabric. A twill weave would not have worked without lining.
The drawing with the front piece has two arrows marking out small details in the fronts seams. At the centre front there is a small bend going in under the bust, and at the side seams there’s another, making the seam run in a bend, and then changing direction after the bust and running straighter over the stomach. This way of sewing will make the bust stay better in place, allowing for bust support without lots of sturdy layers. But the bust will have a rounder form and not as much steadiness as a garment with lining.
I did however put in a narrow strip of linen around the neck opening on the inside, to avoid it getting stretched. There is plenty of ways to make hems sturdier, such as a narrow strip of fabric, running or stab stitching or using another layer or quality of fabric on the inside, for example. You can find this in extant finds such as Herjolfnes and finds from 14th c London, as well as in paintings. It is an easy way to finish your garment, make it last longer while being historically made.
The side lacing is made with sewn holes and a lucet braid in plant-dyed wool thread. A wool thread will be a bit stretchy, and won’t run as smoothly as silk, which makes it a bit slower to lace, but the cord will stay in place. In this photo, you can see the lacing which starts at the sleeve and reaches to the waist seam, a gap where the shift is visible (did I have too much good food this winter?) and also some mending is done on the sleeve. After the waist seam, I tie the cord (I lace it from sleeve to waist) and the skirts are opened another 15 cm to allow for easy undressing. The skirt is not laced, it stays closed anyway, and by sewing some folds in the sides, the opening will not be very visible.
A note on fitting a dress like this:
I always make a fitting for every single item I make, and that is especially important if it is supposed to be tight fitting. I do have a basic pattern, drafted on my own body (a toile) but after I have basted the pieces together I need to try them on before sewing the garment. Every fabric you work with is slightly different, some more stretchy, some supportive and stiff, and by trying the pieces on you can adjust the garment to your taste.
The method for adjusting and fitting a dress like this is the same as I use while making a supportive upper body toile, and you achieve the support by taking in the upper body in the sides and front, sometimes also by stretching the shoulder seams upwards a bit.
A front laced kirtle is a bit easier to adjust to a bigger bust, but you can make it work with a side lacing as well, just remember to make the same adjustments to the laced side as the sewn together side, and maybe lacing it double one turn just below the bust for greater support.
For a complete outfit; linen shift, wool hose and leather shoes under the kirtle. A simple belt to hang the money purse from (change is very important for today’s trader) and a veil on the head. Here I have a simple cap under the Great Veil, to have a base to pin it on. The veil can then be worn in many different ways, depending on how you like to wrap or fold it. 2-3 brass pins secure the veil to the cap under it.
Whoho! Finally documented this dress a bit, so now I don’t have to feel “bad” about forgetting it all the time. As you have noticed, this is not a complete step-to-step tutorial but rather a post with guidance if you want to make a similar dress.
Many readers ask me to share more sources and such material on the blog, but according to copyright laws I am not free to post all the stuff that inspires me on the internet, and therefore you will often find links, reading tips and Pinterest notions where you can find artwork and resources of your own. Hope you understand my take on this!
This is my walk-through on how I made my green 15th c kirtle/dress in wool. It is not a complete tutorial with all details, so if you have never sewn before I recommend starting with a shift or other straight garment. If you want more good sewing tip, you will find many problems addressed in my other tutorials.
This is a common late 15th c middle dress for women, it is quite easy to make, practical and is shown in many different pictures from the period. Your choice of colour, neckline, clasps and other details will make it different, and if you choose a thicker wool fabric it will work as an overdress too. The artwork I have used is from 1470-1485.
You will need about 3-4 meters of thin wool fabric, I bought mine from Handelsgillet, they have a thin twill fabric that is easy to work with and quite historically accurate for the period. I fell in love with the perfect green colour… And you can see some examples of green kirtles at the bottom of this blog post and in other artworks from the period. The shade can be achieved with plant dying but is more expensive than a madder red or yellow, and I think it makes a good option for my outfit; a well of burgher from a city.
I lined my dress with prewashed, unbleached linen, but you only need to line the upper body for some stability, and that will need a maximum of 1 meter. I sew my dress by hand, with waxed linen thread. Running stitches for the main seams, back stitches in armholes and sides, and whip stitches for the seam allowances and hems, are all you need. The dress closes with hooks and eyes, be sure to have lots of them!
This is what the model looks like, it is really simple, and if you have a personal toile/mock-up for your upper body you can use that with some small modifications. The front opening should have a slightly curved seam to follow your body, and the closure makes the front pieces lay edge to edge.
Comparing to a supportive kirtle, you need a bit more room now for your bust area, it should be quite loose and lay over your breast, to get the shape of the period. Make a new mock-up in fabric and make the front pieces a bit wider, and try it out.
The sleeves are regular S-sleeves or a sleeve with a curved upper edge and seam under your arm. You can see both from the period, though the S-sleeve seems to be more common. The skirt is made up of 4 pieces in my dress. Here are the pieces I used together with my measures (around 36-38/small European size)
The dotted line on one of the skirt panel indicates a gore to save some fabric, but I wrote out the wrong number of pieces; the left panel is the front and you only need one of them. But this is just one way to create the skirt; you can use more pieces, gores, or just 2 wider parts.
The upper body back piece is whole, you can shape the back in the sides and with the help of the waist seam.
I lost my sketch of the outlay but made another one just to show you. Since I am a rather petite person, I can use the width of the fabric for most outlays, but if you are longer than I am (around 160 cm) you may want to lay the skirt panels out the other way. In this picture the panels are a bit wider in the back than that above, so you only need two. The front is straight or almost straight. Note also that I apparently drafted regular sleeves instead of S-sleeves, but you will get the idea…
After I cut out all the pieces, I basted the dress together to try it out. When happy with the fit and measures, I started to sew all the seams by hand. If you keep the correct basting stitches while sewing, you don’t need to pin and can easily work on the sofa, super cosy!
Make the dress in the following order:
Sew the upper body together, front and back pieces, and then sew the sleeves before you insert them in the body.
Sew the skirt panels together, but leave around 20 cm at the top centre front, to be able to put the dress on (the slit shown on the first sketch). I hemmed the body and the skirts upper circle separately, and then attached them to one another with whip stitches. This seam will get a lot of wear, so it is nice to make it twice or use a sturdy thread, like the buttonhole silks or a thicker linen thread, like 35/2.
When the whole dress was assembled together, I put it on my doll to hang out for some days, before I cut and hemmed the skirt and sleeves. If you have a doll, it is really good to leave the dress hanging for a couple of days before hemming, this will make the fabric in the skirt stretch out, and you can cut away excess fabric to make the hem even.
The front with its lining is sewn from the right side, first with basting and then with a seam. To make the front opening and the neckline more durable I added a second row of stitches around.
The hooks and eyes are fastened last. This is what it looks like on the inside, note that I have sewn the hooks and eyes not only in the loops but also at the stems/higher up. This will make your opening lay flat and give that characteristic look at the closure you can see on 15th c paintings.
And finally, some of my favourite artworks that I used during my research. As you can see, they are all green kirtles, of the same models, but with some different cuts, necklines, closures and headwear.
Historically accurate? My main aim with making this outfit was practicality, durability and a dress I would feel comfortable in, based on period clothing. With this said, I aimed to make the dress (and outfit) as historically believable as possible from my means.
The fabric is machine woven and dyed to cut on costs, but the pattern construction, sewing techniques, material and look aims to be close to the dresses from the period. Another modern take is the hooks and eyes, which are machine-made instead of handmade.
I rarely work with metal due to some problem with my joints, but I tried to make a couple of hooks and eyes by hand. It is not hard work, they got quite pretty, but I didn’t make enough of them for a dress.
One thing I did give a lot of thought was the lining. My experience is that lining a skirt with a different material that is sewn down in a slim hemline rarely gives a good result. But I was curious and gave it a try with the method of letting the skirt and skirt lining hang down before cutting and hemming. It worked quite well but gave me a lot more work than leaving the skirt unlined. In artwork, you can often see a lining inside the dresses, and this was a try to make one without adding warmth with another wool layer.
This is a tutorial with very detailed step-to-step instructions, and I will base other tutorials on this one and simply state “do as in the simple dress tutorial but…” so this is a go-to for many different garments. I call it the simple dress since it is so versatile, the base for so many other garments!
It is also suitable to make men’s kirtle, tunics and coats, just adjust measures and fitting to a male body. Most garments are more difficult to make for women’s bodies since the measures differ more, and therefore you will find more tutorials on my page for women’s clothing.
This is the dress we are going to make. Note that a regular S-sleeve does not have two seams, only one at the back. The reason my dress have two seams in the sleeves are 1. you will learn how to make that for doublets, jackets and 2. I saved fabric that I was short on.
Good tips:
If sewing on a sewing machine, pin from right to left, across the seam, to make it easy to remove the pins while sewing. If sewing by hand, pin along the seamline so as not to get the pins in your hand, or baste the seams before sewing.
When pinning; always lay your pieces on a flat surface (a table or the floor) and work on that while pinning. This will make the work easier, and the seams better.
Basting seams are an easy way to try the fit, size, movement and drape of skirts while sewing. Basting the armhole before sewing makes that seam easier to finish nicely. When you pin/baste together long seams, such as a diagonal cut gore with a straight panel, put the gore (the diagonally cut stretchy part) under the other one, when sewing on a machine the gore will not stretch.
Don’t be afraid to cut out your armhole according to your body. The sleeve should cover your arm, the arm joint, but fit snugly under your arm (in the armpit). A too shallow armhole will make your sleeve hang, but too wide will make movement hard. Experiment on scrap fabric first.
How many gores? Two are enough for undergarments and knee-long kirtles, four or more will give you more width, a smoother and more even fall of fabric and more movement when walking. Regular seam allowance is 1,5 cm. For hems 2 cm. You can pick whatever measure you want between 1 cm-3 cm, just remember what you chose. Seam allowance is mentioned as SA in this post.
Wash and iron your fabric before sewing. The fabric is prepped with chemicals to avoid mould or bugs during the shipping and selling process and could be stretched uneven after the weaving. It will also most likely shrink a little, so this makes you able to wash your clothes after using them.
Start with your measures:
Around your widest part on your upper body(often over the bust).
Length of the garment; from shoulder to hem.
Length of arm; from shoulder-elbow, while bent 90 degrees, to the wrist.
Around your wrist (for tight buttoned sleeves) or around your hand to be able to take on and off the garment.
Create your armhole (if you find this hard; try to measure around a loose shirt or blouse. The armhole should be a bit loose without hanging).
Length from shoulder to natural waist (for women) to hip (for men). This is where I attach the gores.
Draft the pieces you need on a bit of paper. Calculate the measures you need:
Around your widest part of torso: Divide in 2. Add seam allowance: 3 cm/piece. Add some extra for movement: around 6%. Example: around bust: 100 cm. Divide in 2= 50 cm. Add s.a = 53 cm/piece. Add movement = 53 + 6% = around 56 cm. Each piece is now 56 cm wide.
Length of garment; from shoulder to hem. Add seam allowance: 2 cm = hem + 1,5 cm for shoulders. Example: dress should be 140 cm when finished. Length of piece: 143,5 cm.
Length of arm; from shoulder (around elbow while bent 90 degrees) to wrist: Example: 64 cm. Add SA., so sleeve pieces should be 64 +1,5 +2 cm= 67,5 cm. Try on before hemming to adjust the length to your taste.
Around your wrist (for tight buttoned sleeves) or around your hand to be able to take on and off the garment): The narrow part of the sleeve. Check so you can put it on/off. Shape the sleeve to your taste so it fits comfortable around your arm while sewing the sleeve. This is just the starting measure.
Around your armhole (if you find this hard; try to measure around a loose shirt or blouse. The armhole should be a bit loose without hanging). The measure you got is divided into 2, for a measure of the sleeve hole on the front and back piece. Example: around my armhole, I have 56 cm. 56/2=28 cm. Each armhole on the pieces should be no more than 28 cm (measure the curve).
The sleeve base should be 2 cm wider than the complete armhole. 56 cm + 2 cm= 58 cm (measure around the S curve of the arm) add SA: 58 + 3 cm= 61cm is the sleeve base measure.
Length from shoulder to natural waist (for women) to hip (for men). This is where I attach the gores. For example: my measure is 38 cm. From the shoulder, I measure 38 cm and make a line, here is where the gores should be attached on front and back pieces. For gores in the middle back and front, cut a straight line to 1 cm below this measure (39 cm from shoulder) to insert them. Check out my tutorial on how to make these
Length of gores: length of the dress – length from shoulder to waist/hip + 3,5 cm SA. Example: 143,5 cm -38 cm = 105,5 cm + 3,5 cm = 109 cm.
The width of gores depends on what kind of dress you would like to do, your overall size and how much fabric you have. I recommend a measure between 50-80 cm for each gore. A lower-class garment might have narrower gores, a fancy dress wider. If you calculate on a larger size than this example, let the width of the gores follow the other measures. For example: if your circumference around your torso is 20% more, also add 20% width to the gores. This will make sure the dress keep good proportions and all the drape.
When calculating all these measures, draft them out on your pattern pieces to remember them.
Then, draft all the pieces on your fabric with a fabric marker and ruler. Check that you have made all the pieces with the right measurements and that all are drawn onto your fabric before cutting. Mark them with front/back/sleeve/gore.
Cut them out. If I work with linen, silk or brocade that will fray, I sometimes zigzag around all pieces on my sewing machine.
Sew the pieces together in this order:
Shoulder seams
Make the sleeves
Attach the gores to dress front, back, sides
Side seams; front to back and gores so the sides will be completely closed
Sew the sleeves into the armholes
Hemming and adjusting length
Note: This work order goes for both the sewing machine and hand-sewing. When I make a seam I finish it off before starting the next one. That means;
pinning/basting
sewing the pieces together front to front
pressing down the seam allowance on the wrong side (the inside)
cut down the seam allowance on one side
press again, the wider over the cut one
whip stitch the seam allowance down (can also be done when the dress is ready if you want to try the fit during sewing)
The reason to press the seams before sewing another one is that you will have flat and nice looking seams, and it will be easier to make the next one crossing the first. I really recommend you to at least press the seam allowance once, it makes such a difference!
Step-to-step for sewing the dress.
Sleeves:
Pin the seam on the S-sleeve (the back seams if you have a sleeve in two pieces.
Sew the seam with running stitches or a sewing machine. Remember to fasten/lock all seams at the start and finish. Here 1 cm SA is shown. I prefer 1,5 cm to easy fell the seam and whip stitch it down.
Press the seams with an iron. If you use fine wool or silk, a damp pressing cloth (cotton cloth) can be used between iron and garment pieces to avoid pressing marks. In the photos below you can see the difference between a pressed and a new seam. Totally worth the effort!
When pressing: press the SA to both sides. Let it cool. Cut down one of the sides to half the width. Press the other SA over the cut one, pin down if necessary. This will create a sturdy seam when sewn down, saves you time and looks neat on the right side.
Pin and sew the other sleeve seam (if any). Press it the same way as the first seam. This is easiest with a sleeve ironing board, but if you don’t have any; press the seam with the sleeve laying flat on the board. Try to avoid creating folds in the sleeve with the iron.
seam on the inside of the sleeve
These photos show the technique with and without a sleeve ironing board
Gores:
This dress use 4 gores, one at the middle front, one back, and one in each side seam. The gores give you movement and a good drape to the skirt. On female garments I want the gores to start by the natural waist (where you are slimmest) to accentuate the curve of the hip and belly. On men’s garments, I start at the hip bone to give movement but no feminine curves.
Tip: When drafting your gores, do not make them into straight triangles, but make them slightly curved at the base. Like in this example: the gore should be 100 cm long, and as you can see the rectangle is just that, so the gore will be exactly 100 cm at the middle, but at the sides, you need to measure from the top and down, 100 cm, and that will be a bit shorter than to the line.
Why? To get the right measures, and a good shape at the bottom hem, as described in this picture:
The gores are cut at a diagonal/bias on the fabric. This means they tend to stretch more than the front and back pieces when pinning and sewing. To avoid this, work on a smooth surface and pin + sew the seams with the gore under the front/back piece. This is mainly a problem on a sewing machine with too much pressure on the presser, but also a good tip for hand sewing.
One gore has a seam in the middle to save fabric. Pin, sew and press this seam first. I like to place this gore in the back so it wont show, and to create symmetry in the dress. Then, cut the front and back center to be able to attach gores there. Make the cut line about two cm shorter than the gores; like this:
Start with the side gores, pinning them to the front. Sew them in place, and press both seams the same way you did with the sleeves.
Pin the front and back gores to the front/back pieces, right side to right side, one seam at a time. Sew it but leave the last 6-8 cm at the top. Repeat with the other seam, so you will have two gores with the tip lose. I prefer to make the tip by hand, from the right side of the garment
3 different ways to insert gores:
Press the seams you made, and press the SA on the front and back to either side of the slit, as if it was already done, from the wrong side. When reaching the end of the slit, the s.a will become narrower, and then disappear. Turn the piece and work from the right side. Pin the gore in the slit, so it lays flatly under the already pressed s.a of the front/back. Then sew it in place with a small whip stitch. With this method, you can check the gore to be sure it fits nicely, and it does not matter if it turns out a little bit too big; it will look perfect!
Another method is to sew the whole gore with this technic, if you sew your garment by hand. This is also historically accurate. Start with pressing down the s.a on the front and back slits, and then pin the gore along each side, and sew it from the right side using whip stitches. Press the s.a on the wrong side, and sew this down with whip stitches on the wrong side to, like when felling the seams in the sleeves.
If you only want to use the sewing machine, work on the inside of the garment, and continue with your sewing machine seam to the top of the gore, making the SA narrower as you go along the last 4-6 cm. If it is hard to see, fasten the seam, turn the gore up and sew it from the other side (still on the inside, just flip the garment from front/back to gore side). This might take a few tries before you get it right, just go slow and be prepared to rip the seam and try again if not satisfied.
When the gores in front and back are finished, sew the side seams; the side gores to the back piece and then the side seams (leave a hole for your arms for now. When all the gores are finished, remember to press all the seams!
Neckline:
I like to draft the neckline by hand for each garment, to be able to adjust it to each look I want. The secret is to try it on often, and just cut away a little at a time. You can choose between pinning, basting or sewing the shoulder seams before this. Make them the same way you did the other seams, but don’t press them yet.
Start with drafting a neckline, and armholes. Put the front and back on top of each other, mark the middle and draft a small neck-hole. Mine is 18 cm across, 9 on each side of the middle. Make it shallow, about 4 cm, just in order to try it on. You can then draft the shape and size of your neckline directly on your body in the shape you want (just put the dress on, inside out and draft in front of a mirror. Copy the side you liked best to the other side, left or right. The neck will probably just be cut down with some cm, depending on your size, while the front will be deeper. Remember to leave 1-1,5 cm SA; when you hem the neckline it will be a bit bigger than before.
Arm holes:
Making armholes is much easier if you already got a toile/mock-up to copy, but you can try this too: Put the dress on, inside out, and draft the armholes where your shoulder joint start, follow the curve at the front. Mark where the holes should meet at the side, as tight under the arm as possible. Do this at the back (ask a friend) or take the dress off and draft on a flat surface.
Now you should have a drafted line at front and back. Measure these ones, and compare them with the measure you took for your armhole in the beginning. Redo if necessary, the armhole should be a bit narrower than the sleeves (about 2-4 cm) in order to make a well-fitted sleeve. The front curve is deeper, and the back more shallow, but they should start and finish at roughly the same place on the shoulder seam and side seam. It does not matter if one line is a bit longer (front/back) than the other, as long as the circumference is correct.
This is the difference between the front and back of my dress. Note that I also cut down the shoulder seams to become a bit sloping. This is optional for you, if you have very sloping shoulders it will help you with the fit. If needed, do this before the shoulder seams are finished. Then sew the shoulder seams and press them.
Attaching the sleeves
The next step is to attach the sleeves, and I will be honest with you; it can be a bit tricky at first, so don’t give up if you have to rip the seam a couple of times before you get satisfied. The most important thing is to take the time to pin/baste the sleeve to the body and check it out. Don’t hurry!
You will have two sleeves, sewn together to tubes. Baste the sleeve cap (top curve of the sleeve) with loose running stitches.
If you want to check out how the fit is; baste the sleeves around the armholes, and try the dress on. Move around, stretch. Bulkiness at the front might be trimmed down a little. If the sleeve seems tight on top of the shoulder a bit more sleeve fabric might be moved upwards. Do not bother if the sleeve gets a little creased or has small folds, that will be possible to fit inside the armhole, that is what the basting is mainly for. When you think you have something:
Mark out the top of the sleeve (towards the shoulder seam) and the bottom (armpit on sleeve towards the side seam) with a marker or pin. Maybe there will be more sleeve on the back of your body, but that is just fine, you use it when reaching in front of you. Now you are ready to sew the sleeve into the dress!
This is a step-to-step on how to insert a sleeve in the armhole and make it fit. Use it as a guide if you felt unsure about the above: Turn the sleeves to the right side. Put the sleeves inside the inside out dress, and fit them into the armhole. They should lay right side to right side now.
Pin the sleeve marked shoulder – shoulder seam and marked armpit – side seam. Continue to pin the armpit, the part under the arm. Lay the fabrics smooth against each other, no folds.
The sleeve is a bit wider than the armhole, so it should make small waves, like in these pictures. This will be solved with the basting thread you sew on the sleeve. Gently pull them to gather the fabric of the sleeve a bit, in order to fit it inside the armhole. As the sleeve follow the arm hole curve better, pin it in place. The fabric should not make folds, but only gentle crinkles or waves. Adjust if you need. The basted and pulled together fabric should only be pinned to the upper half of the sleeve, never in the armpit.
When you have worked your way around the hole with pins and like the result, baste it in place with big running stitches. Make the other sleeve up in the same way, or try to make it the same… When satisfied; flip the dress to the right side, and try it on. Check the fit of the sleeves and your movement. A bit bulkiness around the armhole is ok, but there should not be folds or stretched fabric sections.
If it looks good, turn the dress back inside out, and sew the sleeves following the basting (with machine or backstitches). Then remove all the basting stitches.
To finish the seams, press them on a sleeve ironing board, or roll a bath towel firmly and put it inside the sleeve if you don’t have one. Press the SA down in each direction, then finish the seams like the ones before. I press them towards the body and whip stitch them down.
Wow, good job! Almost finished. Try the dress on again to adjust the length, hemline, sleeve hems and neckline if needed.
The sleeves should be a little too long when the arm is hanging, to fit nicely when you use your arms and bend the elbow. Check, mark any change you want to make, and do the same to the neckline.
Ask a friend to check the hemline of the dress so it looks even, mark a new hemline if needed. Remember to check the length with the correct shoes/belt since these can make a difference to how long the dress look. When satisfied, cut away any excess fabric and hem the dress. I prefer to fold the edge twice and whipstitch it down by hand. Remember that our SA for hemming was 2 cm. Thick wools only need a single fold before sewing.
Thats it! Now we have a nice dress, and you can use this tutorial for other garments as well.
Did you like this post? You can find a step-by-step video on a similar dress along with more guides and pattern on my Patreon. Join me there to help me make more tutorials!
I have been reading up on 15-16th century medieval Europe, including art and clothing, for some years now and haven’t really been into the 14th century for a while; I even sold of my Moy Bog gown and some other dresses. But then my friend J told me she wanted to brick stitch embroider a couple of purses, and I could have one in exchange for a minor handcraft effort (at least I thought so- I’m not really into embroidery…) and then I would need a fitting dress to that… And in almost no time I had this one finished, a hand-stitched cotehardie made of thin wool twill, with silk lining, silk lacing at the front and short sleeves.
The dress is for the higher classes, and in pictures from the late 14th century, it is worn with a kirtle underneath (a tight-fitting dress often with buttoned sleeves). Then it seems like the dress remains in the beginning of the 15th century, and is worn as a kirtle/middle dress with loose sleeves for a more fashionable look. After that, the dress seems to change a bit into the waist seam dresses (like my blue Weyden dress). This kind of dresses is very common in contemporary art and you can see them in different countries, with long or short sleeves, a laced front or a hidden side lacing, and with buttons or lacing at the sleeves.
If you would like to make a dress like this for yourself, search late 14th and early 15th art sources (I have some at my reading tips) or look at my Pinterest board about cotehardies.
Here are my best tips for making the dress fit nicely:
Fit the sleeves in carefully, they should be snug around the arm for both good movement and the right look.
Make the lacing holes 1,5-2 cm from each other, no more, to make sure the lacing will not show the shift underneath.
Use a lining inside the dress to make it more supportive for the bust, to add shape and draping to the skirt. If you have a tight fabric budget; just line the upper body.
Try the dress on often during your work with it, and make the lacing before hemming and neckline. Also, you may fit in the dress at the end for that perfect look by leaving the side seams open until last. These are also good to leave open (just back stitch them and secure the selvedges if necessary by zigzag or whip stitches) for adjusting shape, support or weight loss/gain in an easy and fast way.
In these photos, it is worn with loose silk brocade sleeves, but I’m planning on making a kirtle for it with long sleeves to wear under. On the head, I wear my hair in temple braids, and then a silk tablet woven hairband. The veil is pinned down to that, and then I have a woollen hood for warmth. The gloves are modern and just for warmth, it was really chilly to go out with just one dress.
This was the first event trying it out, and after that, I have been adjusting the dress a bit. Inside lining; the silk fabric getting snowy outside.
Hairband, pins and veil.
Historical accurate? The model is quite common for the late 14th and early 15th century, and the silhouette of the period is a rather straight and smooth one, which I have tried to achieve by making the dress a bit loosely fitted around the waist and hip area, in order to get the lean look of the time (I am built a bit too curvy for the 14th c ideal). The woollen twill fabric with its blue colour is representative for the periods upper class, blue is a common colour in women´s clothing during the medieval period, and the twill weave is fine and good looking. Dresses showed in period art often has a contrasting coloured lining, but it seems that this was most often in wool, linen or mixed fibre fabric, while silk blends seem to be more common during the 16th century. For a more historical dress, I would have lined the dress in very thin wool or made the whole dress out of silk. The pink, hand woven silk was chosen for its cheap price (1/3 of a wool fabric of the same weight), its look and the lightness of the fabric, making the dress comfortable and not hot at all.
This is the final layer I made for my wedding outfit, it is a silk velvet dress inspired by the late 15th century over dresses. The gown is open at the front to allow for easy undressing, and to show more of the white dress underneath. This can be seen in paintings, though a closed gown would have been more common.
This was one of the most difficult garments I have ever made. The fabric is a silk velvet, sensitive, very thin and extremely flimsy; I so understand why silk velvet has been replaced by synthetic alternatives on the market (and it is not just a matter of price). The gown is fully lined with silk dupioni for support and look, and has linings in black silk taffeta and on the bottom, the same black high quality wool as in my love’s joined hose. I opted for the golden coloured silk because it did so well under the velvet, and made the velvet shine even more. if using a transparent velvet; try out different shades of lining fabric to find the one that gives you the look you want.
The gown closes with a small hook and eye at the waist, and then this belt is added. The bronze buckle and strap end is made after a painting from the period, and can be seen on houppelandes and similar overdresses from the period.
Working with the fabric. Here you can see the silk lining being laid out at the velvet to act as a pattern piece. The velvet was very sensitive, so pinning was only an option in seam allowances.
The fabric being so thin and flimsy, pinning it to the sturdier silk lining was a good help for cutting, basting and sewing. I treated the two layers as if they were one when sewing, making the seam allowances visible on the inside of the dress. Since the velvet is transparent where the pattern is, it was not an option to have the seams between the both fabric layers.
Front and back pieces of the body being laid out. With a patterned fabric, you might want to consider where to put your pieces, and in what direction. I let the two front pieces have the pattern laid out in the same direction, and then turned the back piece upside down, since the skirt would have the pattern visible in the same direction at the back of the gown. The two fronts doesn’t have to be similar in pattern, all contemporary art depicts uneven patterns on the front of dresses.
You may also note that the front lining pieces have the selvage running along the openings, since the velvet was stretchy, and silk stretch when cut on bias, I laid the pieces out diagonally on the silk fabric to have a non stretchy front, and instead add some flexibility across the body. This way, there is some small movement allowed over the rib cage, while the front lays flat against the body.
I sewed the gown together on the overlock machine, this was one of my best choices ever since the seam both helped with protecting the seam allowance and allowed for some stretchiness in the skirt. After the gown was put together, I hang it on my doll to let the skirts fall out. Fabric cut circular like in this case always seems to hang out unevenly…
And yes it did! I ended up cutting away between 10-15 cm in some places, but only 2 in the areas running along the fabric length. I was quite nervous- cutting a little each time and allowing for the fabric to adjust. There was some massive pinning and measuring and swearing going on at this part and frankly, I just forgot to take pictures because I was so frustrated. Here you can see the velvet skirts hanging out, the silk lining behaving all nicely and staying in shape.
After this, I worked with the hems and inside seams by hand. All the seam allowances were folded down, basted to the lining and then covered by a strip of silk fabric, whip stitched down. No ironing though; velvet does not go along with pressing so the seams were just smoothed out by hand. The front opening and the sleeves were lined with black silk taffeta, the same as love’s doublet were edged with.
The bottom needed a little more heavy lining, and I wanted something that could take some more wear than silk so I chose a thin wool tabby weave. Here it is, laying on the floor.
One of the seams, seen from the outside when finished of. The whip stitches securing the strip inside is not visible on the outside velvet, neither is the machine seam that holds it together.
I am very pleased with the dress, I really plan on using it in the future on events. It was not easy to make, but hopefully some of my experience shared with you will make you want to try one for yourself if you wish!
This was a very spontaneous project with no customer commissioning it, and not for my own wardrobe either. I just wanted to try out how the velvet would work in a full circular houppelande (late medieval over dress) and experiment a bit with pattern construction, seam techniques and silk fabric. I am actually very satisfied with the result; for a cotton velvet the fabric is in a nice quality and with a good drape, the pattern turned out very well, and the silk lining in the sleeves add that extra touch I wanted.
The materials in the dress is cotton velvet (black) viscose/rayon velvet (moss-green) and silk (sleeve lining) with a total of about ten meters for the whole dress. The cotton velvet is really affordable comparing to silk velvet, and is very easily maintained; I actually just put it in a washing machine, air dried it and it came out as new; no shrinkage, no creasing and no sad silk velvet after water washing… If you want to learn more about velvet fabrics, I have a guide about the subject under “tutorials”.
I finished the dress during our brewer’s guild meeting in early December, and would usually iron the silk lining first before wearing it, but it was such a good opportunity to take good photos in gear so the sleeve lining is a bit bulky still. But soon to be fixed!
The skirts are really full; the pattern is based on a circle and the houppelande is also called a full circular houppelande. Lots and lots of fabric.
I have some tutorials about making your own houppelande if you are interested (and also makes them on order by your measures). To make them dramatic, historical and with this massive draping of skirts, it does take more meters of fabric and patience than difficult sewing techniques…
I fell in love with the colour combo of black, moss-green and bright grass-green in the dress. Under is my late 14th century dress, going historical there shouldn’t be a visible lacing underneath this kind of over dress. The gloves are also modern, but was so very nice to avoid freezing my fingers of.
Last year I made a woolen dress, based on the cut, sewing technics and seams from the finds from Herjolfnes, Greenland. I really didn’t plan it, I just had this sudden burst of creativity and had to make a plain, undyed working dress… The fabric is from Medeltidsmode, and it is an undyed natural wool that was just lovely to work with, the seams went very well, and the drape of the shirt is really good to. It is based on two different models, but with my measures- so it is a historical reconstruction with a practical use in mind.
Cutting out the pieces
And sewing them together with running stitches in wool thread
Sewing gores from the right side of the dress, with a whip stitch
The hems are made by a single fold, whip stitched and then sewed with another seam according to the finds. To finish of the hems two times was a bit tiring, but the result went very well, with especially the neckline and wrist coming out nice and stable for wear.
All inside seams are felled and whip stitched down, to make them more durable and the inside smooth and pretty.
There are several gores in the dress, both in the shirt and in the sides, that goes up to the arm holes. This gives the dress lots of hem line, as well as a nice drape. If you would like to make a dress more modern flattering, you could begin the width in the side seams by the waist. My dress is lose almost under the bust, which makes for a warm dress, that is easy to get in and out of, and probably good for medieval pregnancy if you are interested in trying that out…
The dress is so comfy, and despite a rather smooth fit over arms and shoulders it is easy to move in it.
On these photos I have rolled up my sleeves a bit and you can see the linen shift, a good way of keeping your sleeves dry when doing dishes.
Definitly one of my favourite dresses right now, it being so simple and yet pretty!
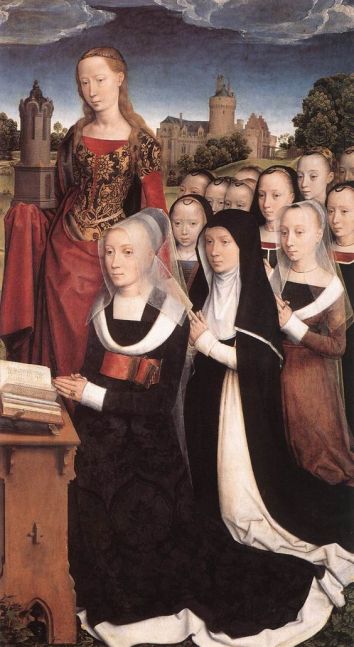
The last 1- 1 1/2 year the 15 century has been one of my main interests. It is a really interesting period in history, with lots of changes in both politics, society and how trade, money and people moved. My main interest has been the clothing in middle Europe, around what is today Germany, Belgium and the Netherlands (more or less, influences and fashions spread and you can see similar styles in areas boarding to these ones).
From these areas came several great artists, there are lots of paintings and artistic work left, and Scandinavia were greatly inspired by the clothing and fashion movements from the German area.
To both challenge and inspire myself I decided to make a Golden Egg challenge on the topic of 15th century clothing. The Golden Egg is a household in the SCA; you can read more about it here. My goal is now to research and make a whole outfit from the late 15th century for myself, and the timeline is one year between start and presentation.
I wanted to share some of my research, as well as some good sources for you to read for yourself. My main interest is the clothing for women, but you will find lots of good inspiration for men’s fashion as well.
Some important points to remember when studying 15 c fashion (or any historical fashion really) is:
The diversity of the period. Fashion shifted over a certain time, and during the 15th c it shifted quite fast. It also differed over areas (such as towns, countries) as well as social classes. It is not possible to sum up the period by stating “a women wore this and this, in such a way” but some things are similar, like wearing a linen shift, middle kirtle and over dress of some kind. How these looked, what materials they were made in and how you wore them differed greatly, as did the accessories.
The art and paintings of the period is a really good source, since there’s a lot of them, and the fashion of art suggested a natural, realistic reproduction of the people living during that period, with lots of details regarding seams, models, fashion and materials. This was also the period when portraits became popular for others than the nobility, with the ever-increasing burgher class economy as a base for portraits. This give us a source of good depictions of people of the time, and also gives a good clue on what kind of clothing and headwear was in fashion. It is important to note that there also were sumptuary laws regarding what you could wear, and how you were to be portrayed according to your status in society, making the understanding of art and symbolic meanings very important.
Religious art was also very important, and great artworks were often the result of a whole workshop with different painters, studies and sketches from different areas and periods, as well as saints depicted with biblical clothing and symbolic tokens. This means that you can find different styles in one and the same painting, both considering fashion and the style of the artist, even though the master overlooked the work on each artwork. It also means that flowing robes and cloaks that appear might not be the fashionable items like the gowns and doublets right beside them, but more some kind of biblical clothing.
Colours, technics and styles regarding painting developed greatly during this century, with the use of different mineral sources etc as a way of getting vibrant, expensive and fashionable colours. But this does not mean that the colour tone on a painting was the same as the depicted garment from sketches and models; the colour was foremost the result of the client’s budget, where vibrant reds, dark blues and golden inlays were important for the fashionable and rich client. Does this mean that paintings can’t be the source for fashion studies? No, of course you can look at art for getting an idea of the clothing of the time. Just keep in mind that the colour that you see on your computer screen is the result of both a computer screen setting, the photography of the painting (with editing) how well the painting has withstood time (mineral paint tend to change over time) as well as the idea of what a really expensive colour looked like in art versus fashion.
Artists of the time was more handcrafters and less artists in our modern use of the word. They trained for masters, belonged to workshops and worked with paintings as a team, not as one expressive personality. The money came from churches, rich nobility and the burgher class who commissioned art pieces (or bought ready-made pieces) such as piety paintings, portraits and, later on, everyday scenes from their home. This means that art was the result of society, fashion, study and individuals, greatly inspired by the ongoing social development as well as other painters. Of course there were room for personal style; compare Rogier van der Weyden to Durer and you will find style differences, even if you are not a trained art historian.
The artist had knowledge about the fact that fashion shifts; and that what was worn everyday when the paintings was made, was not the clothes of the time depicted in them. So in a painting of Christ’s birth; you can se both people dressed in the high of 1470’s fashion, as well as mythical and religious figures dressed in cloaks and robes that were meant to be seen as “some kind of long time ago clothing”. This might be pretty obvious, but to make it a bit trickier there is also paintings with 14th century fashions depicted (in a rather loose style) in 15th century paintings.
Dress for your age; as for society today, people tend to dress after their age, with the young girls and women of that time preferring high fashion dresses, loose hairstyles or flowing hair for the unmarried (or soon to be crowned queens) while older women seems to be more covered, with additional layers and more elaborate veils. Older women can also be seen in “unfashionable” garments; what was the thing 10-20 years ago at their prime seems to hang along.
Having this in mind, you can clearly se that if you aim to make an outfit as historical accurate as possible (…possible for your means, skill etc) an important start is to choose a certain time and period. The social standing is also important, so a good starting point could be a woman from south Germany (or a city of your choice) from the wealthy burgher class, who lived during 1450-1470.
I have chosen to focus on the area of Germany, the Netherlands and the Flemish region. This because there were some great artists living there that I want to study further, but I also enjoy the fashion of that area and how the geographic areas and countries influenced each other. If you compare this areas to (for example) Italy or France, you will find that both style in art and fashion differs greatly.
Another thing to consider, is to search for sources besides art; like finds, surviving clothing items, sketches, written documentation etc. This will give a depth for your understanding of the period, where the beauty ideals and painting technique might touch up certain details to the point of it being difficult to interpret (like, how did all the women have those small round breasts sitting high up on the body?)
These are some important painters and artists from the German/Netherland/Flemish (Belgium)/Burgundy region during the century that I have chosen to study in more detail:
(About the dating: Sometimes it is difficult to find the year of birth/death for individuals, so the dating in uncertain, but it will provide with a overview of when they lived and were active)
Limbourg brothers (1385-1416) Germany
Hubert van Eyck (1366-1426) Flemish
Jan van Eyck (1395-1441) Netherlands
Rogier van der Weyden (1399-1464) Netherlands
Petrus Christus (1410-1476) Netherlands
Hugo van der Goes (1440-1483) Netherlands
Hans Memling (1430-1494) Netherlands
Hieronymus Bosch (1450-1504) Netherlands
Gerard David (1460-1523) Netherlands
Hans Holbein the Elder (1460-1524) Germany
Albrecht Durer (1471-1528) Germany
If you are interested in this period and want to learn more about the art, there’s some good books about different artists, and this really good (and free) article at Wikipedia about the subject.
I have also studied books on different artists, the Prestels “Masters of Art” series have been very interesting. There you can find both Van Eyck, Durer and many more.
Want to see more artwork from the time? Check out my Pinterest folder!
More sleeves! If you have checked my “Pin on sleeves” tutorial, you will find some likeness with this garment, but I wanted to some nice tips when doing these ones. First some inspiration:
I started by drafting the sleeves from the pin-on pattern; the same as I used for my golden sleeves below (laying under them, you can see my original sleeve pattern for comparison)
First, I have tried out two kinds of sleeves that are tied at the arms; my wedding dress and lately, my 15th century Italian silk dress. The difference between these two sleeves is that my wedding dress is just opened at the seam in the arm and then closes with strings, while my green/black sleeves are cut out to make the chemise even more visible. Also, the green sleeves are tied at the shoulders and therefore loose; I can change them for others at any time. The wedding dress is sewn together, the sleeves sewn after the sleeve tutorial I have on my blog.
Here you can see the wedding dress, the sleeves are quite straight, and the chemise is puffing out between the laces. When making these sleeves, you just sew a regular S-sleeve but leave it open above the elbow. Hem the edges, and make lacing holes and sew on laces on the edges. These ends with a pearl decorated cuff, but a regular sleeve will do fine.
The green sleeves look like this when cut out:
I started with my basic loose sleeve pattern in scrap fabric, pinned it on my arm and tried out where the gaps with chemise sleeves visible should be, then I cut away the excess fabric, and here you can see the result. The sleeves are in pure silk fabric, and I wanted to make them reversible to be able to choose between green or black ones for my dress. So I cut out two identical pieces of fabric for each arm, here you can see the black sides. Remember to make them mirrored, one for each arm.
I then pinned the fabrics together and marked out where the ties were going to be. Here you can see both layers of fabric.
I decided to sew them on the sewing machine since they are going to be turned inside out afterwards, so the seams would not be visible. But if you like; just follow the steps but sew them with runningstitches or backstitches instead.
To make it easier; sew the ribbons at the same time as you sew the sleeves together. I cut out the silk ribbons (40-50 cm each) and then pinned them by the seam allowance around the sleeves, on the inside between the two fabrics.
And sew around the sleeves. Leave an opening for turning them; I left the wrist open. Here you can see the silk ribbons in the seam allowance, just make sure they don’t slip away or get under a seam when sewing.
All done! Trim the edges by cutting away tips and seam allowances at the corners, turn the sleeves inside out and iron them flat. Since I want them to be reversible, I will make sure the two layers of silk fabric lays smooth and even edge to edge around the garment so the black won’t be visible when turning the green out, and vice versa.
Now it is time for some hand sewing; start by making lacing holes for the ribbons. I make them with a sharp awl, and whipstitch them with buttonhole silk thread.
After that, fold the fabric edges at the wrist to the inside of the sleeves, and sew that side closed with small whipstitches by the edges. If you use fake silk ribbons, you may burn the edges carefully to make them melt and not thread. If using pure silk, you will have to sew the edges or finish them in some kind of way. I folded mine twice and sewed them down with whip stitches and a thin silk thread (for sewing machines). This part took the most time on the sleeves, with the making of the sleeves on around two hours and the ribbon hemming around 2,5 hours. I failed to photograph this part, apparently, there was some movie time on the sofa instead. But this is what it looks like when done:
The silk ribbon has two lengths and these are pulled through the hole and then knotted. Either a simple knotted loop like this or a regular bow can be seen on art. At the shoulders, the sleeves are attached to the dress by similar holes and ribbons, three on each shoulder.
And finally, some good advice when making silk sleeves:
Silk often needs to be lined to get that really good look, chose a thin fabric in silk, cotton or linen or a mix of these to get a historical lining which also works great.
Silk is not a stretchy material, so make your silk sleeves a bit larger than your woollen ones.
Try them on while working to be sure you get the look you want.
Straight sleeves lay more flatly on your arm (white dress), while cut out sleeves gives more volume, pick the model that fits your project.
Underwear in linen – you can always use another one. Here is an easy and basic tutorial about how to make your own. I use prewashed white or natural linen fabric, about 150 cm in width. You need about 2 meters for a shift for size small to medium. If you are tall, take another 50-60 cm. If you need a bigger size or want the shift to be long and full, take 3 meters of fabric (or draw out the pattern pieces on paper first.)
Early morning in only my linen shift. This also has a gore in the middle, to make that- check out my tutorial on how to put in a gore in your dress.
Before you start:
Soak the fabric in water for a couple of hours, then prewash in 40-60 degrees C. Zigzaging the edges before washing will prevent fraying. Hang dry linen, and iron it on high heat after it is dry. Now you are ready to sew, without having to worry about the garment shrinking during washing.
Take your measures:
Length of shift/shirt + 3 cm seam allowance (SA).
Width of shift (around your chest or your widest part of your upper body) + 6 % for movement.
Width of armholes + some cm for movement. Compare with a modern shirt that fits you.
Length of the arm, from shoulder to wrist.
After measuring yourself; draw out the pieces you need on paper with the measurements you got. This is my layout with pattern pieces; front, back, two sleeves, two sleeve gussets, two side gores (one is split in two). Add seam allowance (SA) 1-1,5 cm on each side, 2 cm at hems (sleeve wrist, neck-line, bottom hem).
Adjustments:
I cut out my neckline at once, but you can start with a narrow neck-hole of around 18 cm width, sew your shift together and then try it on to adjust the neckline to your taste. Note that I also cut out my armholes on the body pieces; around 4-6 cm on the shoulders and then in a straight line down. This makes the shift lay better on my shoulders.
Draw the pieces on fabric:
When everything has been drafted on paper with measurement+ SA added, it is easier to transfer it all to the fabric. Draft the pieces out on your linen, starting with front and back pieces, sleeves, then side gores and sleeve gussets (if you want any). I draft my side gores around 40-60 cm wide but use the fabric you have and adjust to your size (xs-small=minimum 40 cm, medium=min 50 cm, large= min 60 cm etc.)
If you are going to sew everything on the machine, start with a zig-zag or serger around all fabric edges. This is important so the fabric wont fray and fall apart when wearing and washing.
If you sew your shift by hand, start with assembling the pieces, and then finish off the edges. Backstitches for assembling, and whipstitch down SA and double folded edges are durable and historically accurate.
Sewing:
After this, it is time to sew the pieces together. Start with the sleeves + sleeve gussets and then assemble the split side-gore. Next step is to sew the side-gores to the sides of the front piece. I always pin the pieces first, on a flat surface.
Sew the pieces together, and press the SA to each side with an iron, or by hand. Repeat these step after every seam, and it will be easier to sew the crossing seams nicely and make the seams look better.
Sew the shoulders together. When these are done, lay the garment out on a flat surface, with the right side up, and put the sleeves on top of the garment right side down and pin the sleeves to the armholes. (You don’t need to do a fitted sleeve on this item, just sew the sleeves in place as a regular flat seam.) The middle of the sleeve should meet the shoulder seam, continue to sew along the sleeve until you reach the gusset, sew this in place but leave 1 cm open at the edge.
Pin the side seams and sleeves together. I start sewing from the wrist, along the sleeve to the start of the gusset. Then I sew the gusset in place from the sleeve to the armhole, fasten the thread, change directions and sew the gusset to the armhole and down towards the side gussets.
When sewing the area around the sleeve gussets you might find it a bit bulky. Don’t be afraid to finish your seam, cut the threads and then change direction or the way the fabric run on the machine (or in your hand). Pinning or basting before sewing is also a great help. Remember your SA on the gusset; leave 1-1,5 cm open at the edges of the seams to make it fit. Make it as easy as possible for you at every step and you will find it much more fun!
When your garment is assembled, try it on to adjust the neckline and the length of the sleeves if necessary, and then finish the hems by hand. The easiest way to do this in a historical way, is to fold the hemline twice and whip stitch it down (this will keep the fabric from fraying, or hide your zig zag stitch). I use waxed linen thread in the same tone as the fabric, which makes for a descreet seam.
Good luck sewing!
Check out my shirt tutorial for help on how to sew a linen garment by hand.


")

")


")


")