

Welcome to this step-by-step tutorial, perfect for beginners. It might seem long, but explains everything you need to know. Follow it as you go, or look up the section where you might need extra guidance.
This is a great project to begin with! Easy, straight forward and the fabric won’t be too expensive.
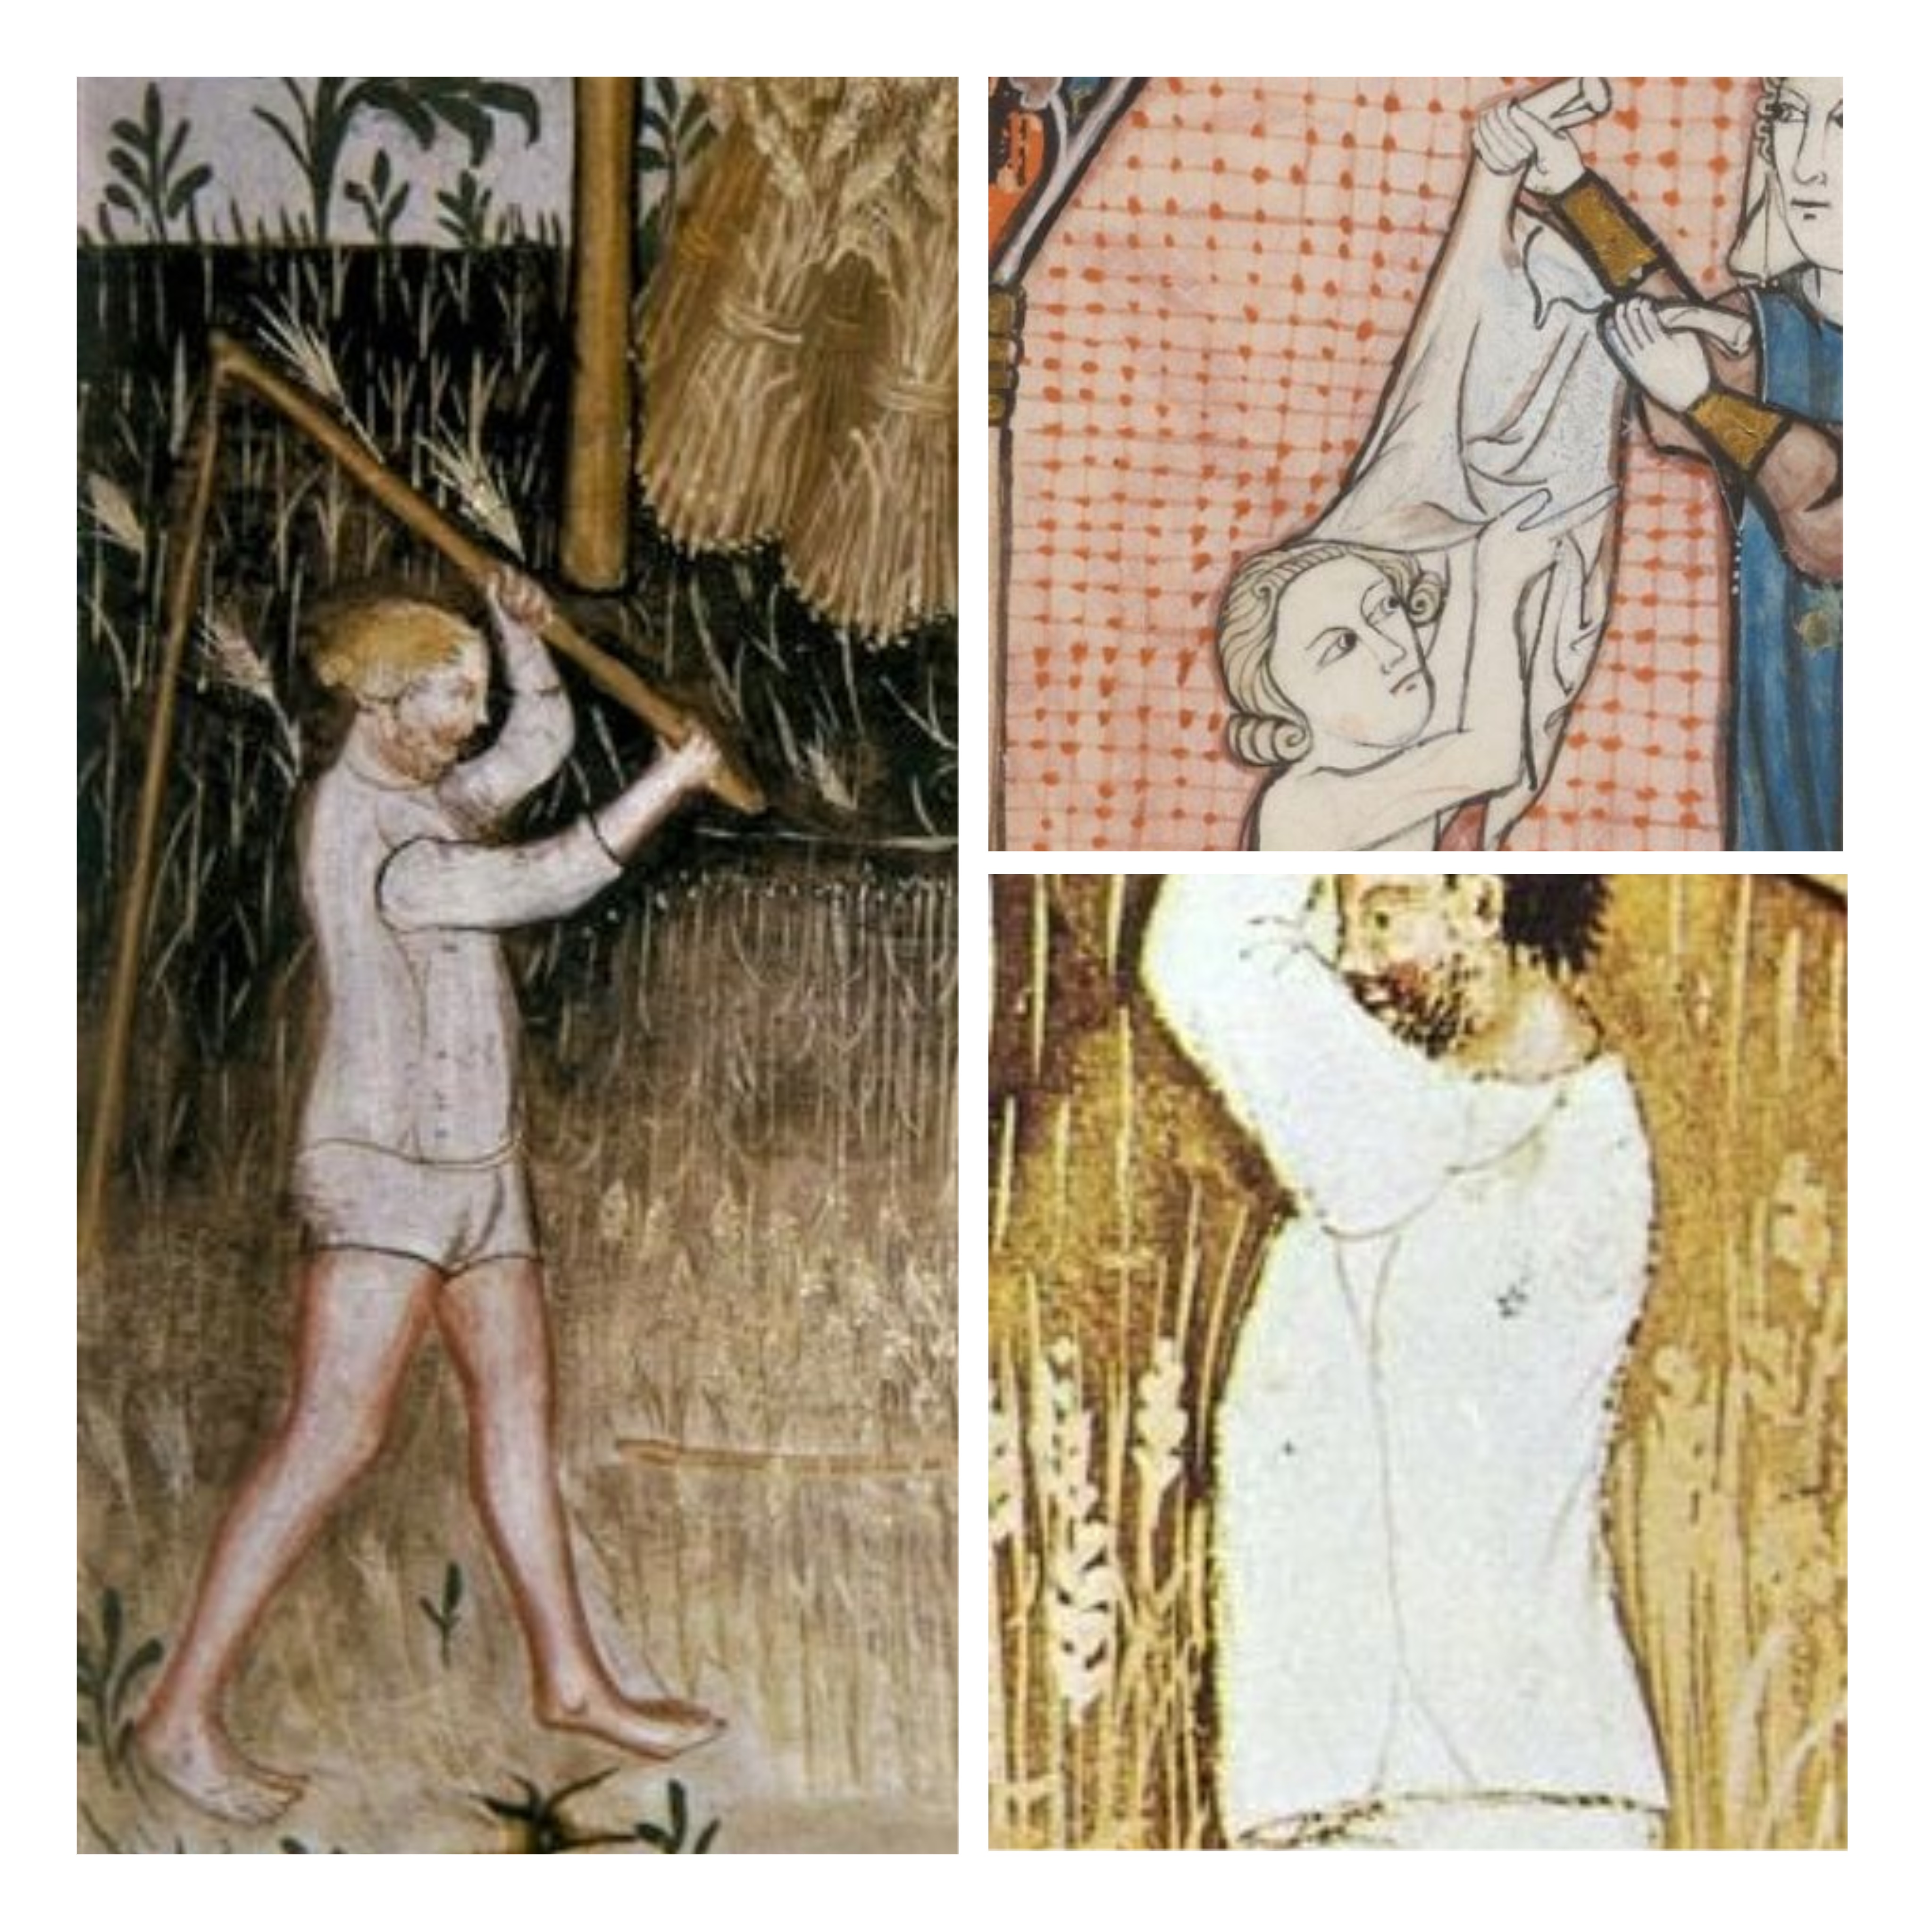
Most people wore linen underwear during the medieval period, and a man’s kit was made up of breeches or a type of loincloth, and the shirt. While you are at it; make two shirts! It is really nice to be able to change and wash your clothes during longer events, and a pleasantly smelling shirt will make it easier to make new friends…
Buying fabric:
The amount of fabric you need depends on your size and the width of the fabric. This example will use cloth 150 cm wide. To decide how much you need to buy, calculate the measures on your pieces and how much fabric you need for those, then add another 10% minimum to allow for shrinking or uneven edges. (Fast tip: just buy 2 meters up to XL, a bit more if you have a larger size. Extra fabric may always be used for other projects.)
Look for linen fabric of 120-180 gram, I prefer a thin and even weave. (That is more historical and comfortable than a coarse and lumpy weave.) Bleached or unbleached linen, according to the status you would like to aim at. Bleached linen was a bit more expensive, but don’t go for the super-white ones in modern stores.

Preparing the fabric:
Zigzag the raw edges to prevent them from fraying while washing, or buy a bit of extra fabric if you don’t want to bother with machine work.
Pre-soak, wash and iron your fabric before starting to cut and sew your shirt. Washing will avoid future shrinkage, make the weave even and remove any pesticides. Pre-soaking the fabric will lessen the wrinkles and make it easier to iron. 40-60 degrees c machine washing, hang dry.
Things you will need:
Needle, linen thread, beeswax, scissor, measuring tape and something to mark your fabric with (fabric chalks or just a pencil). A ruler or straight piece to draw against is nice, but not necessary.

Measure:
- 1. Lenght of finished shirt from shoulder to hemline.
- 2. Circumference around the widest part of your upper body, often the chest.
- 3. Length of sleeve from shoulder to wrist.
- 4. Circumference around your hand/wrist (make a loop with the measuring tape, and try to pull your hand through it, it should be big enough to be easy, in order for you to be able to take the shirt off.)
- 5. Armhole (measure around your should/arm as the picture shows, then make the measuring tape into a loose circle, and when you find it comfortable-check the measurement.) I usually add about 25% extra from my body measure, from 40 cm body measure to making the sleeve hole 50 cm.

Example (with measures) so you can see how I do this:
- 1. Lenght of finished shirt from shoulder to hemline: 100 cm
- 2. Circumference around the widest part of your upper body, often the chest: 100 cm.
- 3. Length of sleeve from shoulder to wrist: 70 cm
- 4. Circumference around your hand/wrist: 28 cm
- 5. Armhole: 60 cm. This means the sleeve base will be 60 cm, and the armhole on the body parts will be 30 cm on front and 30 on back.
Add ease of movement:
What is that? If you were going to cut out your pieces with the above measures, the shirt would fit tight along your skin, making it impossible to move, or take it on and off. Therefore, we will add extra space for movement. I usually calculate 6% of the circumference around your body, 10% if I want a loose fit.
Example: 100 cm + 6 cm (6% of 100 cm) =106 cm. Split this measure in 2 for front and back: 53 cm each.
That’s it! (we already added ease into the sleeve by making sure we could pull the hand through, and the sleeve base by adding extra room there)
Add seam allowance:
What is that? Seams always need to be a bit from the edge of the fabric in order to be durable. The space between seam and fabric edge= seam allowance. Short= SA. I will add 1 cm, between 1-2 cm is recommended.
Example: Add 1 cm to all edges around your pieces, like this:

Seam allowance can be added directly in your calculating and drafting the pieces, to paper pattern pieces, or drafted on the fabric outside the pattern. We use the first method here.
Example:
- 1. Lenght of finished shirt: 100 + 2 cm SA= 102 cm (I like to add another 1 cm to hems; so 103 cm)
- 2. Circumference around chest: 100 + 6 cm movement + 2 cm SA= 108 cm
- 3. Length of sleeve from shoulder to wrist: 70 + 2cm SA= 72 cm
- 4. Circumference around your hand/wrist: 28 + 2 cm SA= 30 cm
- 5. Armhole: 60 + 2 cm SA = 62 cm sleeve base. Armholes: still 30 cm *2.
Draft your measures into a pattern:
Now you are ready to draft your pieces! I like to do this on paper first, to save as a reference, for future projects, and to determine how to save on fabric. I draw my piece of fabric onto paper, making 10 cm=1 square:

Nr. 1 is the front and back pieces, nr. 2 sleeves. As you can see; if you would like to have side gores instead of slits in your shirt, nr. 3 would be excellent to use. This is just an example, do a draft with your measures and lay out the pieces in a way that suits you.
I recommend drafting the front, back and side gores either along or across the length of the fabric (do all these in the same direction) the sleeve may go along or across, depending on what is more convenient (the shirt will look better with this method).
A note on sleeve measures: this sleeve doesn’t sit on top of the shoulder when finished, it hangs on your upper arm (see photo at the beginning), which makes this measuring method work. When measuring for a fitted sleeve, always measure around your bent elbow.
Design your neckhole:
These are my general measures: small-medium: 1 = 18 cm. large-xlarge: 1= 20 cm. The back I cut out around 5-6 cm deep, the front (2) is cut 10-15 cm deep. If I want a slit at the front (3) I cut it around another 10 cm deep. If you don’t want a slit, you might need to make the neck opening a bit deeper/wider in order to fit your head. You can always draw it out, cut a little, try it on, draw a bit more, cut and so on, until you are satisfied with the look.
Shape your armholes:
If you feel that the shoulders are a bit wide, you may shape the armholes a bit (common if you have a large chest but narrow shoulders). Cut 4 cm (small/medium) to 6 cm (large/xl) from the shoulder top (4) and create a gentle curve to the armpit, or draw a straight line from the top (4) to the armpit (see photo further below). Then sew the sleeves as described. The seam should still be hanging slightly below your shoulder, not at the top of it.

Cut out the pieces:
When you have drafted all your pieces on paper as above, you are ready to draft them onto your fabric! Iron the fabric and lay it down on a flat surface, draft all your pieces and check the measures with a measuring tape. Use a piece of chalk suitable for fabric, or if you don’t have that; a pencil. A ruler, a large book or a straight stick can be used to make the lines even. Everything seems good? Cut the fabric pieces out! (you may also want to mark them Front, Back, Sleeves if you are unsure.)
Sewing time!
The order of sewing is as following, I will walk you through every step below: shoulder seams if any, sleeves to shoulders, side gores if any, sew together sleeves and sides. Adjusting neck-hole, adjusting sleeve length to your wrist, hemming.
1. Start with pinning the shoulder seams. Putting in pins alongside the fabric edge makes it easier to avoid stabbing yourself when handling the project.
2. Cut a piece of linen thread, the length of your arm. Coat it with bee´s vax by pulling the thread over the vax piece a couple of times. Thread a needle (the needle should be as small as possible, but thicker than the thread to make it easy to sew), and make a knot at the other end.

3. Sew the shoulder seams with backstitches. 3 stitches/cm is a good guide, and 10-15 mm seam allowance depending on what you drafted on your pattern. If you find it difficult to make the seam straight, draw a thin line with a pencil where you want it to be.

4. Press the seam allowances to either side. Use your fingernail, a pressing tool or ironing. Fold the seam allowances double, and pin down.

5. Use running stitches (or whip stitches) to sew the folded edge down to the shirt. The stitching should only be visible at the right side as small dots.


6. Try out the neck hole by pulling it over your head. Cut out more if you need, and check in the mirror to see if you like the look. When you are satisfied, hem the neck opening. Start with folding the edge twice and pin it in place. Make the folds as narrow as possible, to make it easier to sew nicely, mine is 5 mm. Sew the edge down with whip stitches.

7. Pin one sleeve to the armhole of the shirt, right side against right side (this photo show a shaped armhole). Sew it in place, using running stitches or back stitches. Pin and sew the other sleeve in place. Press the seam allowance to either side.
8. Now we are going to save some time with a folded over seam allowance! (photos below in 10.) Trim one side of the seam allowance down to approx half-width (5-6 mm) and then fold the larger one over this, press in place. To avoid fraying and loose threads, fold in the edge of the fabric under the seam allowance. Press down, and pin in place. Now you have a neat looking fold, ready to be fastened down. When sewing the seam allowance down like this, you save time and make the seam more durable since the fabrics will be sewn twice to each other. I prefer whip stitching for this seam, it is easy and durable.
Which way should you press the folded over seam allowance? I often go for pressing and sewing down to the biggest fabric piece. So for the sleeve seam, the seam allowance will be pressed down onto the body parts. On side gores, the gores will be pressed out onto the body piece. It makes it easier to sew and gives the garment a nice drape.

9. Time to sew the side seams and sleeves! Lay the shirt down inside out on a flat space, and pin the side seams and sleeves. Make sure the fabric is smooth and the edges lays on top of each other. Mark where you want the seam to be if needed, and then sew from the sleeve wrist, all the way down the side seam. I like to leave the bottom 10-20 cm open on the side seams to create a slit in the shirt, if I don’t have side gores. Backstitching will make the seam durable, but if you are in a hurry a running stitch with some backstitching in the armhole will also suffice.

10. Finish of the side seams by pressing the seam allowance flat, and make a folded over seam allowance. Press, pin and sew this down.

11. Now it is time to fold the edges and sew them down. On linen fabric, I like to make a double fold to avoid fraying threads from the fabric edges. Start with the hem around the bottom of the shirt. Fold two times, around 0,5 cm each (or the SA you choose), and press the fabric in place with an iron or your nail. Sew with whipstitching, travelling on the inside of the shirt, which will make small dots of threads visible on the right side of the shirt.

After that, finish the sleeves in the same way. I like to try the shirt on before hemming, to be able to adjust the sleeve length. If they are a little too long, just create a deeper fold, or cut off the extra fabric. If you have made them too short you can sew on another piece of fabric and make a hem on that one. Piecing is always historical.
How to fasten the thread:
When there is about 10 cm thread left (approx the width of your palm), it is time to fasten the thread and take a new one. Sew another stitch, pass through that loop before pulling tight, and repeat at the same place a couple of times. Then you can pull the rest of the thread down into the fabric before snipping off the leftover, hiding the thread inside the seam. Neat! Take another thread, prepare, and start sewing at the same place you stopped.
Uhm, this is a lot of steps for a simple shirt? Yes, it is. Can you cut the corners, get a bottle of beer and sew it all on the sofa? Of course you can, but each step may not be as easy, and it will be harder to have a nice view of the process. What I mean is- this is just my way of describing the process as easy as possible for you, to allow a handcrafting process where each step is straightforward, and where the sewing will be as fast as possible to do.
General advice:
- Always pin on a flat space to make sure your seams will be even.
- Be nice to yourself; sit comfortable, take lots of breaks, use tools to make your sewing easier.
- Remember to actually try out the fit, the length, the neck hole etc before finishing sewing. It is very easy to just continue sewing once in a flow, but if you end up with a garment you don’t like, you will have to redo lots of work.
- Is the measuring a bit off? No worries; in this project, a 1-2 cm difference will not matter. You can probably go on sewing. I sometimes have wonky measures. Medieval finds are full of uneven pieces, wobbly seams or piercings. Don’t worry!
Other types of shirt models:
Shirt with side gores: adding side gores is easy, and give you extra movement on a longer shirt. Sew them in place before sewing the side seams closed. Use the same stitches and folded over seam allowance as above.
Shirt with sleeve gussets: small square pieces of fabrics get stitched in under the arm, to add more movement and to save on fabric instead of making larger sleeves. I usually sew these after the sleeve, while sewing the sleeve and side seams closed.

That’s it on shirt sewing. These techniques will also do well on a number of different projects, and is somewhat of a basic go-to. Enjoy your sewing! Did you like this post? Support me on Patreon to help me make more.


 Olika folkslag; olika dräkter gör det enkelt för lajvare att spela mot varandra utan att behöver lära sig vad alla spelar utantill.


