If you know me, you know I am travelling and living my medieval/viking adventure life right now, and both blog and social media conversations are running low. If you are new- welcome here! I will not leave you bored in the middle of the event season, but have prepared some interesting posts for you to check out.
Last year at Visby; only a week left now!
The best way to reach me right now is by email. I also try to keep Instagram updated, but rarely use Facebook since it doesn’t work great on the phone. https://linktr.ee/handcraftedhistory for more ways to reach me!
If you are attending Medeltidsveckan in Visby, you can find me at Kapitelhusgården from Sunday to Sunday. The shop is open, and I also have workshops in pattern drafting and tablet weaving. These are currently fully booked, but you can check out the full schedule here: https://medeltidsveckan.se/programme/
Last years pattern drafting (sleeves)
Are you attending one of my workshops and have questions? Send me an email! The info at the program states if you need anything special (like a modern t-shirt or similar clothes on your body for the pattern making) othervise you can just stroll in with a snack and a ticket- I will bring everything else!
If you want to check out more about Medeltidsveckan I have written about past adventures here; https://handcraftedhistory.blog/?s=visby where you also find the old guide and the packing list in Swedish.
In my shop you will find lots of straw hats and felted wool hats- but be sure to come by early in the week to secure the colour/size you want. Last year they sold out. For you readers interested in straw and wool hats but not attending Medeltidsveckan- I will open up my Etsy store and start accepting commissions when I am back home and can start packing and shipping regularly again. Thank you for your patience! (Yes- I remember you who have emailed/pm/contacted me)
At Kapitelhusgården
New blog posts, patterns and research articles will be coming again this autumn- I look forward to share new and interesting stuff with you! With that said, I will continue with my packing/working/panic sewing days. Yes, I also have late projects. Yes, I will also sew on the ferry over… It is tradition, is it not?
In Sweden, the historical camping season has begun, and with that lots of clever reenactors are sitting at home, working on their packing lists and piling their things in large heaps. For your convenience and enjoyment, I have asked around after the best packing tips, clever hacks and what-not-to-forget as a beginner.
Here it is, the Ultimate Packing List! Containing everything and more, just what you need to plan your event. Just adjust after your preference and need, and print it out!
swimwear historical or modern depending on the rules
socks, and extra socks. Some more socks.
shifts/shirts
middle layers for warm days
overlayers for cold and rainy evenings
headwear that protects against the sun
Food, eating and cooking:
eating utensils: spoon, knife, pick/fork, plate, bowl, jug and glass
food storage: cloth bags, chests, plastic bags, cool bag with freezing blocks
water container to carry with you during daytime
fire maker (matches, striker etc)
towel/rags for hot kettle, table, dishes
fire extinguisher
fire pit/somewhere to make your food
tripod for your pot
firewood, coal
pot to cook in (frying pan or cauldron)
dish brush and dish soap
towel
tasty drinks
snacks
food for all your meals
trash bag or bin with a plastic bag inside for icky trash
Necessities:
toilet paper
towel
soap
hand sanitiser
plastic bags
wet wipes
your regular medicines and toiletries like toothbrush etc
menstruation pads
abrasion patches (band-aids for your feet)
Good Things to have:
power bank
extra socks
extra medicines (for cold, pains, band-aids etc)
extra blanket/sleeping bag for warmth
sunscreen
earplugs
mosquito repellent
snacks
first aid kit
cloth sacks to store things in
cloth sacks, baskets, fässing, bags to carry things in
mending/sewing bag
fluid replacement (to put in water if the event is very warm)
axe
small broom for the tent
To make the stay more enjoyable:
candles in lanterns, and/or led candles for lighting your tent in a safe way
heater for the tent + fuel for the heater
toys according to your hobby; sewing projects, swords, bow, armour etc
*Please be advised that some events have restrictions on fire and cooking or modern equipment etc so be sure to learn what rules apply to the event you want to visit!
Good luck with your packing and adventuring! I am going to pile some more “important-looking-stuff” now for my trip to DW next week.
I could call myself somewhat of a pro at living in historical tents, or more accurately, sleeping bad and freezing in historical tents… Therefore, I present to you a guide on how to choose your tent and live comfortable in that!
(This turned out to be a really long blog post- I have apparently missed talking to you. I marked all my personal thoughts and anecdotes with cursive, for easier reading)
Which period?
Different models are based on finds from different periods, so if you are going on viking adventures the Geteld or A-frame models are most often used. For medieval adventures, Getelds and Pavilions are good choices. Small shelters called “Soldier’s tents” are also often used.
When looking at websites selling tents, many will show you models that are not based on finds or pictures but called “historical” anyway. The openings could be placed in new ways, the seams made to save fabric widths or moved to be able to sew on a machine. The poles and ropes holding the tent up might be done in different ways that can not be seen in manuscripts and so on… These tents may still be good tents, but it is always good to know what you buy, and what it is based on for the future. If you are unsure about a model, ask!
A-frame tents at a viking market
What says finds and historical pictures?
Viking type tents are based on ship burials which have included a tent with a wooden frame and canvas. We don’t really know if people actually slept in these on land as well, and they probably did not bring them to different markets all summer… But what to do, when you are a modern person wanting some comfortable living?
Medieval type tents are seen in numerous manuscripts and paintings, both used by nobility and commoners. Brightly painted, large tents are used for festivities, tournaments and for avoiding that pesky sun, while small sleeping tents and shelters can be seen in military settings. A quick search gave me this board.
Round pavilions at Double Wars.
Where are you going?
Many events have lists or recommendations about what tent models are allowed on their events. Mostly, you can bring Getelds and A-frames to viking events, as well as small canvas pieces as simple roofs. To medieval events, Getelds are often allowed, as well as square, round and oval-shaped Pavilions. Materials may also be advised to be linen or wool.
Sleeping tent in the middle, and large pavilions in the background.
The event organizer will want to have as pretty a camp as possible, but at the same time, they know tents are really expensive and that guests will stay at home if their living investment is not allowed. The same is true with market tents; most of them are not strictly historical since a modern seller will need light loads to carry and transport, as well as a big enough tent to be able to bring enough products to earn a living. Not everyone can sell jewellery and candy, so some will need big, bright and roomy tents.
Other things to consider are the campgrounds; is it rocky and hard to put down tent pegs? Then an A-frame tent might be good. Is it often stormy and windy, then perhaps a smaller tent with a sturdy frame and long tent pegs is a good choice. Have you ever seen a jumping A-frame tent in a storm? I have, they can really get quite far…
Cotton, linen or wool?
Cotton is by far the most common tent canvas today since it is cheaper, lighter and easy to come by in the right thickness and waterproofing. I use cotton in my Pavilion to be able to lift the canvas pieces myself and to have a tent that is bright enough for customers to see my products, even if it is rainy outside. But oooh, my old linen pavilion was prettier!
Linen is heavier but more resistant to mold, and unbleached linen will keep your tent cooler and darker. Perfect for sleeping in, not so good if you are a market vendor selling fabrics. Linen gets bleached over time in the sun, giving the canvas a really good look.
Wool is mostly used in A-frames and a good, felted wool fabric will keep you dry, cool and comfortable in all kinds of weather. May be waterproofed with modern products, or with lanolin (wool fat) which is more historical.
Different types of fabrics; brown wool tent, white cotton tents and the unbleached linen pavilion in the background.
Consider this when choosing your model:
Packing space available (how much space do you have in your car for a tent canvas and wooden frame?)
Storing space (where will you keep the tent off season?)
How many people and how much stuff do you need to fit?
Is it important that you can put up the tent fast?
Is it important that the tent is easy to lift/carry? (consider a canvas in several pieces)
Should the door be big (welcoming/good shop) or small at one edge (more sleeping space)?
I have always been partial towards Geteld models since they are often economical, easy to transport and fast to put up and down.
With that said, after living for weeks in this model you will get really tired of the sloping walls, giving you almost no space to hang clothes for drying (except in the middle). Storing all your things around the base of the tent will save lots of space to allow you to walk around in the middle, but it will also mean you crawling around on your knees looking for things every day.
A-frame tents also seem very practical and I am slightly jealous of my friends when we are putting up camp at rocky, hard grounds. While I am sweating and swearing trying to put down the tent pegs in the ground, they simply fold their tent in place, secure the canvas by the frame and move in. I usually get my revenge when the carrying distance between car and camp is long since I can carry my poles in one go…
A-frame tents are practical, economical and if you have the storage and packing space for the frame it is a good choice. It is also considered the easiest tent to make yourself.
Pavilions often have a roof with separate walls, allowing you to open up different sections of the tent if you want the breeze to get in, or want a nice display area. Straighter walls with poles or wooden wheels mean you can place furniture along the walls, and hang clothing from the wooden frame, which is both practical and pretty. More sloping walls on the other hand might ride out storms better.
Round and square pavilions may be sensitive to hard winds and storms; during the Medieval Week in Visby you may see knocked down tents of these models, or tents laid down by choice before a storm. If the round pavilion has a sturdy roof frame, you can remove the middle pole, fold the walls and secure the roof down to the ground covering all your furniture and belongings while you wait for the storm to pass. You might not fit inside, but your tent will survive…
If you only want a sleeping place, tents called “soldier’s tent” or one-man tents might be the right choice for you. I would advise you to get a tent big enough to fit a bed inside, then you will always have a dry space, and can store your things under the bed.
Will I get wet?
A good tent will keep you dry even in heavy rains, as long as you can stay of the ground (in a folded camp bed or wooden bed for example). Also, never put clothes or bedding up close to the canvas, ideally, nothing should touch the canvas walls except the framework.
Our oval pavilions have kept out heavy rains on several occasions, with the single drop or two from a slacking corner joint between roof and wall. During one event, the rain was so heavy that small runlets formed and travelled through the tent. Everything above ground kept dry, but a turn shoe almost floated away…
Look for a tent construction that has sloping roof/walls, and a canvas that is thick, sturdy and treated with a waterproofing agent. Even so, after some years out and about the canvas may need to get additional waterproofing.
How to care for a historical tent:
Let’s start at the beginning; oil all your wooden poles upon arrival, and once a year after that (or when needed). When you put up your tent; find the right way to do so without adding unnecessary tension to the pole, canvas or ropes. The same goes for taking down the tent; do so slowly and controlled, and get some friends to help you in the beginning. Always mend loose ropes, or broken seams at once. Make sure the tent canvas is really dry before folding it away in the storage, and that it is reasonably clean since rotting mud, grass and insects may cause damage to the canvas over time. Brushing away loose bits before folding the tent is good. I also brush off the dirt from the tent pegs and ropes. The canvas should be stored in a dry space, outdoor sheds are not ideally. I can give you several examples of people having their tents destroyed by mold and rats during winter…
More tips to be comfortable in the tent:
Furniture like a bed, table and chairs (so you don’t have to sleep and sit on damp ground)
A heater for those chilly events (if you live in an area with cold nights and rains). We have a portable gasoline radiator (the same type you might have in a trailer van).
A mosquito net to drape over the bed at night
Look for opportunities to hang things inside the tent; a lantern and a rope for drying clothes make life easier.
Things to ask (or look for) when buying a tent:
What material is the canvas made of, and is it waterproof? Treated to withstand mold? Treated to slow fire down?
How much does the canvas weight? Does it come in 1 or several pieces?
How long are the frame/tent poles?
Are rope and tent pegs be included?
How should you take care of the tent?
If the tent canvas breaks, is it possible to buy additional fabric for mending?
Pricing?
Historical tents are expensive. Or at least, there is lots of money involved. The cheapest way is often to make one yourself if you have the time, space and skill. The second-hand market is also a really good choice, when people get tired of their small, practical tents and want to level up, they will often sell them for a good price. But try to inspect the tent yourself before you pay for it (ideally put up) to avoid bad canvas, mold, rips or a cracked frame.
A short sneek view over the camping ground at Double Wars; here you can see many different kinds of tents!
Welcome! Today I’ll show you some of my favourites from my historical wardrobe and give you my best advise on what to choose for your own outfit. Let’s start with veils.
My current favourite is the semicircle veil in different sizes. It is easy to drape and style, and the semicircle cut gives it a smooth and flowing drape. Here are some examples:
large semicircle veil
medium veil from behind
The measures on my different veils:
small: diameter 85 cm (the straight front edge) length 55 cm (from front head to the back).
medium: diameter 100 cm, lenght 58 cm.
large: diameter 140 cm, lenght 60 cm.
small semicircle veil
This is a larger semicircle veil in wool muslin fabric, worn over braids, cap and wimple. Pinned in place by the temples and in the back of the neck:
winter wool veil
To make one: Use a thin tabby linen (90-120 gram/m2) with an even weave. Presoak and wash before sewing to avoid shrinking in the future. I draw the measures directly on the fabric; a semicircle shape following the measures above. The reason for not making a mathematical semicircle is more a matter of taste; how long you want the front edge to be and how much fabric you want in the back. Try it out and see what you like!
I make small double folded edges and whip stitch them with silk sewing thread or 60/2 thin linen thread, vaxed before sewing.
The rectangular veil is a very useful veil that can be worn in several ways. It has a straighter fall than the semicircle, but is ideal for wrapping or draping around the neck, like this:
rectangular veil
rectangular veil with decorative edge
If you make the rectangular veil longer it becomes what I call a Great veil:
great veil for wrapping
The great veil above measures 55*250 cm and is great for creating turban styles seen in the 15th century.
The measures of some of my veils:
Simple rectangular veil: 55*150 cm
Veil with a decorative edge in linen: 50*150 cm
Great veil: 50*250 to 55*350 cm
Use the same quality linen fabric as above, and the same seams.
Shorter Great veil (200-250 cm) worn wrapped around the head, the end folded over the head and resting on top.
When sewing veils for wrapping, I find it easier to use them if they are not to wide. 50-55 cm is enough.
silk veil
Square veils are the hardest to style in my opinion. This model was the first I tried out, but we never made a great team. I do have one left though; my silk veil with freshwater pearls. Silk veils are high status veils, and look great. They are also very light, so you barely feel them on your head.
If you want to make a silk veil for yourself, use a fabric with a heavy drape and thin enough to be a little transparent. Sew the edges double folded with running stitches or even better; make a rolled hem with invisible stitches. (Or buy one ready-made from me with an email/pm).
Measures for a square veil: 80*80 cm or bigger (the silk one above is around 90*90 cm.)
This style is actually two or three different pieces: a cap with a folded strip of fabric pinned on, and a great veil on top. It is a simplification of the large head dress the fashionable woman wore during a preiod of the 15th century. Painting shows headwear with many folds or layers, held in place with pins, basting (or some kind of magic). But since I live in a tent during summer events (and not a comfortable house with a maid) I need simplified ways to dress myself. This was one option that came out nicely, it is both easy to pack and manage during medieval camping, and easy to dress myself in. It should be more tightly pulled in the neck though- contemporary pictures shows no such fabric volume in the neck.
simple style turban
This is another way to style the Great veil, for that “I am hard working but yet fashionable” look. The veil is pinned directly around the head without any shaping braids, padding or cap, and wrapped around the head a couple of times. It is then pinned down to the layers below, and the end left hanging.
To avoid bulky fabric in the neck, I have found that it is better to pin all models of veils in place instead of tying them.
Veil measures: 55*250 cm, thin linen with double folded edges.
Buying fabrics for veils?
Thin linen 90-120 g/m2 with an even weave, a semitransparent and drapey silk, or a fine wool muslin fabric are the materials used above. There’s no find of wool veils, but I use the fabric when I need to stay warm, and for its beautiful colour tone and drape. It is hard to find linen good enough for veils today.
Threads: I use 60/2 thin linen thread for linen veils, and silk sewing thread for wool and silk veils.
Type of stitch: Hand stitching is a good choice for veils since they are very visible, and the drape will look very different with a machine seam. I always fold the hem twice, as narrow as I can before sewing. Whipstitching is always a good choice, but running stitching will do the work faster and create a more discreet seam. Perfect if you have a very thin fabric, or are in a hurry. Silk fabric edges I like to roll and sew with an invisble seam.
variations; linen rectangle worn double folded.
You can vary your veils in many different styles to fit different periods, fashion and status. Above is the rectangular veil with a decorative edge, folded twice and pinned onto a birgitta cap.
The best way to find your styles is to look at contemporary paintings and portraits and try to replicate the look in front of the mirror. When satisfied- take some photos to remember how you did it. I always end up in early spring wondering what veil style I should wear for which outfit…
In this tutorial, a gore is a triangular-shaped piece of fabric sewn into the garment. A gusset is a square piece of fabric, sewn into the armpit to add movability and space, used on shifts and shirts to take a few examples.
How do they work?
A gore inserted in your sleeve will add space and freedom of movement. Depending on the placement of the gore in the sleeve, it will add space to different effects, like moving your arm up and forward or adjusting your sleeve to larger muscles in your arms.
Why do you want to use gores in sleeves?
Gores might have several reasons to be where they are:
To save fabric while cutting out your fabric pieces.
To add movability by cutting the gore on another grain than the rest of the sleeve.
To mend a broken sleeve or seam.
To enlargen a sleeve being to narrow.
Gores might be inserted while making your garment, but also afterwards if you feel a need to adjust the fit. This guide shows you how to put in a gore in a cut slit at the front of the sleeve, but you can also add gores to the seam on an S-shaped sleeve. The principle is the same; fitting the sleeve into the armhole and then adding as much gore as you need to make the sleeve ”whole”.
An example of how this method was used during the medieval period is the Moy Bog dress, which has a similar gore. Maybe an adjustment to add space to a new wearer that had more mass over arms and shoulders?
The easiest way to make well-fitted sleeve gores is to cut out a piece of fabric, pin/baste it on the inside of the assembled garment, and sew it in place. Here is a step to step guide on how I do:
14th-15th c short sleeved dress
This dress has a tight fit, and I decided on a small gore in the sleeve front to add a bit more flexibility and movement.
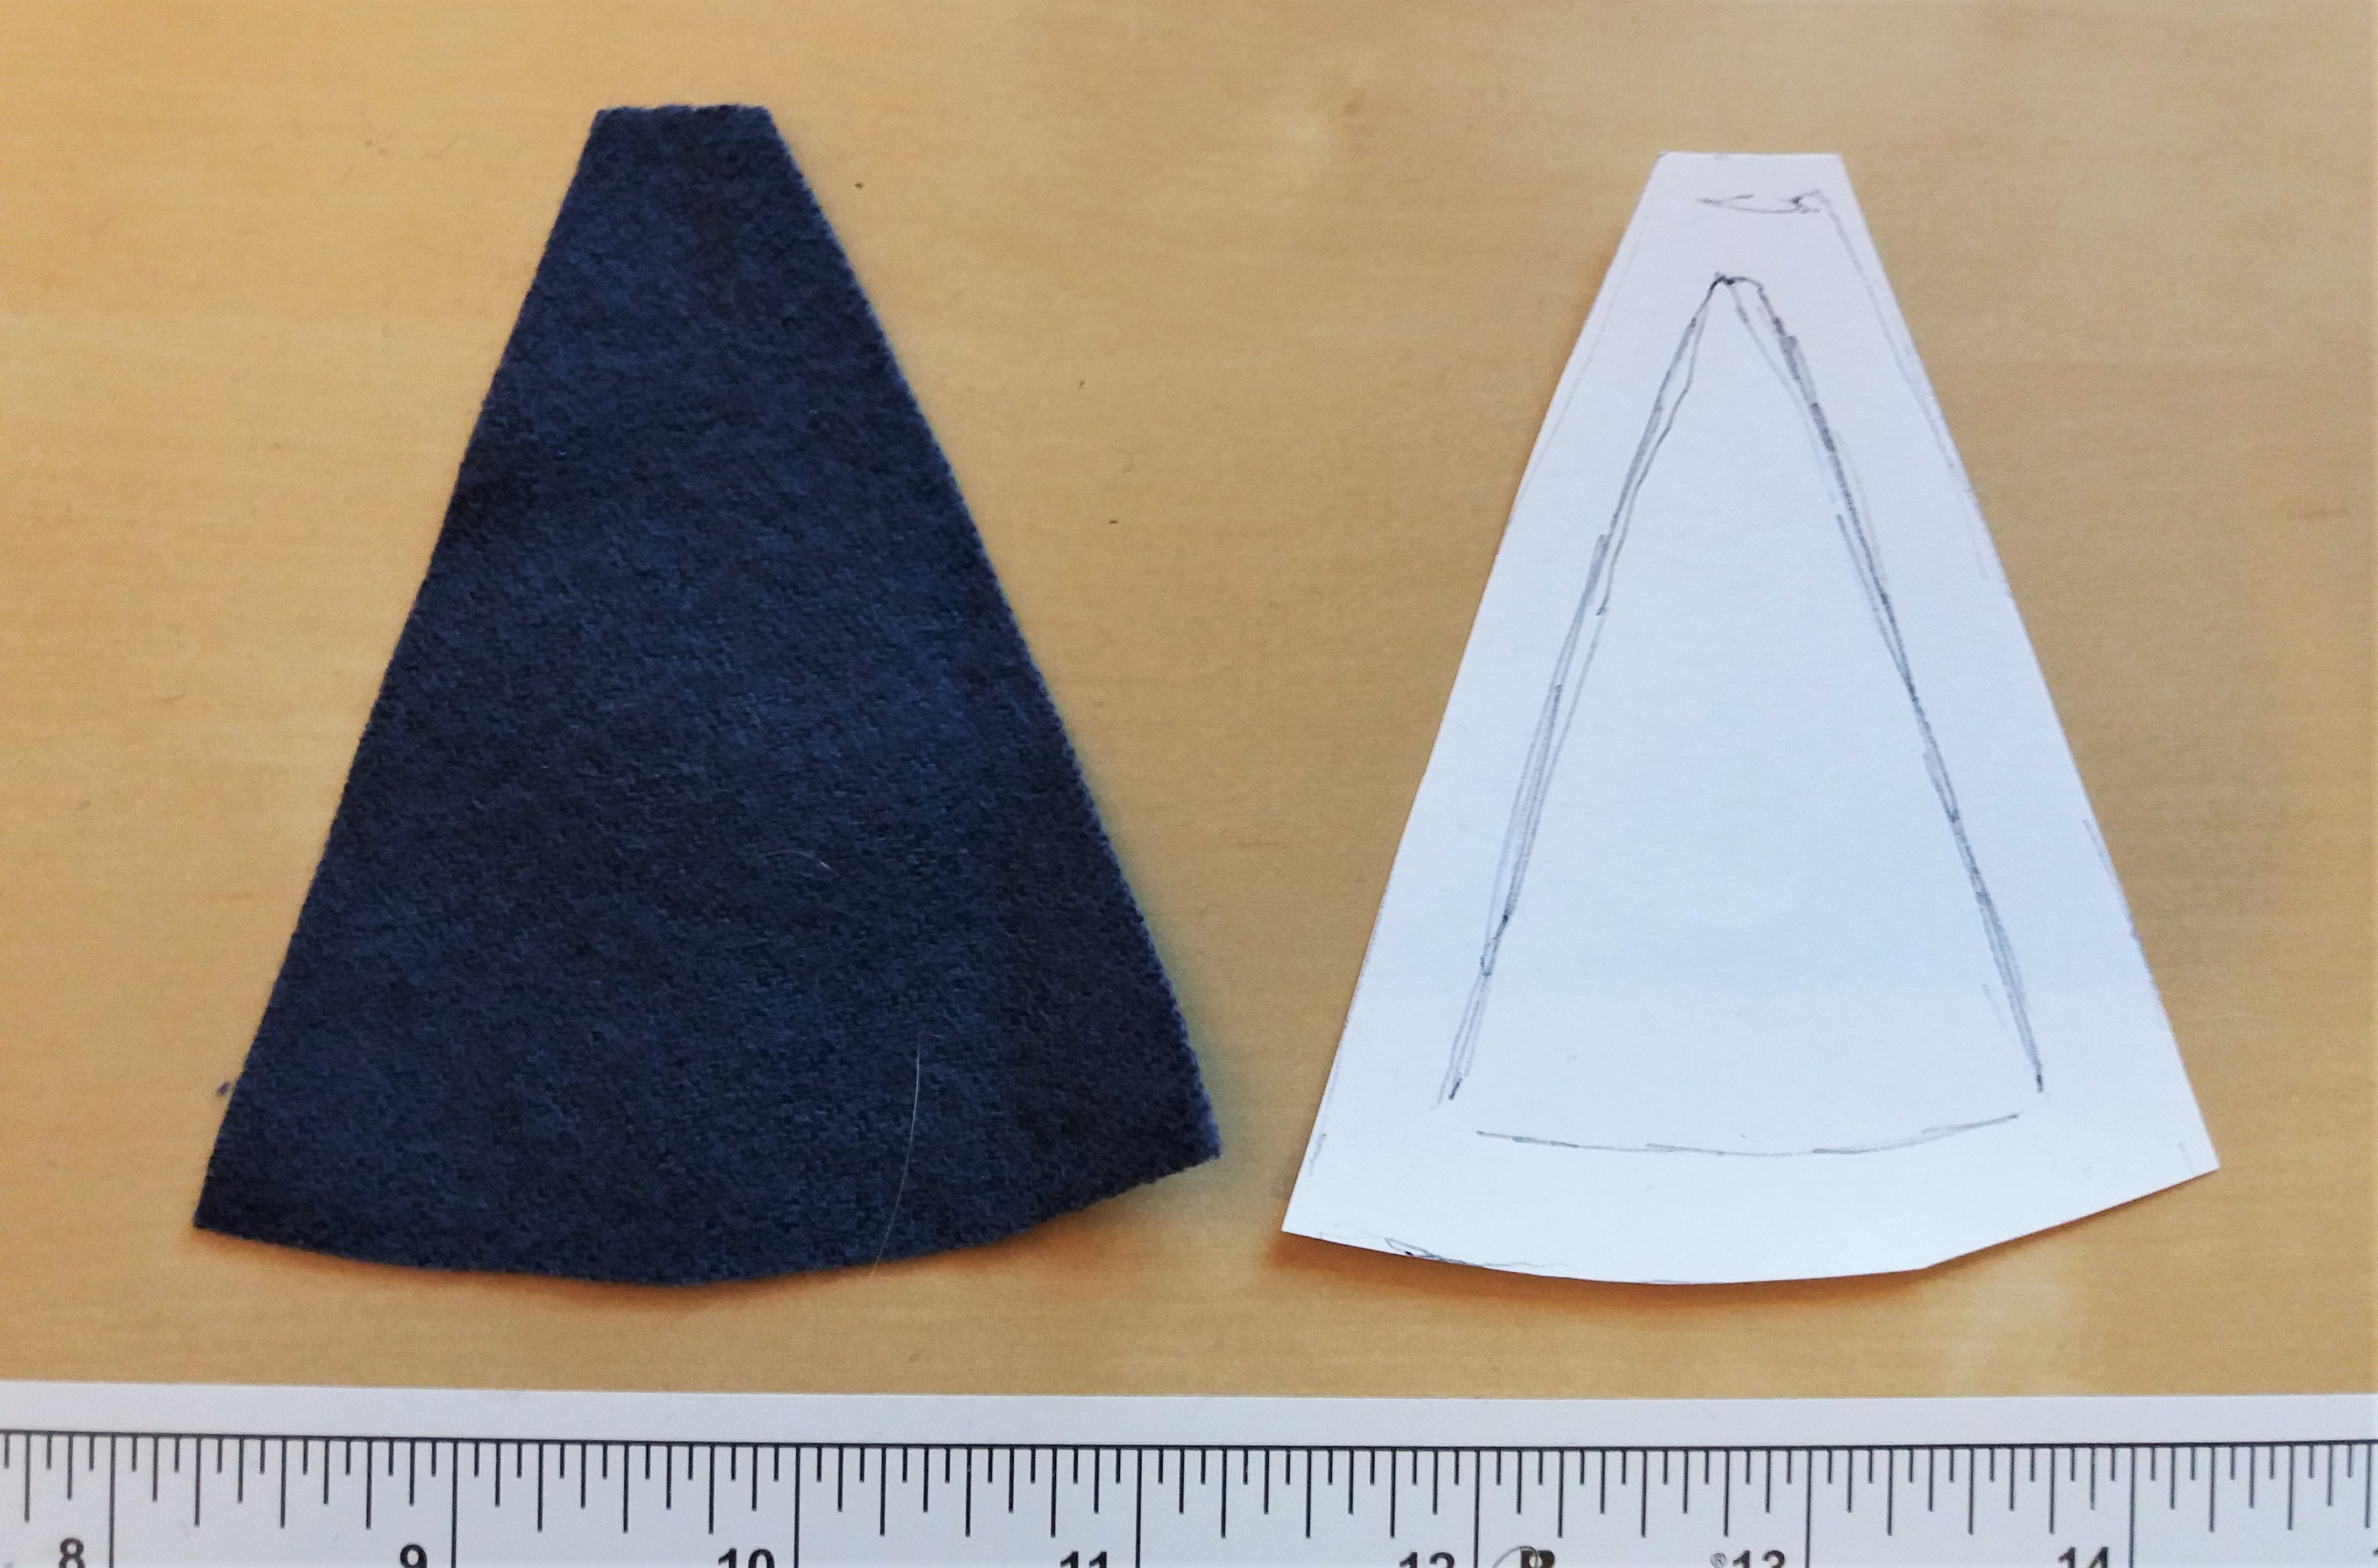
I started with inserting the sleeve in the armhole and then cutting up a slit in the front to make the sleeve fit all around (this means you will have to make a sleeve that has a slightly smaller measure than the armhole if you make a new dress.) When I am satisfied with the inserted sleeve and slit, I press the seam allowance to the inside and start with the pattern for the gore.
Put a piece of paper on the inside of the dress, and smooth the fabric on top of this. Draw a paper draft for the gore by tracing the ”hole” on your paper. Very easy!
Add seam allowance around the draft, and cut out.
Put the paper pattern onto fabric and draw + cut two gores, one for each sleeve. Remember to mirror the pattern and mark the gore with up/down and front/back.
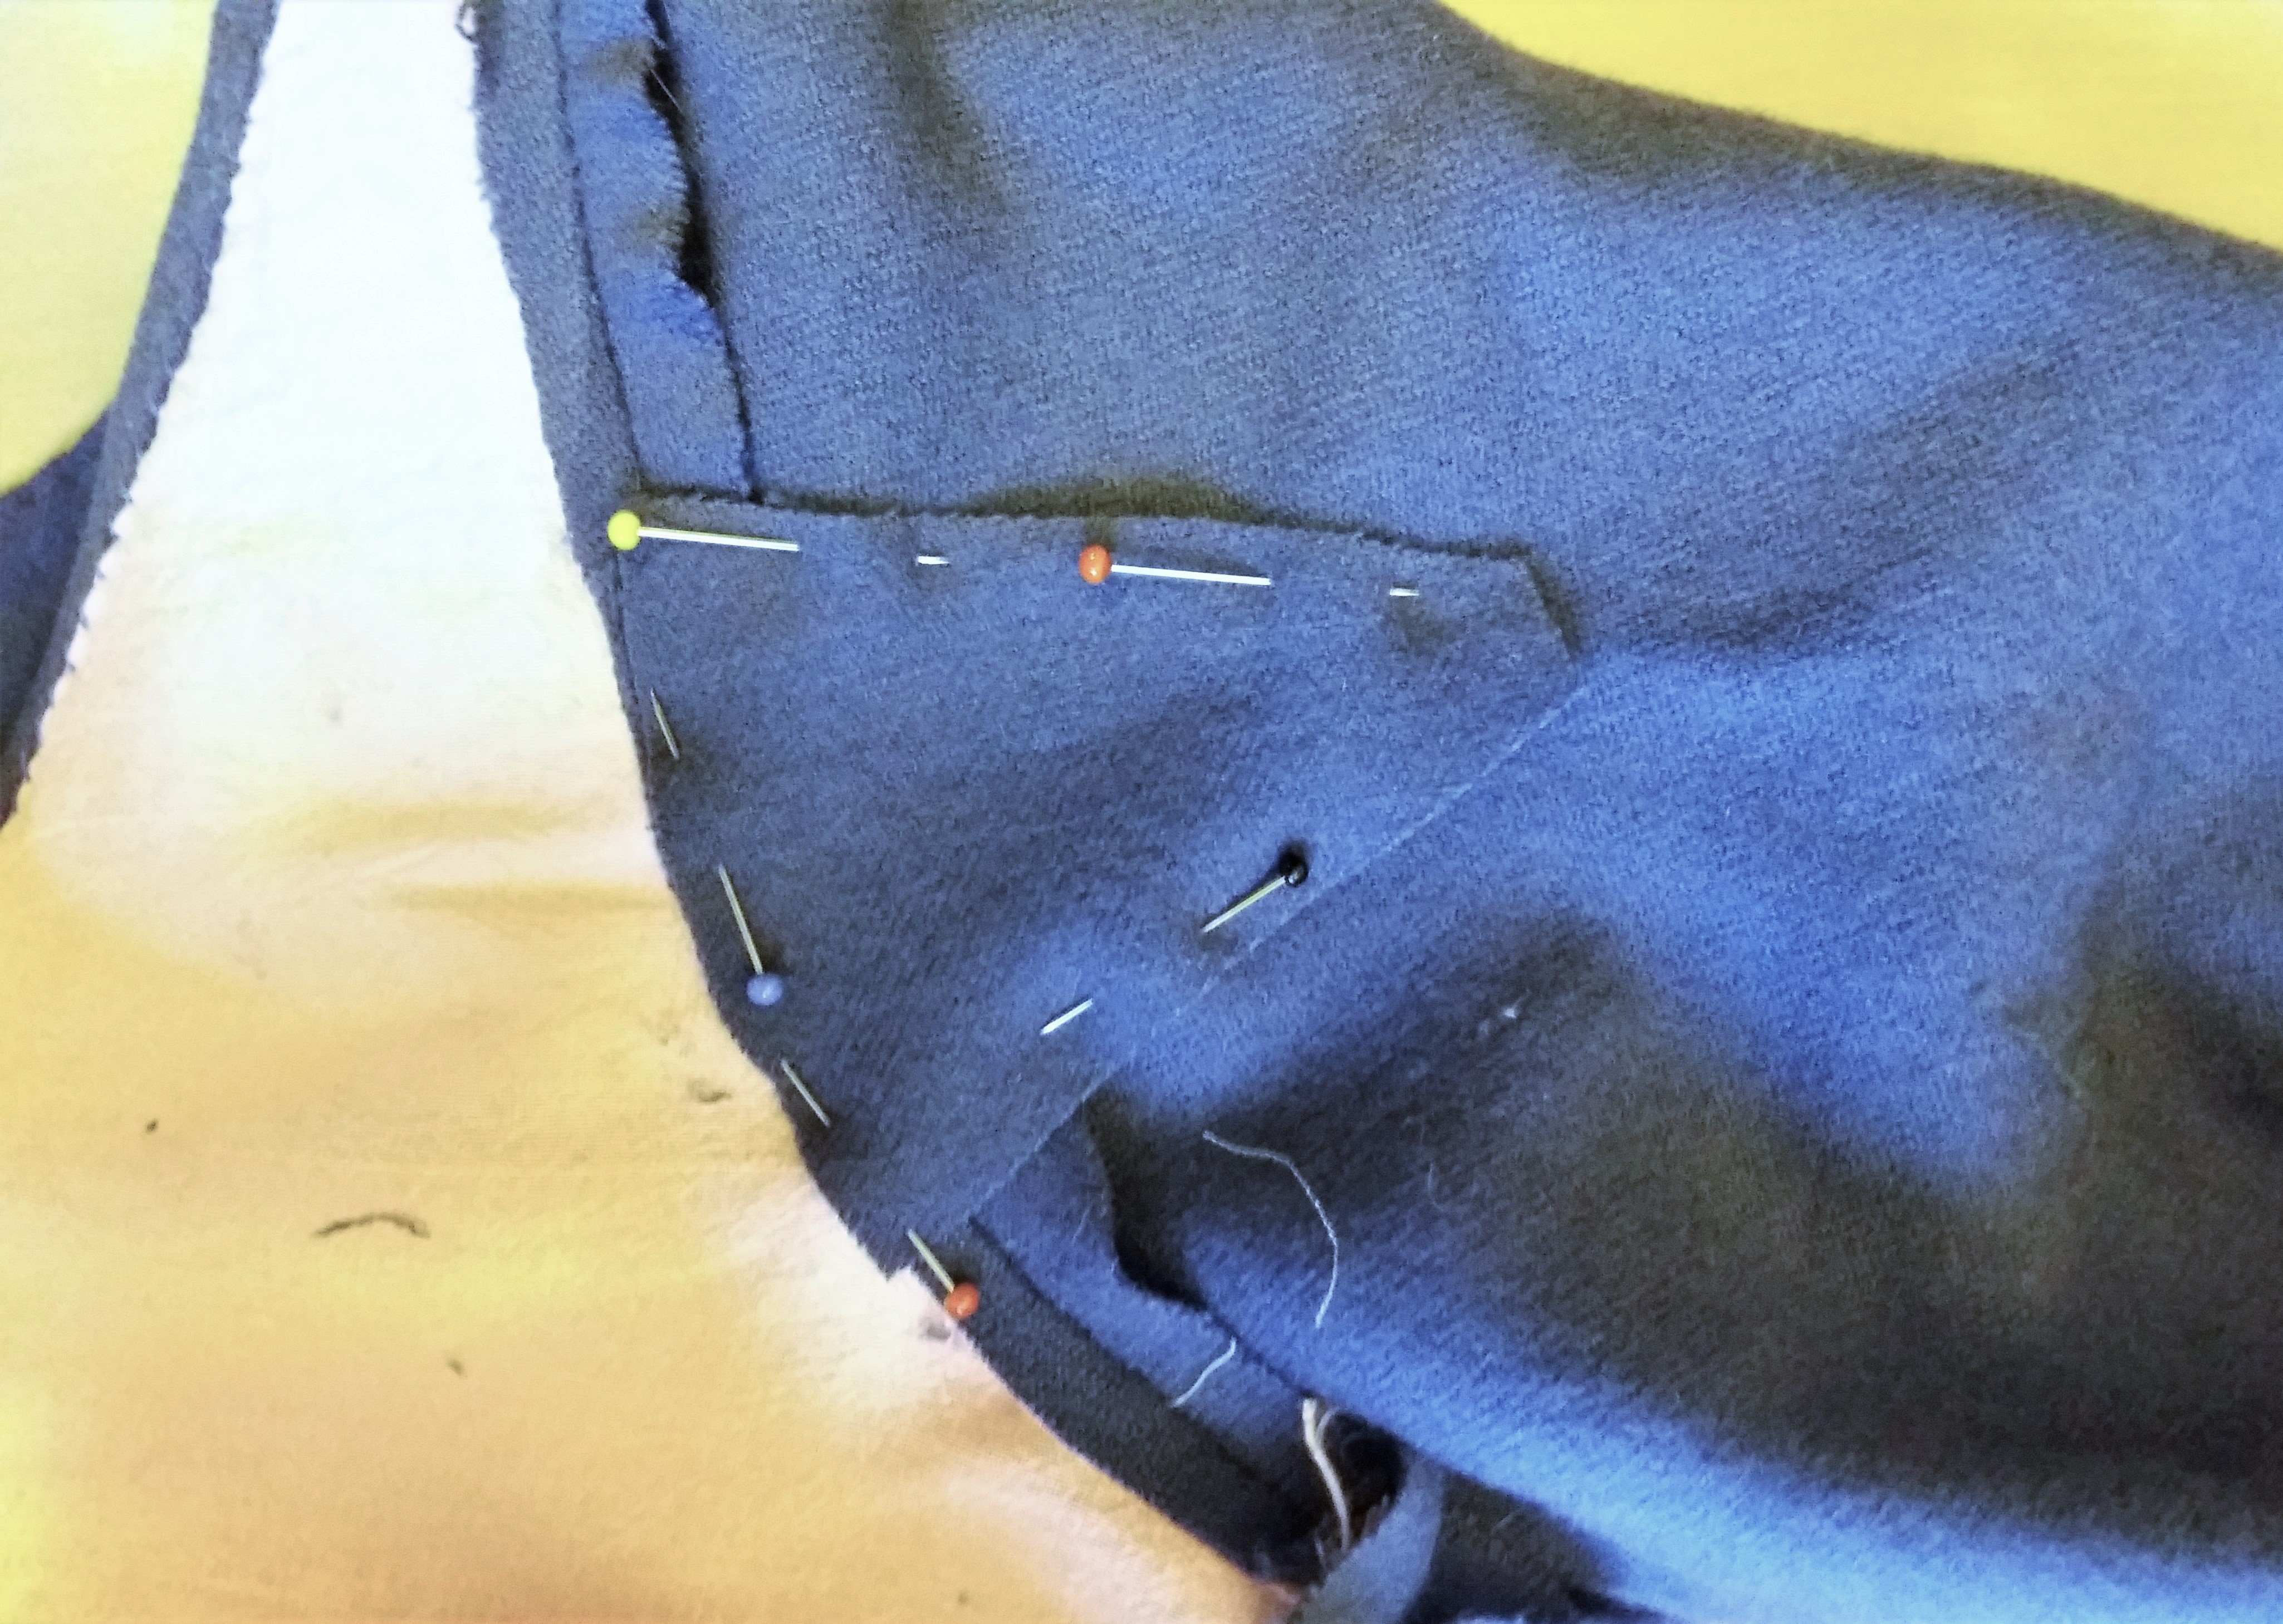
Fit the fabric gores into the sleeve slits, and pin in place (here I worked on the inside, but if you find it easier you can work from the outside of the garment).
This is what it looks like from the right side of the dress:
With pins in place, baste or sew the gore into your garment. Here I used small whip stitching, not bothering with basting. But if you are unsure or want to test the fit before sewing, basting is a great way to do that. Fastening the gore from the right side of the garment makes it easy to get a good result, since you can see the result while sewing.
When I have inserted the gore, the seam allowance is most often pressed to either side (down to the sleeve) and whip stitched down. I always press the s.a towards the bigger fabric piece. For example, sewing it down onto the sleeve and/or body piece. After that, it is all done!
The new blue gown also has a gore in the front of the sleeve, barely visible but great for movement!
Back in 201something (2016 maybe?) I made this outfit with a brown woolen overdress, based on Drei Schnittbücher by Katherine Barich/Marion McNealy. I wrote a research post to summarize my background research and thoughts but never got around to writing about the finished outfit. The research focused on middle Europe in the early 16th century, but when I found the book with pattern drafts I took the sidestep to try and make the gown after one of the models presented, even though it might be more probable to have made a dress with a waist seam like my trossfrau dress. But who can resist a fun pattern draft from a medieval tailoring book?
Since then, I have been wearing this outfit several times and even adjusted the dress with a lower neckline and a piece of mending over one of the skirt folds. I like this outfit since it is both pretty and comfortable for working, so I thought I would share it with you.
Winter event, with all three layers
I start with a basic linen shift in half bleached linen, based on my tutorial. It has a square cut neckline to match the dress and kirtle, and long sleeves.
Over that, I wear a kirtle or middle dress in wool, sleeveless and simple. This is a really practical working garment, and allow me to roll up the shift sleeves when doing dishes. Back then, I had a yellow sleeveless dress, that got sold to make a new one, one size larger.
Unfortunately, I got sidetracked when making that and decided on an Italian styled dress that is also shown in this tutorial. After that, I realised I really needed a middle layer to make this outfit complete, and made another kirtle in grey-blue wool, with a decorative fabric strip in black wool.
Both the middle layer and the overdress is rather tight fitted, giving me bust support when worn.
(This is what it looked like at first before I moved the neckline down a bit)
The overdress is made in brown wool with decorative borders in amber coloured wool. I liked this dress pattern since it is quite different from others I had tried, and I fell for the challenge. Sadly, the tailor books do not come with much information about how one should assemble all the pieces, so you could best describe this as a try on a medieval pattern, rather than something strictly copied.
I adjusted the cutting out of the fabric pieces to fit the fabric I had available, which was around 300*150 cm of wool. I also choosed to widen the skirt at the back to make it look more like the artwork from the period. The tailoring book shows the centre back (and front) straight, but that does not give the desired folds seen on women. Maybe a gore was supposed to go in there, or some other adjustment that was so obvious none bothered to write it down? To accommodate for the skirt width, I had to piece the sleeves with three different fabric scraps to get the dress together.
The front piece is folded at the centre front, making the skirt without a seam in the front.
The back pieces are pieced at the hem for fuller width
One of the sleeves, basted for trying on.
pattern pieces from the book
The overdress (well, the entire outfit) is sewn by hand, and on this dress, I only used linen thread, a choice I based on research for the period. Sadly, I have misplaced many notes and sources so the only reference I have left is a note saying “linen thread common for working-class clothing, do not bother with silk or wool). Ok, I apparently did that…
The skirt panels and some longer seams are made with running stitches, and the rest of the dress is sewn with backstitching, and the seam allowances are sewn down with whipstitching. The decorative fabric pieces are also whip stitched in place. On the inside, the dress is lined with a piece of sturdy linen fabric in the body, and the front closing is reinforced with a piece of linen canvas and closed with hooks and eyes. Another possibility would be lacing, but I like how fast the dressing is with hooks and eyes!
I found this model harder to fit than the 16th c models with waist seam, since you can’t adjust the waist placement during fitting. It has to be cut out at the beginning. I like to raise the waistline 1-2 cm above my natural waist to achieve the early 16th c silhouette, and that was more difficult here. But the dress made up for it by being really fun to assemble with the skirt folds.
I folded the skirt part that stretches outside the body in several folds and fastened these to the sides and centre back of the body. This gave a lot of strain on specific parts of the dress, causing the folds to rip when someone accidentally stepped on the dress hem. So I mended that side with a piece of fabric.
Here you can see the folds in the centre back and sides.
If I were to remake this whole pattern, I would choose to cut a slit between the body and skirts and fit the skirt in folds as you do on 18th c clothing. But this was several years ago and I hadn’t tried that technique yet.
Side view showing the gathered skirt fabric in the side; drapey and voluminous!
The greatest thing about this pattern was the drape of the skirt. It is full and generous and the folds look great in the centre back and sides. The front on the other hand is straight, with just an extra 15 cm overlap to allow for getting out of the dress. I just fold the gap shut and wear an apron above, but you could pin or hook it in place, or make a slit in the front. The straightness of the front makes the skirt great to work in; when I bend forward the skirt rearrange itself towards my legs, avoiding any flames or obstacles before me. Someone gave this thought “back then”!
The gollar I already made a tutorial for, and you can find it here. The early photos show an amber coloured English broadcloth gollar, fully lined with fur. The red one only has fur strips, enough to add some warmth but still be conveniently small for packing in a suitcase… Erh, I mean historically stylish yet cheap. Yeah?
The cap is a simplified Birgitta cap, and should be worn with a veil on top to be considered “well dressed for the public”. These caps are unusual in contemporary finds from the 16th century, I have seen a model doll and some “maybe” examples in art- it could be a cap but could also be a folded veil or other headwear. Hairnets, veils, braids, straw hats and other kinds of headwear are also visible. The most important is to have your head “dressed”; either with a hairstyle or headwear appropriate to the period.
You can find my pattern on the Birgitta cap at my Patreon or in my Etsystore.
The hoses are the same knee-high wool hose I use for other outfits, and here is a tutorial to make your own.
The apron is made in handwoven linen and smocked with linen thread. Two double folded strips of fabric were sewn shut to form the bands that I tie the apron with. The rest of the apron is only double hemmed and sewn with whipstitching.
When I went back to my old research post I also remembered that I wrote that I needed a jacket and a cloak, amongst other things. I actually made several examples of wool jackets, but they never made it to the blog for some reason. A black wool jacket based on the same tailoring manuscript book as the dress got photographed at an event, but then I sold it to make another one and try out some variations.
photo: Annika Madejska
Phew! So this was a lot of thoughts, and sewing, and years gone by without finishing up the writing on this project. I seldom return to old projects like this one, but since I still like it I thought it would be fun to share it with you. It is not a tutorial of any kind, more of a diary or a presentation of a project done.
Sometimes when you see others on the internet doing cool projects and posting photos of fancy dresses it is easy to feel like you don’t get anything done, but sometimes the road to finished projects can be long, windling and a bit unsure. It is ok too!
My Patreons wished for more research to be published, and I am happy to do so! Want to support the blog and be able to ask for content? Consider joining my supporters here!
Welcome to this blogpost about luceting! This post was made with the support from my Patreons!
A lucet cord is made out of interlocking loops and is a really practical way to make cords/strings for lacing garments, garters, shoelaces and more since it is stretchy and durable. I prefer working with wool or silk thread, a thin 2ply yarn or an embroidery yarn with a higher twist. Avoid chunky or uneven yarns since these will offer you problems and break.
This is how my luceting fork looks, but you may use practically anything with two pointy things and a handle, for example, a regular fork with the middle part removed. The historical finds looks quite different, here is one medieval example from Historiska Museet:
I find this a bit harder to use, but with a crocheting needle or pointy stick, it is easier. Lucet forks can be found from both the late iron age/viking age and medieval period. Susanna Broomé writes about viking finds in her booklet Cords and braids (I recommend her booklets.)
Finds of lucet cord are made of wool or silk (and in one case even silk and gold thread). If your thread of choice is too thin and you want a thicker cord, you can use two threads at the same time, treating them as one. But learning with a single thread is faster at the start!
Here is a written instruction:
Start with a thread, making an 8 figure around your fork. Hold the thread end with your hand, and twist the lucet fork ½ a turn, while you make a new loop with the other hand and pull the old one down into the cord. The loops should be pulled tightly into knots. Continue with this until you have a cord the lenght you desire. If you lose yourself, the loop that is easiest to tighten is the newest one, so continue with the old loop first.
And here are videos showing you how to start…
…And how to finish!
Also, a photo series showing the finishing if you prefer that:
Cut off your thread, leaving a bit for fastening.
Put this thread through the old loop, the one you would work with next. Remove from the fork.
Pull it tight.
Put the thread through the new loop, and remove this from the fork. Pull tight. Done!
Now your lucet cord is finished and ready to use. If you cut it in the future, you can either redo this finishing by unravelling a bit of cord or just make a knot at the end.
In Swedish tradition, Lucia comes at the winter’s darkest night, bringing light and hope. But the night is not only hopeful and joyous but also dangerous. It is best to stay awake, keeping watch over the darkness and your loved ones.
Lucia is the bringer of light, but also a fierce and strong soul, being murdered for her faith and her belief. She is sometimes depicted with a sword or a dagger as well as a light; symbols of her martyrdom. Her role as a light bringer, today often overshines her darker side; that of a dark magical being bringing trouble during the night in Swedish folklore.
In Swedish folklore, the night before Lucia was dark and full of magic; the animals might talk to you and many people stayed up all night- a tradition that still remains today. The celebration of Lucia as a turn of the year (Midwinter) toward lighter times is older than Christianity, and Lucia exists somewhere between an ancient goddess of light, a Saint and a white-clad girl coming with lights and cakes in the morning. With the modern calendar, Lucia is no longer at the Midwinter night but is celebrated 13th December.
The history of Saint Lucia (or Lucy) comes from Syracuse, around the 3-4th century CE. Lucia is the patron saint of the blind, as well as a number of professions, and the patroness of Syracuse in Italy. If you want to learn more about the Christian martyrdom https://en.wikipedia.org/wiki/Saint_Lucy is a good start.
This is my Lucia, a being existing somewhere between a magical place and the everyday life of people. She comes dressed in clothes from a thousand years ago, with both candles and a sword. She is a strong soul, bringing both light and darkness at the same time.
I have always loved the traditional Lucia celebrations with song and cake in the early morning, coming together to enjoy the light and music as well as longing for brighter days. To me, Lucia is both the Lightbringer and the Dark magical being. A reminder to both enjoy the light and the darkness of the year.
You know when you are browsing fabrics, looking for something practical and discreet to make a working garment with? Yeah, that didn’t go as planned here…
I fell in love with this silk brocade and bought several meters of it during Double Wars. I had no plan at the moment, but it was lovely and the pattern a replica from the 15th century, so I figured I would find it useful. However, it took a couple of years to come around to cutting the fabric and making it into this gown:
15th century silk brocade dress
buying the fabric
Research:
I collected some examples of dresses that I liked that would fit the time period, social status and use for this fabric. This one is a favourite, painted by Pedro Berruguete around 1485, but I already made a tight fitted one when I made my velvet overgrown for the wedding, so I opted for a looser style now.
The weave, material and pattern of the fabric place this project at the top of the social structure in 15th century Europe, something to be worn by royalty. Brocades are most often seen as outer garments, with wide panels and a loose fit (the better to be taken apart and remade for the next wearer?) Here’s my pinterest board with examples. This fits my fabric well, since it is quite stiff, with a dramatic drape.
The model is best described as an overdress or houppelande, with narrow S-sleeves. The panels starts to get wider below the armhole, and adds as much volume as possible to the hem. The neckline is cut in a V-shape and slightly rounded in the back. I made the back panels longer to get a train and cut the middle front straight and floor-length to be able to walk in it without tripping over the hem.
Working with brocade fabric:
When making silk brocade garments for yourself, remember that you need more seam allowance than you use when sewing in wool or linen. First, the fabric will often shred and loose threads everywhere, and second, the brocade is often stiff and does not give any flexibility when worn. I calculated 1 cm extra seam allowance (2,5 cm instead of 1,5 cm) and another 2-4 % of the total measure for movement (if your pattern is 100 cm around the bust, the total will be 102-104 cm + seam allowance).
I do not wash silk brocades before sewing, instead, I steam them with an iron. This will lose the weaving tension without altering the fabric appearance overly much.
When drafting the pattern pieces, remember to adjust them to the fabrics pattern and right/wrong side. This means that if you want to use your fabric wisely, half the dress will have the pattern running in the ”wrong” direction. On my dress, the pattern is ”upside down” on the back panels, and the right way in the front. The fronts are not matched pattern-wise but cut out to maximize the use of the fabric. To the modern eye, this might feel wrong, but never mind modern ideals! Also, piecing in the skirt or sleeves does not have to follow the pattern direction, just use what scraps you have.
zigzag your edges after cutting
After cutting your fabric pieces, I recommend zigzagging or overlocking the edges on your sewing machine, even if you are about to hand sew your garment and will have to rip away the threads while you work. This will prevent the seam allowance to disappear before you have even finished sewing the pieces together.
For hand sewing, silk thread and running stitches or backstitching will do fine. Try pinning only in the seam allowances to avoid damage to the fabric, or use small clamps instead of pins. I also like to bast; here is the sleeve sewn into the armhole with a linen basting thread, before backstitching it with silk thread.
brocade sleeve inserted to armhole
If you prefer to sew your garment on a machine, use a silk thread and a little longer stitches than normal, to allow for a good looking seam. You might want to adjust the thread tension a bit- try on some scraps first!
I press all my seams while working (with steam and a cloth), to make them tidy and easier to sew down. If you don’t want to fell the seams, leave a zigzag or overlock on the inside. If you prefer to fell the seams, use silk thread and try to press and fold the seam allowance as tight as possible for a nice finish. The hem is also pressed and folded over twice before I whip stitch it in place.
The gown, before the finishing pressing with steam. Notice that the sleeves pulls a bit toward the back? The seam is a bit on the tight side, I should have used looser stitches when closing the sleeve. Now I had to adjust it with a good steam and press to reset the shape. Never underestimate steam!
trying the dress on a mannequin
the back of the gown after pressing, the train turned out great!
I have yet to wear the dress to an event, and I am really looking forward to it. This type of dress needs to be paired with nerdy headwear, sparkly jewellery and a great party!
Update summer 2022: I finally took the gown out during Skellefteå Medeltidsdagar! I actually packed it early in the season, but the weather was so rainy and muddy I didn’t want to wear (and ruin) the dress until July. It really turned out great, and was really comfortable to wear during the party.
With this blog post, I am celebrating 10 years worth of blog posts on this blog. I had another blog before this, so I have been writing for a longer time, but when I moved here I decided to take with me the handcrafting posts, and the first one is dated to late October, 10 years ago.
So with this, I am sending a big THANK YOU to all of you who read and support the blog; by reading, sharing, liking, talking, supporting the blog on Patreon and doing business with me whenever we meet. It is thanks to you the blog still remains, without your support I would probably have lost the heart to continue writing here. Let’s hope we stay together for 10 more years to come!
This summer I visited the island Björkö again, where the viking city Birka flowered as a centre for trade and cultural influence during the Iron Age. Birka is such a magical place, and I can really see how people have chosen to live here for such a long time.
I wore my most recent viking outfit, I call it my Västerbotten Viking (which I explain in the blog post about the garments) and enjoyed wearing a comfortable and practical outfit as I strolled the pastures, enjoyed magical light and amazing sunsets.
One evening my friend Rand I enjoyed a nice view of the harbour when we got company from a friendly sheep and her lambs. Apparently, vikings give the best scratches, and handmade beads and bronze jewellery is great to nibble at. Yes, I now have lamb drool all over my things. Totally worth it.
We also enjoyed some adventuring; rowing out with this viking boat (…ship? Do you call it a boat or a ship? I know nothing about boat-things) which was fun, sweaty and a great experience.
In the viking harbour, several reconstructed boats were available for admiration and occasional trips around the island. Here another group of vikings set sail out into the evening sun. In Sweden, there are several viking groups specialising in maintaining and using these ships, and we met lots of friendly and knowledgeable persons that gladly shared their knowledge with us.
One evening we had a great feast in the village, with skilful cooks preparing a meal and festive-dressed vikings enjoying it. After a long time with pandemic restrictions, it felt almost unreal to meet so many other people at the same time and eat by the same table. But alas, some work was required to take nice photos without the hand sanitisers visible…
Pretty vikings with pretty flowers and glass replicas.
And even more pretty vikings up at the hill, enjoying a guided tour ending by the sunset. This year we got a guided tour by Max, who kindly shared all his knowledge and told us about strange finds from around the site.
Viking age clothing; linen sark, wool apron dress, wool shawl and a veil. From my brooches, my knife and needle case is hanging by chains.
Birka is one of my latest infatuations and I long to go back there. This is really one of the most amazing things with my work and hobby; getting to visit and live at these historical and lovely sites. It is also really hard, because I now harbour a deep love and longing to visit places all over Sweden such as Visby and Birka, but also Tällberg where the larping area is, as well as southernmost Sweden for Double Wars, and Hamar in Norway to mention a few… How will I have time for it all?
Do you also have a magical place that you keep in your heart?